Netgear RND4000 RND4000 User Manual - Page 62
Editing a Backup Job, Setting Up Printers, Print Shares over CIFS/SMB
 |
UPC - 606449053272
View all Netgear RND4000 manuals
Add to My Manuals
Save this manual to your list of manuals |
Page 62 highlights
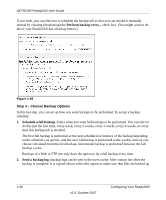
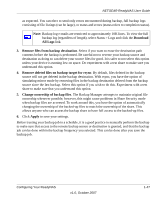
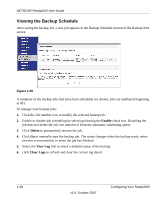
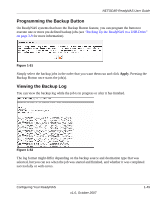
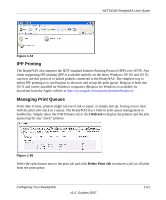
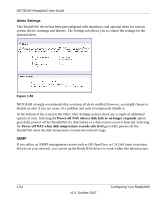
NETGEAR ReadyNAS User Guide Editing a Backup Job To edit a backup job, you can either click the 3-digit job number button in the Backup Jobs screen, or you can click the Edit Backup Job link while viewing that job log. You can then make appropriate changes or adjustments to the job. Setting Up Printers The ReadyNAS device supports automatic recognition of USB printers. If you have not already done so, you can connect a printer now, wait a few seconds, and click Refresh to display detected printers. The print share name automatically reflects the manufacturer and model of your printer and is listed in the USB Printers section of the Print Queue service screen. Figure 1-53 Print Shares over CIFS/SMB The ReadyNAS can act as a print server for up to two USB printers for your Windows or Mac clients. To set up a printer in Windows: 1. Click Browse in RAIDar or simply enter \\hostname in the Windows Explorer address bar to list all data and printer shares on the ReadyNAS. 2. Double-click the printer icon to assign a Windows driver. 1-50 v1.0, October 2007 Configuring Your ReadyNAS
-
 1
1 -
2
-
3
-
4
-
5
-
6
-
7
-
8
-
9
-
10
-
11
-
12
-
13
-
14
-
15
-
16
-
17
-
18
-
19
-
20
-
21
-
22
-
23
-
24
-
25
-
26
-
27
-
28
-
29
-
30
-
31
-
32
-
33
-
34
-
35
-
36
-
37
-
38
-
39
-
40
-
41
-
42
-
43
-
44
-
45
-
46
-
47
-
48
-
49
-
50
-
51
-
52
-
53
-
54
-
55
-
56
-
 57
57 -
 58
58 -
 59
59 -
 60
60 -
 61
61 -
 62
62 -
 63
63 -
 64
64 -
 65
65 -
 66
66 -
 67
67 -
68
-
69
-
70
-
71
-
72
-
73
-
74
-
75
-
76
-
77
-
78
-
79
-
80
-
81
-
82
-
83
-
84
-
85
-
86
-
87
-
88
-
89
-
90
-
91
-
92
-
93
-
94
-
95
-
96
-
97
-
98
-
99
-
100
-
101
-
102
-
103
-
104
-
105
-
106
-
107
-
108
-
109
-
110
-
111
-
112
-
113
-
114
-
115
-
116
-
117
-
118
-
119
-
120
 |
 |
