Netgear RND4000 RND4000 User Manual - Page 98
Resynchronizing the Volume, Resetting Your System (System Switch), To re-install the ReadyNAS firmware
 |
UPC - 606449053272
View all Netgear RND4000 manuals
Add to My Manuals
Save this manual to your list of manuals |
Page 98 highlights
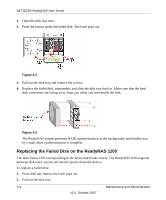
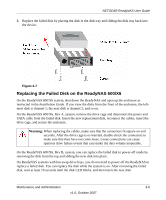
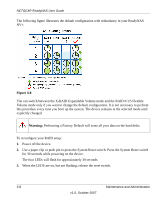
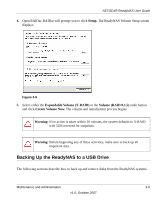
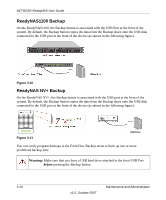
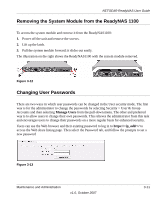
NETGEAR ReadyNAS User Guide Resynchronizing the Volume If you had to power off to replace the failed disk, turn on the power on the ReadyNAS. The RAID volume automatically resynchronizes with the new disk in the background. The process takes several hours depending on disk size. During the resync process, the ReadyNAS can be used as normal, although access will be slower until the volume is finished resynchronizing. You will be notified by e-mail when the resync process is complete. Resetting Your System (System Switch) Refer to the Installation Guide included in the shipping box (a PDF of the Installation Guide is also on your Installation CD) for the location of the System Reset switch on the back of the ReadyNAS. The System Reset switch allows you to perform three functions: 1. Reinstall the ReadyNAS firmware. 2. Reset the ReadyNAS back to the factory default settings. 3. Change between X-RAID and Flex-RAID mode. Typically, you should not need to resort to options (1) and (2) unless you exhausted all other means of recovering your system. You might want to reinstall the ReadyNAS firmware as a first step, if the ReadyNAS had been working normally but a configuration change makes it inaccessible. If this does not work or you wish to set the ReadyNAS back to a factory default state, you can do so following these instructions below: • To re-install the ReadyNAS firmware: Use a paper clip to depress the switch while the system is off. Continue to depress the reset switch while powering on the system for approximately 5 seconds until the disk LEDs flash once to signify that the command has been accepted. The firmware installation takes several minutes to complete. The Status LED in the front will be solid green when the process is complete. The installation does not affect the data on the ReadyNAS. Warning: Make sure that you do not continue to press the reset switch after the LEDS flash once, otherwise a Factory Default will occur that erases your data. (see below) 3-6 Maintenance and Administration v1.0, October 2007
-
 1
1 -
2
-
3
-
4
-
5
-
6
-
7
-
8
-
9
-
10
-
11
-
12
-
13
-
14
-
15
-
16
-
17
-
18
-
19
-
20
-
21
-
22
-
23
-
24
-
25
-
26
-
27
-
28
-
29
-
30
-
31
-
32
-
33
-
34
-
35
-
36
-
37
-
38
-
39
-
40
-
41
-
42
-
43
-
44
-
45
-
46
-
47
-
48
-
49
-
50
-
51
-
52
-
53
-
54
-
55
-
56
-
57
-
58
-
59
-
60
-
61
-
62
-
63
-
64
-
65
-
66
-
67
-
68
-
69
-
70
-
71
-
72
-
73
-
74
-
75
-
76
-
77
-
78
-
79
-
80
-
81
-
82
-
83
-
84
-
85
-
86
-
87
-
88
-
89
-
90
-
91
-
92
-
 93
93 -
 94
94 -
 95
95 -
 96
96 -
 97
97 -
 98
98 -
 99
99 -
 100
100 -
 101
101 -
 102
102 -
 103
103 -
104
-
105
-
106
-
107
-
108
-
109
-
110
-
111
-
112
-
113
-
114
-
115
-
116
-
117
-
118
-
119
-
120
 |
 |
