Netgear WG602 WG602v3 User Manual - Page 53
Advanced, Wireless Bridging., Wireless Multi-Point Bridging, Wireless Accept Point List. - router
 |
UPC - 606449030730
View all Netgear WG602 manuals
Add to My Manuals
Save this manual to your list of manuals |
Page 53 highlights
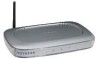
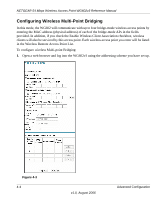
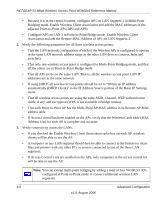
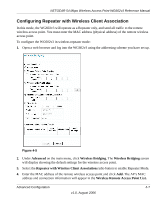
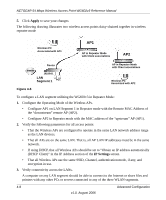
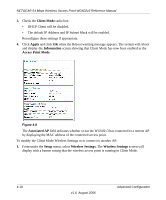
NETGEAR 54 Mbps Wireless Access Point WG602v3 Reference Manual 2. Under Advanced on the main menu, click Wireless Bridging. The Wireless Bridging screen will display showing the default settings for the wireless access point. 3. Select the Wireless Multi-Point Bridging radio button to enable multi-point bridging. 4. Enter the MAC address of the first wireless access point and click Add. The AP's MAC address and connection information will appear in the Wireless Accept Point List. You can add wireless access points to the list for a total of four. (These wireless access points must be configured for Multi-Point Bridging.) 5. Check the Enable Wireless Client Association radio box to allow wireless clients access to this wireless access point. 6. Click Apply to save your changes. To delete a remote AP from the list, click Delete adjacent to the AP's MAC address in the Wireless Remote Access Point List. The following figure illustrates a multi-point bridge setup over three LAN segments. AP2 AP3 Wireless PC Card in a Notebook Computer Internet Router 192.168.0.1 LAN PCs Segment 1 Point-to-Point Bridge Mode AP1 Multi-Point Bridge Mode Point-to-Point Bridge Mode Hub or Switch Hub or Switch LAN Segment 2 PCs LAN PCs Segment 3 Figure 4-4 To configure wireless access points in a multi-point configuration: 1. Set the Operating Mode of the three Wireless APs as follows: • Configure AP2 on LAN Segment 1 in Point-to-Point Bridge Mode. Enable Wireless Client Association and add the Remote MAC Address of AP1 on LAN Segment 2. Advanced Configuration 4-5 v1.0, August 2006
-
 1
1 -
2
-
3
-
4
-
5
-
6
-
7
-
8
-
9
-
10
-
11
-
12
-
13
-
14
-
15
-
16
-
17
-
18
-
19
-
20
-
21
-
22
-
23
-
24
-
25
-
26
-
27
-
28
-
29
-
30
-
31
-
32
-
33
-
34
-
35
-
36
-
37
-
38
-
39
-
40
-
41
-
42
-
43
-
44
-
45
-
46
-
47
-
 48
48 -
 49
49 -
 50
50 -
 51
51 -
 52
52 -
 53
53 -
 54
54 -
 55
55 -
 56
56 -
 57
57 -
 58
58 -
59
-
60
-
61
-
62
-
63
-
64
-
65
-
66
-
67
-
68
-
69
-
70
-
71
-
72
-
73
-
74
-
75
-
76
 |
 |