Netgear WPN824v2 WPN824v1 Reference Manual - Page 45
Wireless Settings, Apply, Wireless Channels on D-7
 |
View all Netgear WPN824v2 manuals
Add to My Manuals
Save this manual to your list of manuals |
Page 45 highlights
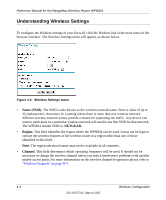
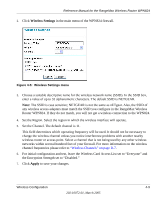
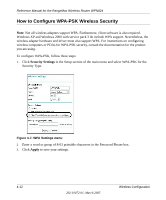
Reference Manual for the RangeMax Wireless Router WPN824 2. Click Wireless Settings in the main menu of the WPN824 firewall. Figure 4-5: Wireless Settings menu 3. Choose a suitable descriptive name for the wireless network name (SSID). In the SSID box, enter a value of up to 32 alphanumeric characters. The default SSID is NETGEAR. Note: The SSID is case sensitive; NETGEAR is not the same as nETgear. Also, the SSID of any wireless access adapters must match the SSID you configure in the RangeMax Wireless Router WPN824. If they do not match, you will not get a wireless connection to the WPN824. 4. Set the Region. Select the region in which the wireless interface will operate. 5. Set the Channel. The default channel is 11. This field determines which operating frequency will be used. It should not be necessary to change the wireless channel unless you notice interference problems with another nearby wireless router or access point. Select a channel that is not being used by any other wireless networks within several hundred feet of your firewall. For more information on the wireless channel frequencies please refer to "Wireless Channels" on page D-7. 6. For initial configuration and test, leave the Wireless Card Access List set to "Everyone" and the Encryption Strength set to "Disabled." 7. Click Apply to save your changes. Wireless Configuration 4-9 202-10072-01, March 2005
-
 1
1 -
2
-
3
-
4
-
5
-
6
-
7
-
8
-
9
-
10
-
11
-
12
-
13
-
14
-
15
-
16
-
17
-
18
-
19
-
20
-
21
-
22
-
23
-
24
-
25
-
26
-
27
-
28
-
29
-
30
-
31
-
32
-
33
-
34
-
35
-
36
-
37
-
38
-
39
-
 40
40 -
 41
41 -
 42
42 -
 43
43 -
 44
44 -
 45
45 -
 46
46 -
 47
47 -
 48
48 -
 49
49 -
 50
50 -
51
-
52
-
53
-
54
-
55
-
56
-
57
-
58
-
59
-
60
-
61
-
62
-
63
-
64
-
65
-
66
-
67
-
68
-
69
-
70
-
71
-
72
-
73
-
74
-
75
-
76
-
77
-
78
-
79
-
80
-
81
-
82
-
83
-
84
-
85
-
86
-
87
-
88
-
89
-
90
-
91
-
92
-
93
-
94
-
95
-
96
-
97
-
98
-
99
-
100
-
101
-
102
-
103
-
104
-
105
-
106
-
107
-
108
-
109
-
110
-
111
-
112
-
113
-
114
-
115
-
116
-
117
-
118
-
119
-
120
-
121
-
122
-
123
-
124
-
125
-
126
-
127
-
128
-
129
-
130
-
131
-
132
-
133
-
134
-
135
-
136
-
137
-
138
-
139
-
140
-
141
-
142
-
143
-
144
-
145
-
146
-
147
-
148
-
149
-
150
-
151
-
152
-
153
-
154
-
155
-
156
-
157
-
158
-
159
-
160
-
161
-
162
-
163
-
164
-
165
-
166
-
167
-
168
-
169
-
170
-
171
-
172
-
173
-
174
 |
 |
