TABLE OF CONTENTS
1. Unpacking and Installation
.....................................................................................................................
1
1-1.
Unpacking
....................................................................................................................................
1
1-2.
Choosing a place for the printer
...................................................................................................
2
2.
Parts Identification and Nomenclature
..................................................................................................
3
3. Setup
..........................................................................................................................................................
4
3-1.
Connecting the Cable to the PC
...................................................................................................
4
3-2.
Connecting the Cable to the Printer
.............................................................................................
5
3-3.
Installing the Printer Software
.....................................................................................................
8
3-4.
Connecting the Optional AC Adapter
..........................................................................................
9
3-5.
Turning Power On
......................................................................................................................
10
3-6.
Connecting to a Peripheral Unit
.................................................................................................
11
3-7.
Loading the Paper Roll
..............................................................................................................
12
4. Attaching the Accessories
......................................................................................................................
17
4-1.
Attaching the Holder Plate
.........................................................................................................
17
4-2.
Attaching the Switch Blind
........................................................................................................
19
4-3.
Switch Blind Installation
............................................................................................................
19
5. Consumable Parts and AC Adapter
.....................................................................................................
20
5-1.
Thermal Paper Roll
....................................................................................................................
20
5-2.
Full-Face Thermal Label Paper Roll
..........................................................................................
22
5-3.
Thermal Label Paper Roll (Tack Label Paper)
..........................................................................
23
5-4.
AC adapter (option)
...................................................................................................................
27
6. Control Panel and Other Functions
.....................................................................................................
28
6-1.
Control Panel
.............................................................................................................................
28
6-2.
Errors
..........................................................................................................................................
28
6-3.
Self-Printing
...............................................................................................................................
30
7. Adjusting the Near-end Sensor
.............................................................................................................
31
8. Preventing and Clearing Paper Jams
...................................................................................................
33
8-1.
Preventing Paper Jams
...............................................................................................................
33
8-2.
Removing Paper Jam
.................................................................................................................
33
9. Periodical Cleaning
................................................................................................................................
34
9-1.
Cleaning the Thermal Head
.......................................................................................................
34
9-2.
Cleaning the Rubber Roller
.......................................................................................................
34
9-3.
Cleaning the Sensors and the Surrounding Areas
......................................................................
34
9-4.
Cleaning the Paper Holder and the Surrounding Area
...............................................................
34
10. Specifications
........................................................................................................................................
35
10-1. General Specifications
................................................................................................................
35
10-2. Auto Cutter Specifications
.........................................................................................................
36
10-3. Interface
.....................................................................................................................................
36
10-4. Electrical Characteristics
...........................................................................................................
36
10-5. Environmental Requirements
.....................................................................................................
37
10-6. Reliability Specifications
...........................................................................................................
38
10-7. Black mark specifications
..........................................................................................................
39
11. Dip Switch Setting
................................................................................................................................
40
11-1. Parallel Interface Model
.............................................................................................................
41
11-2. RS-232C Interface Model
..........................................................................................................
43
11-3. USB Interface Model
.................................................................................................................
46

 1
1 2
2 3
3 4
4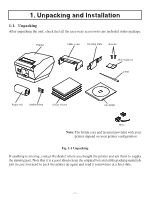 5
5 6
6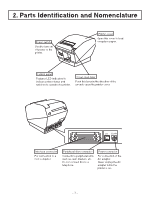 7
7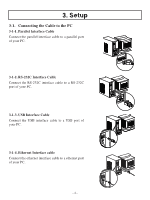 8
8 9
9