Oki OKIPOS408II OKIPOS 408II Software Technical Reference - Page 23
Paper Size, Open the 'Control Panel'. On Windows 7
 |
View all Oki OKIPOS408II manuals
Add to My Manuals
Save this manual to your list of manuals |
Page 23 highlights
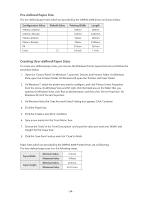
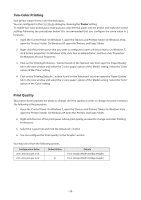
Buzzer 2 - On Time If you've connected a buzzer to peripheral circuit 2, you can control how long it will sound each time it's activated via this setting. Choose the time period that best suites your application; longer for more attention or shorter for less intrusion. Buzzer 2 - Off Time If you've connected a buzzer to peripheral circuit 2, you can control the length of time between tones via this setting. This setting can control the length of time between tones. Shorter for rapid sequences or longer for more spaced sequences. Buzzer 2 - Repeat If you've connected a buzzer to peripheral circuit 2, you can configure the number of times your buzzer sounds per activation. Regardless of the number of tones you've configured, you can stop the buzzer by pressing the 'FEED' button. Paper Size This driver provides you several Pre-defined Paper Size. You can also create custom paper sizes with User-defined Paper Sizes using the Windows Printer Queue. Each paper size is defined to be a specific width and height which denotes the printable area. You need not apply any margins to your documents. The paper size(s) that include the word 'Receipt' in their name are intended for variable length print jobs, like receipts; when using this paper size be sure to choose the 'Receipt' option of the Paper Type setting. Your paper size configuration may be changed according to the current configuration of the applications you are using. If there is not any paper size configuration within your application, please use the following setting. Within Windows there are three different settings associated with your paper size choice. It is best to set these all to the same option. 1. Open the 'Control Panel'. On Windows 7, open the 'Devices and Printers' folder. On Windows Vista, open the 'Printers' folder. On Windows XP, open the 'Printers and Faxes' folder. 2. Right-click the printer queue that you want to configure to open a shortcut menu. On Windows 7, click 'Printer properties'. On Windows Vista, click 'Run as administrator', and then click 'Properties'. On Windows XP, click 'Properties'. 3. Click on the 'Printing Preference...' button found on the 'General' tab, then click on the 'Advanced...' button found on the new window's 'Layout' tab; you will then see the 'Paper Size' setting - choose the same paper size option here. 4. Select the 'FRICTION' option in the 'Form To Tray Assignment' branch of the 'Device Setting'. 5. Click on the 'Printing Preference...' button found on the 'General' tab, then click on the 'Advanced...' button found on the new window's 'Layout' tab; you will then see the 'Paper Size' setting - choose the same paper size option here. - 23 -
-
 1
1 -
2
-
3
-
4
-
5
-
6
-
7
-
8
-
9
-
10
-
11
-
12
-
13
-
14
-
15
-
16
-
17
-
 18
18 -
 19
19 -
 20
20 -
 21
21 -
 22
22 -
 23
23 -
 24
24 -
 25
25 -
 26
26 -
 27
27 -
 28
28 -
29
-
30
-
31
-
32
-
33
-
34
-
35
-
36
-
37
-
38
-
39
-
40
-
41
-
42
-
43
-
44
-
45
-
46
-
47
-
48
-
49
-
50
-
51
-
52
-
53
-
54
-
55
-
56
-
57
-
58
-
59
-
60
-
61
-
62
-
63
-
64
-
65
-
66
-
67
-
68
-
69
-
70
-
71
-
72
-
73
-
74
-
75
-
76
-
77
-
78
-
79
-
80
-
81
-
82
 |
 |
