Oki OKIPOS408II OKIPOS 408II Software Technical Reference - Page 45
Two-Color Printing, Device Fonts (Printer, Barcode and Control Fonts), Windows XP, click'Properties'.
 |
View all Oki OKIPOS408II manuals
Add to My Manuals
Save this manual to your list of manuals |
Page 45 highlights
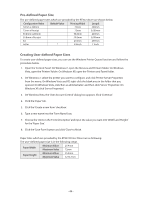
Two-Color Printing Your printer supports two-color thermal paper. You can configure it in the Print Mode dialog by choosing the 'Raster' setting. To enable two-color printing you must put two-color thermal paper into the printer and make the correct settings following the procedures below. It is recommended that you configure the same value in 2 locations. 1. Open the 'Control Panel'. On Windows 7, open the 'Devices and Printers' folder. On Windows Vista, open the 'Printers' folder. On Windows XP, open the 'Printers and Faxes' folder. 2. Right-click the printer queue that you want to configure to open a shortcut menu. On Windows 7, click 'Printer properties'. On Windows Vista, click 'Run as administrator', and then click 'Properties'. On Windows XP, click 'Properties'. 3. Click on the 'Printing Preference...' button found on the 'General' tab, then open the 'Paper/Quality' tab in the new window and select the '2 color paper' option of the 'Media' setting. Select the 'Color' option of the 'Color' setting. 4. Click on the 'Printing Defaults...' button found on the 'Advanced' tab, then open the 'Paper/Quality' tab in the new window and select the '2 color paper' option of the 'Media' setting. Select the 'Color' option of the 'Color' setting. Device Fonts (Printer, Barcode and Control Fonts) Your printer supports a range of printer resident and barcode fonts. These fonts are built into your printer and are selectable from within your application. You can use these when the Print Mode option is set to the 'Line' setting. Using device fonts, you can get both high printing quality and high printing speed. The barcode fonts allow you to print barcodes by simply applying one of the barcode fonts to a section of your document; the text in that section describing the barcode's layout and data. The control font allows you to control various aspects of the printers behaviour, with specific behaviours mapped to specific characters printed using the control font. Click Here to open another help page describing these fonts in greater detail. - 45 -
-
 1
1 -
2
-
3
-
4
-
5
-
6
-
7
-
8
-
9
-
10
-
11
-
12
-
13
-
14
-
15
-
16
-
17
-
18
-
19
-
20
-
21
-
22
-
23
-
24
-
25
-
26
-
27
-
28
-
29
-
30
-
31
-
32
-
33
-
34
-
35
-
36
-
37
-
38
-
39
-
 40
40 -
 41
41 -
 42
42 -
 43
43 -
 44
44 -
 45
45 -
 46
46 -
 47
47 -
 48
48 -
 49
49 -
 50
50 -
51
-
52
-
53
-
54
-
55
-
56
-
57
-
58
-
59
-
60
-
61
-
62
-
63
-
64
-
65
-
66
-
67
-
68
-
69
-
70
-
71
-
72
-
73
-
74
-
75
-
76
-
77
-
78
-
79
-
80
-
81
-
82
 |
 |
