Oki OKIPOS408II OKIPOS 408II Software Technical Reference - Page 34
Two-Color Printing, Paper Width, Minimum Value, Paper Height
 |
View all Oki OKIPOS408II manuals
Add to My Manuals
Save this manual to your list of manuals |
Page 34 highlights
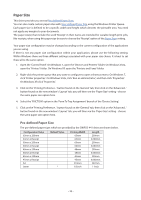
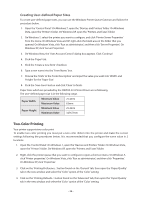
Creating User-defined Paper Sizes To create user-defined paper sizes, you can use the Windows Printer Queue function and follow the procedure below. 1. Open the 'Control Panel'. On Windows 7, open the 'Devices and Printers' folder. On Windows Vista, open the 'Printers' folder. On Windows XP, open the 'Printers and Faxes' folder. 2. On Windows 7, select the printer you want to configure, and click 'Printer Server Properties' from the menu. On Windows Vista and XP, right-click the blank area in the folder that you opened. On Windows Vista, click 'Run as administrator', and then click 'Server Properties'. On Windows XP, click 'Server Properties'. 3. On Windows Vista, the 'User Account Control' dialog box appears. Click 'Continue'. 4. Click the 'Paper' tab. 5. Click the 'Create a new form' checkbox. 6. Type a new name into the 'Form Name' box. 7. Choose the 'Units' in the 'Form Description' and input the value you want into 'Width' and 'Height' for the 'Paper Size'. 8. Click the 'Save Form' button and click 'Close' to finish. Paper Sizes which are provided by the OKIPOS 441 Printer Driver are as following. The user-defined paper size is in the following range. Paper Width Paper Height Minimum Value Maximum Value Minimum Value Maximum Value 25.4mm 63mm 25.4mm 3276.7mm Two-Color Printing Your printer supports two-color print. To enable two-color printing you must put a two-color ribbon into the printer and make the correct settings following the procedures below. It is recommended that you configure the same value in 2 locations. 1. Open the 'Control Panel'. On Windows 7, open the 'Devices and Printers' folder. On Windows Vista, open the 'Printers' folder. On Windows XP, open the 'Printers and Faxes' folder. 2. Right-click the printer queue that you want to configure to open a shortcut menu. On Windows 7, click 'Printer properties'. On Windows Vista, click 'Run as administrator', and then click 'Properties'. On Windows XP, click 'Properties'. 3. Click on the 'Printing Preference...' button found on the 'General' tab, then open the 'Paper/Quality' tab in the new window and select the 'Color' option of the 'Color' setting. 4. Click on the 'Printing Defaults...' button found on the 'Advanced' tab, then open the 'Paper/Quality' tab in the new window and select the 'Color' option of the 'Color' setting. - 34 -
-
 1
1 -
2
-
3
-
4
-
5
-
6
-
7
-
8
-
9
-
10
-
11
-
12
-
13
-
14
-
15
-
16
-
17
-
18
-
19
-
20
-
21
-
22
-
23
-
24
-
25
-
26
-
27
-
28
-
 29
29 -
 30
30 -
 31
31 -
 32
32 -
 33
33 -
 34
34 -
 35
35 -
 36
36 -
 37
37 -
 38
38 -
 39
39 -
40
-
41
-
42
-
43
-
44
-
45
-
46
-
47
-
48
-
49
-
50
-
51
-
52
-
53
-
54
-
55
-
56
-
57
-
58
-
59
-
60
-
61
-
62
-
63
-
64
-
65
-
66
-
67
-
68
-
69
-
70
-
71
-
72
-
73
-
74
-
75
-
76
-
77
-
78
-
79
-
80
-
81
-
82
 |
 |
