Olympus E-100RS E-100RS Instructions (English) - Page 135
Adjusting the white balance with, colors except white
 |
View all Olympus E-100RS manuals
Add to My Manuals
Save this manual to your list of manuals |
Page 135 highlights
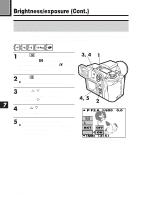
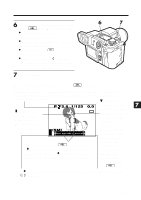
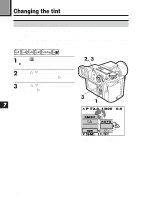
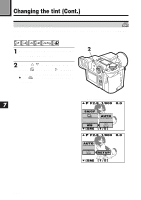
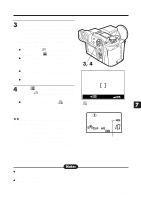
3 Hold a sheet of plain white paper in front of the lens. Position the white paper so that it fills the screen (to ensure there is no shadow). Focus on the paper, then press the OK button. ● To cancel white balance setting, press (Menu button). ● Each time the OK button is pressed, a new white balance setting is stored. ● You can take a picture after this step. ● WB appears on the control panel. 3, 4 4 Press (Menu button) to exit from the white balance setting screen. ● When not using the white balance setting, change the WB setting. EXIT SET OK white balance setting screen 7 Control panel ૽૽Adjusting the white balance with colors except white In step 3, substitute colored paper for white. The white balance is adjusted based on the color, changing the tint. Ex.: Red paper = deeper green, blue paper = orange, yellow paper = deeper purple. Manual white balance Note: ● Unless OFF is selected in ALL RESET, the setting will be canceled when the power is turned off. (P. 00) ● Be sure to check the color in the Display mode. 135
-
 1
1 -
2
-
3
-
4
-
5
-
6
-
7
-
8
-
9
-
10
-
11
-
12
-
13
-
14
-
15
-
16
-
17
-
18
-
19
-
20
-
21
-
22
-
23
-
24
-
25
-
26
-
27
-
28
-
29
-
30
-
31
-
32
-
33
-
34
-
35
-
36
-
37
-
38
-
39
-
40
-
41
-
42
-
43
-
44
-
45
-
46
-
47
-
48
-
49
-
50
-
51
-
52
-
53
-
54
-
55
-
56
-
57
-
58
-
59
-
60
-
61
-
62
-
63
-
64
-
65
-
66
-
67
-
68
-
69
-
70
-
71
-
72
-
73
-
74
-
75
-
76
-
77
-
78
-
79
-
80
-
81
-
82
-
83
-
84
-
85
-
86
-
87
-
88
-
89
-
90
-
91
-
92
-
93
-
94
-
95
-
96
-
97
-
98
-
99
-
100
-
101
-
102
-
103
-
104
-
105
-
106
-
107
-
108
-
109
-
110
-
111
-
112
-
113
-
114
-
115
-
116
-
117
-
118
-
119
-
120
-
121
-
122
-
123
-
124
-
125
-
126
-
127
-
128
-
129
-
 130
130 -
 131
131 -
 132
132 -
 133
133 -
 134
134 -
 135
135 -
 136
136 -
 137
137 -
 138
138 -
 139
139 -
 140
140 -
141
-
142
-
143
-
144
-
145
-
146
-
147
-
148
-
149
-
150
-
151
-
152
-
153
-
154
-
155
-
156
-
157
-
158
-
159
-
160
-
161
-
162
-
163
-
164
-
165
-
166
-
167
-
168
-
169
-
170
-
171
-
172
-
173
-
174
-
175
-
176
-
177
-
178
-
179
-
180
-
181
-
182
-
183
-
184
-
185
-
186
-
187
-
188
-
189
-
190
-
191
-
192
-
193
-
194
-
195
-
196
-
197
-
198
-
199
-
200
-
201
-
202
-
203
-
204
-
205
-
206
-
207
-
208
-
209
-
210
-
211
-
212
-
213
-
214
-
215
-
216
-
217
-
218
-
219
-
220
 |
 |
