Onkyo HT-S7800 Owners Manual - English - Page 21
Remote Controller, Display
 |
View all Onkyo HT-S7800 manuals
Add to My Manuals
Save this manual to your list of manuals |
Page 21 highlights
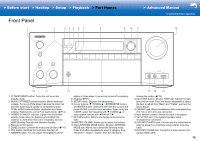
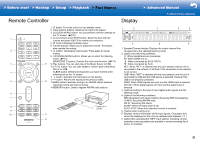
> Before start > Hookup > Setup > Playback > Part Names Remote Controller Display > Advanced Manual Troubleshooting | Appendix 1. Í button: Turns the unit on or into standby mode. 2. Input selector buttons: Switches the input to be played. 1 2 3 4 5 3. Q (QUICK MENU) button: You can perform common settings on the TV screen. (P18) 1 4. Cursor buttons and ENTER button: Select the item with the cursors and press ENTER to confirm your selection. 5. button: Displays the Setup menu. 6. Volume buttons: Allows you to adjust the volume. This button 7 6 7 also cancels the muting. 1. Speaker/Channel display: Displays the output channel that 2 7. button: Temporarily mutes audio. Press again to cancel corresponds to the selected listening mode. muting. 2. Lights in the following conditions. 8. LISTENING MODE buttons: Allows you to select the listening Ë: When headphones are connected. mode. (P14) Z2: When ZONE 2 is on. MAIN/ZONE 2 buttons: Controls the multi-zone function. (P17) : When connected by BLUETOOTH. 3 11 9. Play buttons: You can start play of the Music Server or USB. : When connected by Wi-Fi. 10. button: You can start repeat or random play of the Music NET: When "NET" is selected with the input selector and the unit is Server or USB. connected to the network. It will flash if the connection to the network 4 CLEAR button: Deletes all characters you have entered when entering text on the TV screen. is not correct. USB: When "NET" is selected with the input selector and the unit is 11. button: Switches the information on the display. connected by USB and the USB device is selected. Flashes if the 12. button: Returns the display to the previous state. USB is not properly connected. 5 12 13.MODE button: Switches tuning to an AM/FM station between HDMI: When HDMI signals are input and the HDMI input is selected. automatic tuning and manual tuning. DIGITAL: When digital signals are input and the digital input is 14.MEMORY button: Used to register AM/FM radio stations. selected. 3. Lights according to the type of input digital audio signals and the 6 listening mode. 4. Lights in the following conditions. 7 RDS (Australian and Asian models): Receiving RDS broadcasting. 30° TUNED: Receiving AM/FM radio. 30° FM ST: Receiving FM stereo. 8 Approx.5 m (16 ft.) SLEEP: When the sleep timer is set. AUTO STBY: When Auto Standby function is enabled. 9 5. Flashes when muting is on. 10 13 6. Displays various information of the input signals. Characters that cannot be displayed on this unit are replaced with asterisks ( ˎ ). 14 7. Lights when operating the "NET" input selector indicating remote controller cursor operations are possible in screens showing list of tracks, for example. 21
-
 1
1 -
2
-
3
-
4
-
5
-
6
-
7
-
8
-
9
-
10
-
11
-
12
-
13
-
14
-
15
-
 16
16 -
 17
17 -
 18
18 -
 19
19 -
 20
20 -
 21
21 -
 22
22 -
 23
23 -
 24
24 -
 25
25 -
 26
26 -
27
-
28
-
29
-
30
-
31
-
32
-
33
-
34
-
35
-
36
-
37
-
38
-
39
-
40
-
41
-
42
-
43
-
44
-
45
-
46
-
47
-
48
-
49
-
50
-
51
-
52
-
53
-
54
-
55
-
56
-
57
-
58
-
59
-
60
-
61
-
62
-
63
-
64
-
65
-
66
-
67
-
68
-
69
-
70
-
71
-
72
-
73
-
74
-
75
-
76
-
77
-
78
-
79
-
80
-
81
-
82
-
83
-
84
-
85
-
86
-
87
-
88
-
89
-
90
 |
 |
