Optoma UHL55 Optoma UHL55 User Manual - Page 34
RGB Gain/Bias, Color Space
 |
View all Optoma UHL55 manuals
Add to My Manuals
Save this manual to your list of manuals |
Page 34 highlights
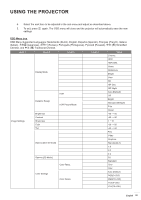
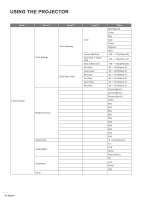
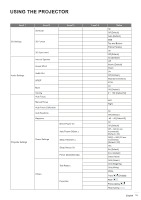
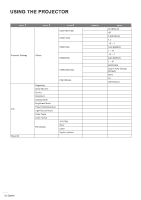
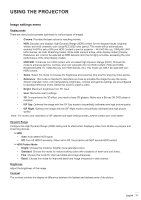
USING THE PROJECTOR Sharpness Adjust the sharpness of the image. Color Adjust a video image from black and white to fully saturated color. Tint Adjust the color balance of red and green. Gamma Set up gamma curve type. After the initial setup and fine tuning is completed, utilize the Gamma Adjustment steps to optimize your image output. ‡‡ Film: For home theater. ‡‡ Video: For video or TV source. ‡‡ Graphics: For PC / Photo source. ‡‡ Standard(2.2): For standardized setting. ‡‡ 1.8 / 2.0 / 2.4: For specific PC / Photo source. Note: These options are only available if the 3D mode function is disabled. In 3D mode, user can only select 3D for Gamma setting. Color Settings Configure the color settings. ‡‡ Color Temp.: Select a color temperature from Standard, Cool or Cold. ‡‡ Color Space: select an appropriate color matrix type from the following: Auto, RGB(0-255), RGB(16-235), YUV(0-255), and YUV(16-235). ‡‡ Color Matching: Adjust hue, saturation, and gain for the red, green, blue, cyan, yellow, magenta, or white color. ‡‡ RGB Gain/Bias: This settings allows to configure the brightness (gain) and contrast (bias) of an image. Brightness Mode Select the brightness mode setting. Digital Zoom Use to reduce or magnify an image on the projection screen. Aspect ratio Select the aspect ratio of the displayed image. ‡‡ 4:3: This format is for 4:3 input sources. ‡‡ 16:9: This format is for 16:9 input sources, like HDTV and DVD enhanced for Wide screen TV. ‡‡ Native: This format displays the original image without any scaling. ‡‡ Auto: Automatically selects the appropriate display format. 34 English
-
 1
1 -
2
-
3
-
4
-
5
-
6
-
7
-
8
-
9
-
10
-
11
-
12
-
13
-
14
-
15
-
16
-
17
-
18
-
19
-
20
-
21
-
22
-
23
-
24
-
25
-
26
-
27
-
28
-
 29
29 -
 30
30 -
 31
31 -
 32
32 -
 33
33 -
 34
34 -
 35
35 -
 36
36 -
 37
37 -
 38
38 -
 39
39 -
40
-
41
-
42
-
43
-
44
-
45
-
46
-
47
-
48
-
49
-
50
-
51
-
52
-
53
-
54
-
55
-
56
-
57
-
58
-
59
-
60
-
61
-
62
-
63
-
64
-
65
-
66
-
67
-
68
-
69
-
70
-
71
-
72
-
73
-
74
-
75
-
76
-
77
 |
 |
