Panasonic AG DVX100B Dvc Camcorder
Panasonic AG DVX100B - Camcorder - 410 KP Manual
 |
UPC - 791871302231
View all Panasonic AG DVX100B manuals
Add to My Manuals
Save this manual to your list of manuals |
Panasonic AG DVX100B manual content summary:
- Panasonic AG DVX100B | Dvc Camcorder - Page 1
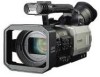
Preparation Description of Before use parts Operating Instructions Camera-Recorder Model No. AG- P . Shooting Playback Editing Displays Menus Reference Before operating this product, please read the instructions carefully and save this manual for future use F0805S0 -H ENGLISH VQT0U08 - Panasonic AG DVX100B | Dvc Camcorder - Page 2
Use specified charger for rechargeable batter- ies. • Do not recharge the battery if it is not a rechargeable type. For Remote Controller • Replace battery with part No. CR2025 only. • Do not recharge the battery. Camera-Recorder The rating plate is on the underside of the Camera-Recorder AC Adapter - Panasonic AG DVX100B | Dvc Camcorder - Page 3
cart, stand, tripod, bracket, or table recommended by the manufacturer, or sold with the video unit. Any mounting of the unit should follow the manufacturer's instructions and should use a mounting accessory recommended by the manufacturer. An appliance and cart combination should be moved with care - Panasonic AG DVX100B | Dvc Camcorder - Page 4
grounding of the mast and supporting structure, grounding of the lead servicing to qualified service personnel. 19. Damage Requiring Service - Unplug this video unit from the wall outlet and refer servicing to qualified service personnel under the following conditions: a. When the power-supply cord - Panasonic AG DVX100B | Dvc Camcorder - Page 5
Contents Before use Important Safeguards 3 Read this first 7 Accessories 7 Operating precautions 8 Checking the system operations 10 Items to prepare 10 Connect the AC power supply cord 10 Insert the Mini DV cassette tape 10 Start shooting 11 Check what you have shot (rec check 12 Eject - Panasonic AG DVX100B | Dvc Camcorder - Page 6
microphone 53 Digital video equipment 54 Television 55 Video deck 55 Audio dubbing 56 Dubbing 58 Analog input 58 Analog output 59 Digital input/output 60 Menus Using the setup menus 66 Using the setup menus 66 Initializing the menu settings 67 Setup menu structure 68 Camera mode - Panasonic AG DVX100B | Dvc Camcorder - Page 7
recording of copyrighted television programs, video tapes and other materials may infringe the right of copyright owners and be contrary to copyright laws." Accessories Battery * AC Adapter * AC power supply cord DC cord Wireless remote control and button battery (CR2025) Eye cup Microphone - Panasonic AG DVX100B | Dvc Camcorder - Page 8
any sand or dust to get into the camera-recorder when using it at the beach and other similar places. • Sand and dust can damage the camera-recorder and cassette. (Be especially careful when inserting or removing the cassettes.) AC adapter and battery • If the battery is extremely hot or cold, the - Panasonic AG DVX100B | Dvc Camcorder - Page 9
battery, check that the battery and its terminals have not been damaged. You can damage the camera and AC adapter if you try to use or recharge a damaged battery caps fitted over any connectors that are not being used. Mounting the camera-recorder on a tripod The tripod mounting hole is 5.5 mm - Panasonic AG DVX100B | Dvc Camcorder - Page 10
to the camera-recorder from the AC adapter. CAUTION: • This unit will operate on 110/120/220/240 V AC. An AC plug adapter may be required for voltages other than 120 V AC. If a conversion plug is required, consult with your dealer as to which one is to be purchased. DC cord Mini DV cassette tape - Panasonic AG DVX100B | Dvc Camcorder - Page 11
Before use 3 Press PUSH to close the cassette holder. The holder automatically goes insert or eject the tape by just holding the cassette cover. • Insert and remove cassette tapes after putting the camera-recorder down on a stable, flat surface or hold it with both hands to keep it stable. • Do not - Panasonic AG DVX100B | Dvc Camcorder - Page 12
. • The cassette holder will not open if the camera is not supplied with power (AC adapter or battery). 120 2 While in the shooting standby mode, press is moving as this can damage the mechanism. • Make sure the camera-recorder is supplied with power before operating the EJECT switch. • Close the - Panasonic AG DVX100B | Dvc Camcorder - Page 13
, move the POWER switch to OFF. The red CAMERA lamp goes out. Disconnect the power cord Battery release 1 Unplug the AC cord from the power outlet. 2 Lift up the viewfinder. 3 While pressing the battery release, pull the DC cord's battery connector towards you. 4 Return the viewfinder to its - Panasonic AG DVX100B | Dvc Camcorder - Page 14
the cover and adjust the length. 2 Close the cover. • Make sure the cover is fully closed. Attaching the shoulder strap Attach the shoulder strap and use it as a precaution against dropping the camera. 20mm or more 20mm or more 14 - Panasonic AG DVX100B | Dvc Camcorder - Page 15
the hand strap. Cassette tapes g Use the following mini DV cassette tapes with this camera-recorder. AY-DVM63PQ Professional series tape ( digital video equipment that you have shot in LP mode on this camera. • When you play a tape in this camera that you have shot in LP mode on other digital video - Panasonic AG DVX100B | Dvc Camcorder - Page 16
Description of parts Camera-recorder 1 3 57 9 2 4 68 control jacks FOCUS/IRIS (3.5 mm mini jack) Connect a remote control to remotely control focus and iris. ZOOM S/S (2.5 mm Super mini jack) Connect a remote control (Page 10) 18 DC INPUT terminal (7.9 V) 19 Battery release (Pages 13 and 22) - Panasonic AG DVX100B | Dvc Camcorder - Page 17
switch (Page 43) 33 WHITE BAL switch (Page 41) 34 IRIS dial (Page 43) 35 IRIS button (Page 43) 36 AUDIO control (Page 44) 37 CAMERA/VCR button and lamp (Page 48) 38 Scene file dial (Page 45) 17 - Panasonic AG DVX100B | Dvc Camcorder - Page 18
) 55 OIS button (Page 35) 56 OPEN button (Page 24) 57 S-VIDEO IN/OUT terminal (Page 55) 58 DV terminal (Page 36) 59 VIDEO IN/OUT terminal (pin jack) (Page 55) 60 Microphone shoe (Page 53) 61 Light shoe 62 Built-in stereo microphone (Page 44) 63 Front tally lamp (Page 82) 64 Front remote - Panasonic AG DVX100B | Dvc Camcorder - Page 19
are for functions that cannot be executed on the camera-recorder. • PHOTO SHOT • MULTI/P-IN-P • STORE STOP INDEX SELECT STORE VAR. SEARCH OFF/ON P.B.DIGITAL PB. ZOOM MENU SET ITEM 14 4 5 15 main unit. 6 REC button (Pages 58 and 60) (Used during VCR mode) 7 PLAY button (q)(Page 48) 8 - Panasonic AG DVX100B | Dvc Camcorder - Page 20
shown by arrow (1) to remove the holder. 2 Insert the battery with the "+" marked side facing up. 3 Return the holder to its original position. Remote control setup When using two camera-recorders simultaneously, set this camera-recorder and the remote control to either [VCR1] or [VCR2] so - Panasonic AG DVX100B | Dvc Camcorder - Page 21
battery Charging Before using the battery, fully charge it with the AC adapter. Keep a spare battery with you. 1 Align the battery with the " " marking on the AC adapter, place it flat, and slide it in the direction shown below. • You cannot charge the battery if the DC cord is connected to the DC - Panasonic AG DVX100B | Dvc Camcorder - Page 22
move it down until it clicks into place. 3 Return the viewfinder to its original position. Detaching the battery • Turn POWER to OFF and check that the POWER lamp (CAM/VCR) has gone off before detaching the battery. • Support the battery with your hand so that it does not fall. While pressing the - Panasonic AG DVX100B | Dvc Camcorder - Page 23
This camera has two viewfinders; one is a miniature LCD in the viewfinder and the other is a retractable 3.5-inch LCD. Use the monitor. To see how the final images will appear, check them on a TV monitor. Using the viewfinder 1 Set the POWER switch to ON and check that images appear in the - Panasonic AG DVX100B | Dvc Camcorder - Page 24
Viewfinder (continued) Using the LCD 1 Set the POWER switch to ON. 2 Press the OPEN button in the direction shown by arrow (1) to open the LCD. It can open out to 120 degrees. Do not try to open it further as this will damage the camera. Emphasizing outlines Emphasizing the outlines of the images - Panasonic AG DVX100B | Dvc Camcorder - Page 25
For menu operation (Page 66) • You can also use the menu buttons on the remote control. (Page 19) ZOOM MULTI/ P-IN-P REC A.DUB /REW PLAY FF/ Camera or Remote control • The viewfinder remains on when you open display can be in color or black and white. (See the setup menus, DISPLAY SETUP screen, - Panasonic AG DVX100B | Dvc Camcorder - Page 26
menus, OTHER FUNCTIONS screen, CLOCK SET, select YES. • For menu operation (Page 66) • You can also use the menu buttons on the remote control. (Page 19) OTHER FUNCTIONS REMOTE VCR1 DV CONTROL OFF DV CMD SEL REC_P END SEARCH BLANK REC LAMP OFF BEEP SOUND OFF CLOCK SET TIME SHIFT - Panasonic AG DVX100B | Dvc Camcorder - Page 27
AC adapter. (Page 10) 2 Leave the POWER switch at OFF. 3 Leave the camera-recorder like this for about 4 hours. • The internal battery charges during this time. • Recharge the battery user information. • You can use numbers from 0 to 9 and the next digit. UB PRESET F 0 0 0 0 0 0 - Panasonic AG DVX100B | Dvc Camcorder - Page 28
RESET TITLE ZOOM MULTI/ P-IN-P REC A.DUB /REW PLAY FF/ Camera or Remote control 6 Press the MENU button when you have finished setting the user information. MENU Setting the time code In the setup menus, RECORDING SETUP screen, set the following time code related items.(Page 74) • TC - Panasonic AG DVX100B | Dvc Camcorder - Page 29
RECORDING SETUP screen FIRST REC TC, select PRESET. • For menu operation (Page 66) • You can also use the menu buttons on the remote control. (Page 19) RECORDING the OPERATION lever t or y to move to the next digit. TC PRESET 1 0 h 0 0 m 0 0 by pressing COUNTER RESET. Camera OSD START/ DATE/ PHOTO - Panasonic AG DVX100B | Dvc Camcorder - Page 30
Time data (continued) 6 Press the MENU button when you have finished setting the time code. MENU 7 The following screen appears, so move the OPERATION lever e to select YES. TC PRESET ___ PRESET OK? NO PUSH STILL YES 8 Press the OPERATION lever [h]. TC PRESET PRESET OK? ___ YES PUSH STILL - Panasonic AG DVX100B | Dvc Camcorder - Page 31
Battery (Page 21) Use a fully charged battery. Keep a spare battery with you. g Cassette tape (Pages 10 and 15) Check that the cassette tape can be used for recording manually. (Page 38) • Check that the lens iris operations can be performed automatically and manually button The camera makes the - Panasonic AG DVX100B | Dvc Camcorder - Page 32
to any equipment you have set up to make backup recordings. REC CHECK button Zoom This camera has a 10 x zoom. Zoom with the zoom button or the zoom ring. Zoom button (handle) HANDLE ZOOM switch Zoom button Zoom ring Finding specific scenes (image search) While in the shooting standby mode, you - Panasonic AG DVX100B | Dvc Camcorder - Page 33
and record. Items shown on the viewfinder and LCD screens are limited to the following. *: Shooting *h: Shooting standby mode : battery indicator remove most overexposed parts by adjusting the iris and shutter speed in the manual mode to remove the areas with zebra patterns. The display changes as - Panasonic AG DVX100B | Dvc Camcorder - Page 34
ratio of the images you record with this camera. Select the aspect ratio in the setup menus, CAMERA SETUP screen, ASPECT CONV. • For menu operation (Page 66) NORMAL: Recorded in the regular 4:3 aspect ratio LETTER BOX: Recorded in the 16:9 aspect ratio. Black bands are recorded at the top and bottom - Panasonic AG DVX100B | Dvc Camcorder - Page 35
camera shake when shooting by hand. Press the OIS button to turn the function on and off. appears on the screen when this function is on. Turn the function off when using a tripod for more natural images. Index recording : Press and hold to fade out to black. Audio also fades out. WHITEFADE: Press - Panasonic AG DVX100B | Dvc Camcorder - Page 36
on tapes in any unit that connected may be overwritten. After backup recording, check the menu item settings before you operate the camera-recorder. • If you use another AG-DVX100B as the external unit for backup recording, select "OFF" for DV CONTROL on the external unit and set it to VCR mode - Panasonic AG DVX100B | Dvc Camcorder - Page 37
a second in the progressive mode. For output and recording, the 24-frame-persecond signal is converted to 60-field-persecond interlace using the widely used "2:3" ratio. This gives you images similar to a movie shot with film. 24 P A B C D E F G H With the "2:3" method, frames [BoCe], [CoDe], [FoGe - Panasonic AG DVX100B | Dvc Camcorder - Page 38
ring FOCUS switch AUTO button PUSH AUTO button 1 If the camera is in auto mode, press the AUTO button to switch to manual focusing ( goes out). 2 Use the FOCUS switch to choose how to control focusing. A (AUTO): Auto focus mode M (MANUAL): Manual focus mode Turn the focus ring by hand. ∞: The - Panasonic AG DVX100B | Dvc Camcorder - Page 39
Shooting Adjusting the shutter speed Shutter speeds you can select Progressive mode Normal shutter speeds (OFF) OFF (60i) 1/60 30P 1/50 24P/24PA 1/50 Shutter speeds you can select with SPEED SEL SYNCHRO SCAN Shutter speed selected 1/60.3 - 1/250 1/100, 1/120, 1/250, 1/500, 1/1000, 1/ - Panasonic AG DVX100B | Dvc Camcorder - Page 40
to normal (OFF), then switch to slow shutter mode. Synchro scan Set the shutter speed of the synchro scan (used when shooting a television or computer monitor) in the setup menus, CAMERA SETUP screen, SYNCRO SCAN. (Page 71) • Adjust the shutter speed to match the frequency of the television or - Panasonic AG DVX100B | Dvc Camcorder - Page 41
balance sensor detects the light source during shooting so the camera-recorder can adjust the white balance. Do not block the sensor. White balance adjustments 1 If the camera is in auto mode, press the AUTO button to switch to manual focusing ( goes out). 2 Set the shutter speed. 3 Place a white - Panasonic AG DVX100B | Dvc Camcorder - Page 42
the ATW feature. ATW will not work if you do. Black balance adjustments It is not normally necessary to adjust the black balance. Adjust it when: • You use the camera for the first time • You use the camera after not using it for a long time • The ambient temperature changes greatly • You switch - Panasonic AG DVX100B | Dvc Camcorder - Page 43
is 12 dB.) Iris adjustments 1 If the camera is in auto mode, press the AUTO button to switch to manual focusing ( goes out). 2 Press the IRIS GAIN (Page 71). Use the ND FILTER Switch to change the ND Filter used (filter to change light intensity). OFF: ND filter is not used. 1/8: Cuts light - Panasonic AG DVX100B | Dvc Camcorder - Page 44
will record more noise. 44 3 When using the phantom microphone, set the INPUT 1/2 (MIC POWER +48V) switch to ON. ON: (When using the phantom microphone) 48V power supply to INPUT 1/2 terminal. OFF: (When a phantom microphone is not connected) No power supply for INPUT 1/2 terminal. • The battery - Panasonic AG DVX100B | Dvc Camcorder - Page 45
necessary file instantly using scene file dial. Scene file dial • Progressive mode will not be changed even if you change the scene file while recording. If you want to change the progressive mode, please set the camera-recorder to recording standby state. When the camera-recorder is shipped from - Panasonic AG DVX100B | Dvc Camcorder - Page 46
scene files (continued) 6 The screen below is displayed, so set the file name of six letters using OPERATION lever. Set the same as user information (Page 27). • Characters that can be set Space, A to Z, 0 to 9 NAME EDIT SW POSITION F1 10 The - Panasonic AG DVX100B | Dvc Camcorder - Page 47
OFF appears on the screen of camera 2. Be sure to turn off camera 2. • When turning off camera 2, be sure to use the power switch. Under no circumstances cut the power by disconnecting the battery or AC adapter. When a file is transferring, do not disconnect the DV (IEEE1394) cable or turn off the - Panasonic AG DVX100B | Dvc Camcorder - Page 48
q to play back. During playback, turn the lever in the direction q to use the variable speed search mode (Page 51), then playback with the speed of 1x While the tape is playing back, press this lever to set the camera-recorder to the playback pause mode. /REW PLAY FF/ STILL ADV PAUSE STILL ADV INDEX - Panasonic AG DVX100B | Dvc Camcorder - Page 49
speed search and pause. (Pages 48 and 51) Viewing images on a television Connect the camera to a television with an AV cable or S-video cord (not included) to view the images on the television. 1 Connect the camera-recorder to the TV set (Page 55). 2 Start playback. • To show the information that - Panasonic AG DVX100B | Dvc Camcorder - Page 50
q to return to normal playback. -V -V Camera or Remote control • Move the OPERATION lever q to return to normal playback. Index search This function searches for the index signals (Page 35) recorded on the tape. Index searches can be performed using the supplied wireless remote control unit - Panasonic AG DVX100B | Dvc Camcorder - Page 51
tape is found, and a still picture that is about a second ahead is displayed while the camera is in recording standby mode. Camera or Remote control INDEX STOP INDEX SELECT STORE VAR. SEARCH OFF/ON P.B.DIGITAL PB. ZOOM MENU SET ITEM • Move the OPERATION q to return to normal playback. EVF - Panasonic AG DVX100B | Dvc Camcorder - Page 52
off. For connection (Page 54) 2 Put the MASTER camera in CAMERA mode and output a video signal from the DV (IEEE1394) terminal. Do the remaining steps on the SLAVE camera. 3 Set the SLAVE camera to VCR mode and in the setup menus, RECORDING SETUP screen, set FIRST REC TC to PRESET mode so the - Panasonic AG DVX100B | Dvc Camcorder - Page 53
PHONES External microphone Stereo Microphone (optional) AG-MC100G Microphone holder Microphone holder Adapter INPUT1 or INPUT2 12 mm 6 mm • When attaching an external microphone to the microphone shoe, use the supplied microphone holder and microphone holder adapter. Playback Editing - Panasonic AG DVX100B | Dvc Camcorder - Page 54
units (continued) Digital video equipment This camera Other Digital video equipment 1 SVIDEO IN/OUT DV CH2 AUDIO IN/OUT CH1 VIDEO IN/OUT 2 DV (IEEE1394)cable (optional) 4-pin type g You can connect a digital video unit equipped with a DV connector and digitally transfer video and audio - Panasonic AG DVX100B | Dvc Camcorder - Page 55
signals are input to both the SVIDEO IN/OUT connector and VIDEO IN/OUT jack, signals of the S-VIDEO IN/OUT connector take precedence. • Except when performing audio dubbing on existing recordings, audio signals cannot be recorded unless video signals are input to the SVIDEO IN/OUT connector and/or - Panasonic AG DVX100B | Dvc Camcorder - Page 56
screen, A DUB INPUT. • For menu operation (Page 66) • You can also use the menu buttons on the remote control. (Page 19) MIC: The sound of the built-in microphone or the external unit connected to INPUT 1/2 connector is recorded. (Select by CH1 SELECT switch and CH2 SELECT switch.) A_IN: The sound - Panasonic AG DVX100B | Dvc Camcorder - Page 57
A DUB INPUT ITEM on the AV IN/OUT SETUP screen. (Page 75). Adjusting the audio input level Use the AUDIO control to adjust the recording level of audio signals input from the built-in microphone or INPUT 1/2 terminal. You cannot adjust the audio signals input into the AUDIO IN/OUT CH1/CH2 terminals - Panasonic AG DVX100B | Dvc Camcorder - Page 58
SVHS (or VHS) cassettes onto DV cassettes or record the television. 1 Connect this unit to a video deck or a television. (Page 55) 2 Press the CAMERA/VCR button and switch to the VCR mode. CAMERA Analog/digital (AD) conversion You can use this unit to convert analog to digital signals. In the setup - Panasonic AG DVX100B | Dvc Camcorder - Page 59
VHS (VHS) tape in a video deck. 1 Connect this unit to a video deck. (Page 55) 2 Press the CAMERA/VCR button and switch to the VCR mode. CAMERA VCR 3 Move the OPERATION lever [q] to start play on this unit. 4 Start recording on the video deck. 5 Stop recording on the video deck. 6 Move the OPERATION - Panasonic AG DVX100B | Dvc Camcorder - Page 60
the connected digital video unit's instruction manual carefully. 1 Connect the digital video equipment to this unit. (Page 54) 2 Set the player unit and recorder unit to the VCR mode. • Press the CAMERA/VCR button for this unit. CAMERA VCR 3 Start playing back in the player. If you are using this - Panasonic AG DVX100B | Dvc Camcorder - Page 61
battery for the calendar has run out. 2 Backup unit displays The status of the backup unit connected to the DV connector is displayed here. Nothing is displayed if in the setup menus, OTHER FUNCTIONS screen, DV CONTROL, you have selected "OFF". DV*: Recording DVh: Recording standby : DV - Panasonic AG DVX100B | Dvc Camcorder - Page 62
is also not displayed during intermittent recording or slow playback. 17 Remaining battery charge As the remaining battery charge drops, the display changes as follows: When the battery has completely discharged, ( ) blinks. (When the AC adapter is being used, a display other than may appear - Panasonic AG DVX100B | Dvc Camcorder - Page 63
become ".". UB: User information When user information could not be read correctly from the tape, [UB*] is displayed. FR: Frame rate information for recording FR 60I : Standard (60i interlace) mode (60 fields/sec.) FR 30P : 30P progressive mode (30 frames/sec.) FR 24P : 24P progressive mode (24 - Panasonic AG DVX100B | Dvc Camcorder - Page 64
using the Optical Image Stabilizer, is displayed even if playing back the tape as camera data. 35 DVTC display Appears when you have set DV IN PRESET to ON in the setup menus, RECORDING value of recording is displayed even if playing back the tape as camera data. Warnings If a problem occurs with - Panasonic AG DVX100B | Dvc Camcorder - Page 65
time mode (SP/LP) 3 3 x (camera) 3 (VCR) x 4 Progressive display 3 3 x x 5 Squeeze record display 3 3 3 x 7 Displaying the function allocated to the USER button 3 x x x 8 Auto-IRIS control display 3 3 3 x 9 Shutter speed display 3 3 3 x 10 Microphone level auto-control - Panasonic AG DVX100B | Dvc Camcorder - Page 66
recording. You can also use the menu buttons on the remote control. (Page 19) Using the setup menus OPERATION lever MENU button MENU 1 When not shooting or recording, press the MENU button. The camera want to change. Example: OTHER FUNCTIONS REMOTE DV CONTROL DV CMD SEL END SEARCH REC LAMP BEEP - Panasonic AG DVX100B | Dvc Camcorder - Page 67
e or r to select the setting you want to change. To change a setting, move [q], then move the OPERATION lever e or r. Example: OTHER FUNCTIONS REMOTE DV CONTROL DV CMD SEL END SEARCH REC LAMP BCELOEPCKSOSEUTND TIME SHIFT VCR1 OFF REC_P BLANK OFF FRONT REAR BOTH PUSH MENU TO RETURN 6 To change - Panasonic AG DVX100B | Dvc Camcorder - Page 68
PLAYBACK FUNCTIONS (Page 73) RECORDING SETUP (Pages 74 and 75) AV IN/OUT SETUP (Page 75) DISPLAY SETUP (Page 76) OTHER FUNCTIONS (Pages 77 and 78) 32K (12bit) AUDIO AUDIO OUT A. DUB INPUT DV OUT DATE/TIME LEVEL METER TAPE BATTERY OTHER DISPLAY VIDEO OUT OSD CAMERA DATA LCD BACKLIGHT LCD SET - Panasonic AG DVX100B | Dvc Camcorder - Page 69
balance). -7 - 0 - +7 MASTER PED (camera) Adjusts the black master pedestal as the basis for images. -15 - 0 - +15 A. IRIS LEVEL Sets AUTO IRIS level. (camera) -4 - 0 - +4 Item/ Display mode) GAMMA (camera) KNEE (camera) Description of settings Selects gamma curve. LOW: Using the gamma curve - Panasonic AG DVX100B | Dvc Camcorder - Page 70
this to shoot in 24P mode (24 frames/second). The tape is recorded in [2:3] conversion. 24P (ADV): Select this to shoot in 24P advanced mode (24 frames/second). The tape is recorded using advanced conversion. NAME EDIT (camera) Edits the name of the selected scene file you have selected with - Panasonic AG DVX100B | Dvc Camcorder - Page 71
camera) speed used camera) Adds the setup level (black level). 0%: The setup level is not added. 7.5%: A 7.5% setup level is added for recording. SW MODE screen Item/ (Display mode) MID GAIN (camera) HIGH GAIN (camera) ATW (camera) HANDLE ZOOM (camera) IRIS DIAL (camera (when in MANUAL IRIS mode). - Panasonic AG DVX100B | Dvc Camcorder - Page 72
to another value, the image can be disordered for a moment. INDEX: INDEX recording (Page 35) SLOWSHUT: Slow shutter mode (Page 40) Enables a function to AUTO SW screen Item/ (Display mode) A.IRIS (camera) AGC (camera) ATW (camera) AF (camera) Description of settings ON: Performs auto iris control - Panasonic AG DVX100B | Dvc Camcorder - Page 73
track Note When the sound is recorded in the 48K (16bit) audio mode, CH3 and CH4 do not exist so the following is always the case. CH1 signals = CH1 track settings and audio track signals output from the AUDIO IN/ OUT jack Audio recording mode 32K (12bit) 32K (12bit) AUDIO item setting ST1 ST2 MIX - Panasonic AG DVX100B | Dvc Camcorder - Page 74
the input level of the external microphone connected to the INPUT 2 terminal. -50dB -60dB Selects the time code used when signals from equipment connected with the DV terminal is recorded. ON: Records with the time code signal input through the DV terminal. OFF: Records with the time code set at - Panasonic AG DVX100B | Dvc Camcorder - Page 75
SETUP screen Item/ (Display mode) A DUB INPUT (VCR) DV OUT (VCR) Description of settings Selects the sound to be recorded for audio dubbing. (Page 56) MIC: A_IN: Select ON to convert analog input signals into digital signals and output them from the DV connector. (Page 58) ON OFF are the factory - Panasonic AG DVX100B | Dvc Camcorder - Page 76
and white for the images on the viewfinder. ON: Color OFF: Black and white DISPLAY ASPECT (camera) (VCR) Select the aspect ratio of the LCD monitor and viewfinder. AUTO: Changes automatically to suit the recording or play mode. 4:3: Fixed at 4:3 16:9: Fixed at 16:9 There is a 10% overscan on the - Panasonic AG DVX100B | Dvc Camcorder - Page 77
the cassette tape write-protect • when condensation has formed inside the camera-recorder • when a problem has occurred in the camera-recorder Ten beeps • when it is not possible to record to the tape Sets the camera-recorder's calendar. The time set using this item is added to the clock time of the - Panasonic AG DVX100B | Dvc Camcorder - Page 78
turns off automatically. OFF: the cylinder head pauses and goes into standby mode without cutting the power. *The camera recorder does not go into power save mode if you use the following controls. • AUTO Button • FOCUS switch • PUSH AUTO button • GAIN switch. WHITE BAL switch • WHITE BAL switch - Panasonic AG DVX100B | Dvc Camcorder - Page 79
on how the battery is used. If the battery operates only for a short period even when it is charged adequately, it has reached the end of its service life. • The battery cannot be charged if the DC cord is connected. Disconnect it. P 21 - - - Normal video recording Cannot record even though the - Panasonic AG DVX100B | Dvc Camcorder - Page 80
Before calling for service (continued) Other types of video recording Cannot focus automatically. • Make sure the camera is in manual mode. You can focus automatically when the auto focus mode is selected. • You may be shooting a scene where it is difficult to bring the subject - Panasonic AG DVX100B | Dvc Camcorder - Page 81
down the camera-recorder's volume control P 49 too far. In the VCR mode, adjust the volume level using the AUDIO camera-recorder is tilted back and forth. • Make sure the camera is supplied with power. Make sure the AC adapter or battery cannot be performed. In this case, slide EJECT switch again to - Panasonic AG DVX100B | Dvc Camcorder - Page 82
tape left, or the remaining charge of the battery is low (1 blink/sec.) Tally lamp System resetting Reset the system microcomputer if you can no longer operate the camera-recorder even though its power is on or a similar kind of a problem has occurred. Use a pointed object to press the RESET button - Panasonic AG DVX100B | Dvc Camcorder - Page 83
finish to peel off. • Before proceeding with maintenance, remove the battery or disconnect the AC cord from the power outlet. • Use a soft, clean cloth to wipe the camerarecorder. To remove stubborn dirt, wipe the camera-recorder with a cloth moistened with kitchen detergent that has been diluted - Panasonic AG DVX100B | Dvc Camcorder - Page 84
Video camera • Wrap the video camera in a soft cloth to keep the dust off. Battery • The battery life is shortened in places with extreme temperatures. • Storing the battery your tapes back into their original cases before storing them. Dust, direct the signals are recorded. Magnetic necklaces, toys - Panasonic AG DVX100B | Dvc Camcorder - Page 85
85% (no condensation) Weight 1.7 kg (3.7 lb) (excluding battery and accessories) Dimensions (WxHxD) 139 mm x 160 mm x 364 mm (5-15/32 inches x 6-5/16 inches x 14-11/32 inches) Recording format DV (Digital video SD format) Tape format Mini DV system Video signals recorded 525i (NTSC) In progressive - Panasonic AG DVX100B | Dvc Camcorder - Page 86
9 conversion lens AG-LA7200G XLR microphone AG-MC100G Hard carrying case AG-HT100G Soft carrying case AG-SC100G Battery CGR-D16 (1600 mAh) CGP-D28 (2800 mAh) CGA-D54 (5400 mAh: equivalent to accessory battery) AC adapter kit AG-B15 (equivalent to accessory AC cord, DC cord, AC adapter) Cleaning tape - Panasonic AG DVX100B | Dvc Camcorder - Page 87
MEMO 87 Reference - Panasonic AG DVX100B | Dvc Camcorder - Page 88
. Fax (800) 334-4880 Emergency after hour parts orders (800) 334-4881 TECHNICAL SUPPORT: Emergency 24 Hour Service (800) 222-0741 Panasonic Canada Inc. 5770 Ambler Drive, Mississauga, Ontario L4W 2T3 (905) 624-5010 Panasonic de Mexico S.A. de C.V. Av angel Urraza Num. 1209 Col. de Valle 03100 Mexico
-
 1
1 -
 2
2 -
 3
3 -
 4
4 -
 5
5 -
 6
6 -
 7
7 -
8
-
9
-
10
-
11
-
12
-
13
-
14
-
15
-
16
-
17
-
18
-
19
-
20
-
21
-
22
-
23
-
24
-
25
-
26
-
27
-
28
-
29
-
30
-
31
-
32
-
33
-
34
-
35
-
36
-
37
-
38
-
39
-
40
-
41
-
42
-
43
-
44
-
45
-
46
-
47
-
48
-
49
-
50
-
51
-
52
-
53
-
54
-
55
-
56
-
57
-
58
-
59
-
60
-
61
-
62
-
63
-
64
-
65
-
66
-
67
-
68
-
69
-
70
-
71
-
72
-
73
-
74
-
75
-
76
-
77
-
78
-
79
-
80
-
81
-
82
-
83
-
84
-
85
-
86
-
87
-
88
 |
 |

Shooting
Menus
Displays
Editing
Playback
Reference
Preparation
Description of
parts
Before use
Operating Instructions
Camera-Recorder
Model No.
AG-
P
.
F0805S0 -H
VQT0U08
ENGLISH
Before operating this product, please read the instructions carefully and save this manual for
future use