Panasonic AG DVX100B Dvc Camcorder - Page 29
Specifying the time code (TC PRESET - mic
 |
UPC - 791871302231
View all Panasonic AG DVX100B manuals
Add to My Manuals
Save this manual to your list of manuals |
Page 29 highlights
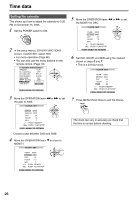
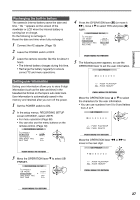
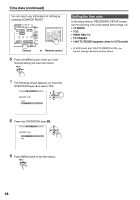
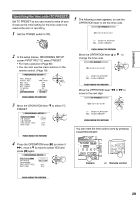
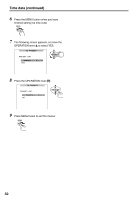
- VOL + Preparations Specifying the time code (TC PRESET) Set TC PRESET so you can record a value of your choice as the initial setting for the time code to be used at the start of recording. 1 Set the POWER switch to ON. POWER ON OFF 2 In the setup menus, RECORDING SETUP screen FIRST REC TC, select PRESET. • For menu operation (Page 66) • You can also use the menu buttons on the remote control. (Page 19) RECORDING SETUP REC SPEED AUDIO REC MIC ALC MIC GAIN1 MIC GAIN2 TC MODE TCG FIRST REC TC SP 48K(16bit) ON -50B -50B DF REC RUN PUSH MENU TO RETURN 3 Move the OPERATION lever r to select TC PRESET. RECORDING SETUP TC PRESET UB MODE UB PRESET ONE-SHOT REC REC TIME USER - - - - OFF 0.5S PUSH MENU TO RETURN 4 Press the OPERATION lever [h] (or move it y), move it r to move to select YES and press [h] again. RECORDING SETUP TC PRESET UB MODE UB PRESET ONE-SHOT REC REC TIME YES - - - - OFF 0.5S 5 The following screen appears, so use the OPERATION lever to set the time code. TC PRESET 0 0 h 0 0 m 0 0 s 0 0 f +/- : PUSH PLAY/STOP SEL : PUSH REW/FF PUSH MENU TO RETURN Move the OPERATION lever e or r to change the time code. TC PRESET 1 0 h 0 0 m 0 0 s 0 0 f +/- : PUSH PLAY/STOP SEL : PUSH REW/FF PUSH MENU TO RETURN Move the OPERATION lever t or y to move to the next digit. TC PRESET 1 0 h 0 0 m 0 0 s 0 0 f +/- : PUSH PLAY/STOP SEL : PUSH REW/FF PUSH MENU TO RETURN You can reset the time code to zero by pressing COUNTER RESET. Camera OSD START/ DATE/ PHOTO STOP TIME SHOT COUNTER RESET TITLE ZOOM MULTI/ P-IN-P REC A.DUB /REW PLAY FF/ or Remote control PUSH MENU TO RETURN 29
-
 1
1 -
2
-
3
-
4
-
5
-
6
-
7
-
8
-
9
-
10
-
11
-
12
-
13
-
14
-
15
-
16
-
17
-
18
-
19
-
20
-
21
-
22
-
23
-
 24
24 -
 25
25 -
 26
26 -
 27
27 -
 28
28 -
 29
29 -
 30
30 -
 31
31 -
 32
32 -
 33
33 -
 34
34 -
35
-
36
-
37
-
38
-
39
-
40
-
41
-
42
-
43
-
44
-
45
-
46
-
47
-
48
-
49
-
50
-
51
-
52
-
53
-
54
-
55
-
56
-
57
-
58
-
59
-
60
-
61
-
62
-
63
-
64
-
65
-
66
-
67
-
68
-
69
-
70
-
71
-
72
-
73
-
74
-
75
-
76
-
77
-
78
-
79
-
80
-
81
-
82
-
83
-
84
-
85
-
86
-
87
-
88
 |
 |
