Panasonic AG DVX100B Dvc Camcorder - Page 10
Checking the system operations, Items to prepare, Connect the AC power supply cord - mini dv
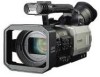 |
UPC - 791871302231
View all Panasonic AG DVX100B manuals
Add to My Manuals
Save this manual to your list of manuals |
Page 10 highlights
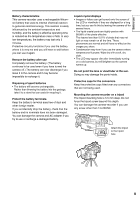
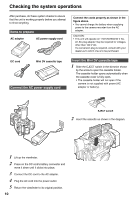
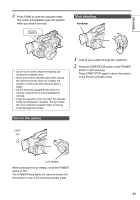
Checking the system operations After purchase, do these system checks to ensure that the unit is working properly before you attempt to shoot anything. Items to prepare AC adapter AC power supply cord Connect the cords properly as shown in the figure above. • You cannot charge the battery when supplying power to the camera-recorder from the AC adapter. CAUTION: • This unit will operate on 110/120/220/240 V AC. An AC plug adapter may be required for voltages other than 120 V AC. If a conversion plug is required, consult with your dealer as to which one is to be purchased. DC cord Mini DV cassette tape Connect the AC power supply cord Insert the Mini DV cassette tape 1 Slide the EJECT switch in the direction shown by the arrow to open the cassette holder. The cassette holder opens automatically when the cassette cover is fully open. • The cassette holder will not open if the camera is not supplied with power (AC adapter or battery). EJECT switch 2 Insert the cassette as shown in the diagram. PUSH 1 Lift up the viewfinder. 2 Press on the DC cord's battery connector and move it down until it clicks into place. 3 Connect the DC cord to the AC adapter. 4 Plug the AC cord into the power outlet. 5 Return the viewfinder to its original position. 10
-
 1
1 -
2
-
3
-
4
-
 5
5 -
 6
6 -
 7
7 -
 8
8 -
 9
9 -
 10
10 -
 11
11 -
 12
12 -
 13
13 -
 14
14 -
 15
15 -
16
-
17
-
18
-
19
-
20
-
21
-
22
-
23
-
24
-
25
-
26
-
27
-
28
-
29
-
30
-
31
-
32
-
33
-
34
-
35
-
36
-
37
-
38
-
39
-
40
-
41
-
42
-
43
-
44
-
45
-
46
-
47
-
48
-
49
-
50
-
51
-
52
-
53
-
54
-
55
-
56
-
57
-
58
-
59
-
60
-
61
-
62
-
63
-
64
-
65
-
66
-
67
-
68
-
69
-
70
-
71
-
72
-
73
-
74
-
75
-
76
-
77
-
78
-
79
-
80
-
81
-
82
-
83
-
84
-
85
-
86
-
87
-
88
 |
 |
