Panasonic AG DVX100B Dvc Camcorder - Page 46
Using scene files continued, below appears, and the changes to the scene
 |
UPC - 791871302231
View all Panasonic AG DVX100B manuals
Add to My Manuals
Save this manual to your list of manuals |
Page 46 highlights
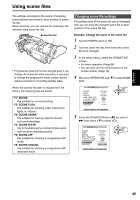
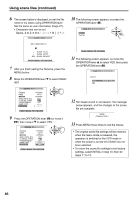
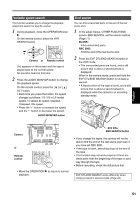
Using scene files (continued) 6 The screen below is displayed, so set the file name of six letters using OPERATION lever. Set the same as user information (Page 27). • Characters that can be set Space, A to Z, 0 to 9 NAME EDIT SW POSITION F1 10 The following screen appears, so press the OPERATION lever (h). FILE F1: SAVE INITIAL + : PUSH PLAY - : PUSH STOP SEL : PUSH REW/FF PUSH MENU TO RETURN 7 After you finish setting the filename, press the MENU button. 8 Move the OPERATION lever r to select SAVE/ INIT. SCENE F1:- GAMMA KNEE MATRIX SKIN TONE DTL V DETAIL FREQ PROGRESSIVE NAME EDIT SAVE/INIT NORMAL AUTO NORMAL OFF OFF PUSH MENU TO RETURN 9 Press the OPERATION lever (h) (or move it y) then move it r to select YES. SCENE F1:- GAMMA KNEE MATRIX SKIN TONE DTL V DETAIL FREQ PROGRESSIVE NAME EDIT SAVE/INIT NORMAL AUTO NORMAL OFF OFF YES PUSH MENU TO RETURN PUSH MENU TO RETURN 11 The following screen appears, so move the OPERATION lever e to select YES, then press the OPERATION lever (h). FILE F1: SAVE? ___ YES PUSH STILL NO 12 Ten beeps sound in succession, the message below appears, and the changes to the scene file are complete. SAVE COMPLETED ! 13 Press MENU three times to exit the menus. • The original scene file settings will be restored when the menu mode is released, the operation is switched to the VCR mode or when the power is turned off if SAVE has not been selected. • To return the scene file settings to the factory settings, select INITIAL in step 10, then do steps 11 to 13. 46
-
 1
1 -
2
-
3
-
4
-
5
-
6
-
7
-
8
-
9
-
10
-
11
-
12
-
13
-
14
-
15
-
16
-
17
-
18
-
19
-
20
-
21
-
22
-
23
-
24
-
25
-
26
-
27
-
28
-
29
-
30
-
31
-
32
-
33
-
34
-
35
-
36
-
37
-
38
-
39
-
40
-
 41
41 -
 42
42 -
 43
43 -
 44
44 -
 45
45 -
 46
46 -
 47
47 -
 48
48 -
 49
49 -
 50
50 -
 51
51 -
52
-
53
-
54
-
55
-
56
-
57
-
58
-
59
-
60
-
61
-
62
-
63
-
64
-
65
-
66
-
67
-
68
-
69
-
70
-
71
-
72
-
73
-
74
-
75
-
76
-
77
-
78
-
79
-
80
-
81
-
82
-
83
-
84
-
85
-
86
-
87
-
88
 |
 |
