Panasonic AG DVX100B Dvc Camcorder - Page 66
Using the setup menus, Camera mode, VCR mode, Example, OPERATION lever, MENU button
 |
UPC - 791871302231
View all Panasonic AG DVX100B manuals
Add to My Manuals
Save this manual to your list of manuals |
Page 66 highlights
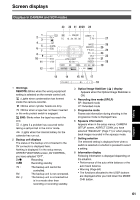
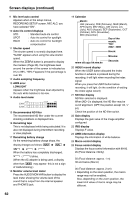
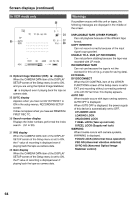
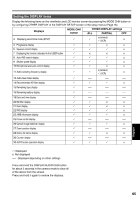
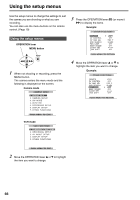
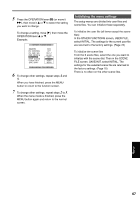
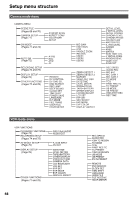
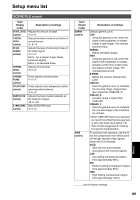
Using the setup menus Use the setup menus to change the settings to suit the scenes you are shooting or what you are recording. You can also use the menu buttons on the remote control. (Page 19) Using the setup menus OPERATION lever MENU button MENU 1 When not shooting or recording, press the MENU button. The camera enters the menu mode and the following is displayed on the screen. Camera mode CAMERA MENU 1 . SCENE FILE 2 . CAMERA SETUP 3 . SW MODE 4 . AUTO SW 5 . RECORDING SETUP 6 . DISPLAY SETUP 7 . OTHER FUNCTIONS PUSH MENU TO EXIT 3 Press the OPERATION lever (h) (or move it y) to display the items. Example: OTHER FUNCTIONS REMOTE DV CONTROL DV CMD SEL END SEARCH REC LAMP BCELOEPCKSOSEUTND TIME SHIFT OFF REC_P BLANK OFF OFF OFF PUSH MENU TO RETURN 4 Move the OPERATION lever e or r to highlight the item you want to change. Example: OTHER FUNCTIONS REMOTE DV CONTROL DV CMD SEL END SEARCH REC LAMP BEEP SOUND CLOCK SET TIME SHIFT VCR1 OFF REC_P BLANK OFF OFF PUSH MENU TO RETURN VCR mode VCR FUNCTIONS 1 . PLAYBACK FUNCTIONS 2 . RECORDING SETUP 3 . AV IN/OUT SETUP 4 . DISPLAY SETUP 5 . OTHER FUNCTIONS PUSH MENU TO EXIT 2 Move the OPERATION lever e or r to highlight the item you want to change. 66
-
 1
1 -
2
-
3
-
4
-
5
-
6
-
7
-
8
-
9
-
10
-
11
-
12
-
13
-
14
-
15
-
16
-
17
-
18
-
19
-
20
-
21
-
22
-
23
-
24
-
25
-
26
-
27
-
28
-
29
-
30
-
31
-
32
-
33
-
34
-
35
-
36
-
37
-
38
-
39
-
40
-
41
-
42
-
43
-
44
-
45
-
46
-
47
-
48
-
49
-
50
-
51
-
52
-
53
-
54
-
55
-
56
-
57
-
58
-
59
-
60
-
 61
61 -
 62
62 -
 63
63 -
 64
64 -
 65
65 -
 66
66 -
 67
67 -
 68
68 -
 69
69 -
 70
70 -
 71
71 -
72
-
73
-
74
-
75
-
76
-
77
-
78
-
79
-
80
-
81
-
82
-
83
-
84
-
85
-
86
-
87
-
88
 |
 |
