Panasonic AG DVX100B Dvc Camcorder - Page 47
Transferring scene files - problems
 |
UPC - 791871302231
View all Panasonic AG DVX100B manuals
Add to My Manuals
Save this manual to your list of manuals |
Page 47 highlights
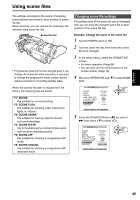
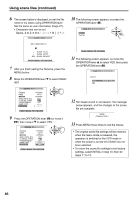
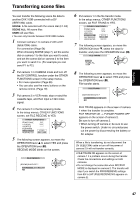
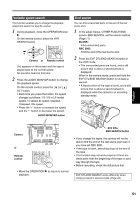
Shooting Transferring scene files You can transfer the following scene file data to another DVX 100B connected with a DV (IEEE1394) cable. SCENE: A file selected with the scene dial (F1-F6) SCENE ALL: All scene files USER: All user files. • You can only transfer between DVX100B models. 1 Connect camera 1 to camera 2 with a DV (IEEE1394) cable. For connection (Page 54) When choosing SCENE (step 7), set the scene dial on camera 1 to the item you want to send, and set the scene dial on camera 2 to the item you want to send it to. (For example you can send F1 to F2.) 2 Put camera 1 in CAMERA mode and turn off the DV CONTROL function under the OTHER FUNCTIONS screen in the setup menus. • For menu operation (Page 66) • You can also use the menu buttons on the remote control. (Page 19) 3 Put camera 2 in VCR mode, stop or eject the cassette tape, and then input a 1394 video signal. 4 Put camera 2 in the file receiving mode. In the setup menus, OTHER FUNCTIONS screen, set FILE RECEIVE to YES. OTHER FUNCTIONS POWER SAVE H.P MODE USER FILE FILE TRANS FILE RECEIVE HOUR METER OFF TAPE YES 5 The following screen appears, so move the OPERATION lever e to select YES and press the OPERATION lever (h). RECEIVE MODE blinks on the screen. FILE RECEIVE SCENE (SCENE)EXECUTE ? YES NO PUSH STILL 6 Put camera 1 in the file transfer mode. In the setup menus, OTHER FUNCTIONS screen, set FILE TRANS to YES. OTHER FUNCTIONS POWER SAVE H.P MODE USER FILE FILE TRANS FILE RECEIVE HOUR METER OFF TAPE - - - - YES 00015H 7 The following screen appears, so move the OPERATION lever r, select the data for transfer, and press the OPERATION lever (h). FILE TRANS SCENE SCENE ALL USER 8 The following screen appears, so move the OPERATION lever e to select YES and press the OPERATION lever (h). File transfer starts. FILE TRANS SCENE (SCENE)EXECUTE ? YES NO PUSH STILL FILE TRANS appears on the screen of camera 1 when the transfer is complete. FILE RECEIVE OK → PLEASE POWER OFF appears on the screen of camera 2. Be sure to turn off camera 2. • When turning off camera 2, be sure to use the power switch. Under no circumstances cut the power by disconnecting the battery or AC adapter. When a file is transferring, do not disconnect the DV (IEEE1394) cable or turn off the power of camera 2.It will not transfer correctly. • FILE TRANS NG appears on the screen of camera 1 if a problem occurs during the transfer. Check the connections and settings on both cameras. • Do not change the scene dial when RECEIVE MODE is displayed on camera 2. The transfer will stop if you switch the PROGRESSIVE settings from 60i to 24P (FILE RECEIVE NG appears on camera 2). 47
-
 1
1 -
2
-
3
-
4
-
5
-
6
-
7
-
8
-
9
-
10
-
11
-
12
-
13
-
14
-
15
-
16
-
17
-
18
-
19
-
20
-
21
-
22
-
23
-
24
-
25
-
26
-
27
-
28
-
29
-
30
-
31
-
32
-
33
-
34
-
35
-
36
-
37
-
38
-
39
-
40
-
41
-
 42
42 -
 43
43 -
 44
44 -
 45
45 -
 46
46 -
 47
47 -
 48
48 -
 49
49 -
 50
50 -
 51
51 -
 52
52 -
53
-
54
-
55
-
56
-
57
-
58
-
59
-
60
-
61
-
62
-
63
-
64
-
65
-
66
-
67
-
68
-
69
-
70
-
71
-
72
-
73
-
74
-
75
-
76
-
77
-
78
-
79
-
80
-
81
-
82
-
83
-
84
-
85
-
86
-
87
-
88
 |
 |