Panasonic CYVHD9401U 9" Overhead Monitor - Page 13
continued, Wire the unit and replace the headliner. - model
 |
UPC - 037988757169
View all Panasonic CYVHD9401U manuals
Add to My Manuals
Save this manual to your list of manuals |
Page 13 highlights
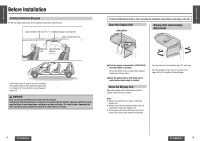
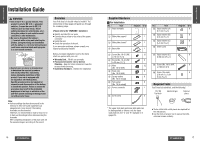
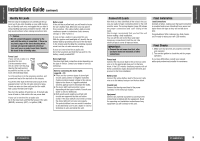
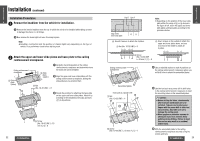
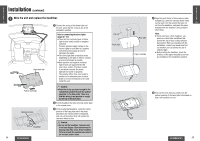
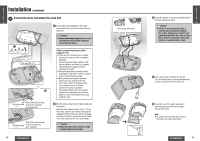
E N Installation (continued) G L I 3 S H Wire the unit and replace the headliner. 11 1 Connect the wiring of the dome light and the unit, and bring the wiring as far as the installation position. Base plate top Note for connecting the dome lights (page 30s31): ≥ There are two common types of dome light circuits used, positive or negative switched. Positive systems supply voltage to the interior lights to turn them on, negative switched systems apply ground to illuminate the bulbs. ≥ The dome light lead connection varies depending on the type of vehicle. Consult a service technician as needed. ≥ Both positive and negative switched light circuits are supported by this unit's door switch. If the door switch is not wired correctly, the dome light will not come on properly. The polarity differs from one model to another so be absolutely sure to ask a dealer or service technician to wire and install the unit. Pullout openings Reference holes Headliner 24 CY-VHD9401U/L Caution: ≥ Pass the wiring you have brought to the installation position through the pullout openings in the base plate. Take care that the wiring is not pinched or caught by the top of the base plate. 2 Put the headliner that was removed earlier back in its original place. 3 In the re-attached headliner, locate the center position of the base plate which has been attached to the reinforcement crosspieces, and cut out the section that will expose the reference holes to view. Caution: ≥ As you cut the headliner, take care not to cut your fingers. Also take care not to damage any other areas of the headliner. Failure to heed this caution may result in an accident and/or injury. Cut out Front side E N G L I 4 Align the guide holes in the accessory paper S H template (1) with the reference holes which can be seen from the section that was cut 12 out from the headliner, and paste the paper template onto the headliner using a tape or other thing. Rear side 1 Paper template Note: ≥ Some cars have a thick headliner, use spacers or have other conditions that prevent the use of blue ceiling reflected illumination. Before proceeding with the installation, contact your dealer and find out whether your car allows the use of reflected light. ≥ Before cutting the headliner, check the direction of the paper template to prevent any mistakes in the installation position. 5 Pull out the wires that you pulled from the pullout opening of the base plate beforehand so that it will be easier to wire. CY-VHD9401U/L 25
-
 1
1 -
2
-
3
-
4
-
5
-
6
-
7
-
 8
8 -
 9
9 -
 10
10 -
 11
11 -
 12
12 -
 13
13 -
 14
14 -
 15
15 -
 16
16 -
 17
17 -
 18
18 -
19
-
20
-
21
-
22
-
23
-
24
-
25
-
26
-
27
-
28
-
29
-
30
-
31
-
32
-
33
-
34
-
35
-
36
-
37
-
38
-
39
-
40
-
41
 |
 |
