Panasonic CYVHD9401U 9" Overhead Monitor - Page 3
Safety Information, Contents - parts
 |
UPC - 037988757169
View all Panasonic CYVHD9401U manuals
Add to My Manuals
Save this manual to your list of manuals |
Page 3 highlights
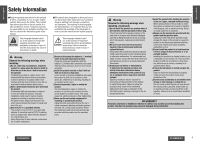
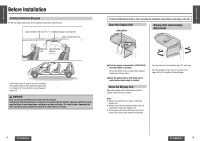
E N Safety Information (continued) G L I S H Caution q Take care that the wiring is not pinched or caught by the base plate attached to the roof Observe the following cautions when or any other parts. installing. Failure to heed this caution may result in an q Do not damage the cords. accident and/or injury. Wire breaks and short circuits can cause q Before installing the unit, be absolutely sure to electrical shock or fire. check that the screws do not make any contact Run the cords so that they do not get tangled in with the ceiling panel. the moving parts (such as the seat rails), screws If some space is required between the base plate or car body. and the unit, attach and adjust the under cover. Do not damage, pull too hard, fold, twist, or For details on installing the under cover, consult work on the cords. Do not place the cords near heating appliances or put heavy objects on the your dealer. q Wear goggles or protective eyewear to shield cords. q Install the monitor in a position where it will your eyes from airborne metal particles during drilling. not hit anybody's head when it opens and Failure to heed this caution may result in an closes. Failure to heed this caution may result in an accident and/or injury. q As you cut the headliner, take care not to cut accident and/or injury. qTake care not to injure your fingers with the your fingers. Also take care not to damage any other areas of the headliner. power drill or other tool you are using. Also Failure to heed this caution may result in an take care not to damage the wiring near the ceiling panel. accident and/or injury. q Follow local rules and regulations for Failure to heed this caution may result in an installing the unit. accident, injury and/or malfunctioning. qDo not poke your fingers between the ceiling Observe the following cautions for and this product. Failure to heed this caution may result in an injury and/or malfunctioning of the product. q Wear gloves for installation work to protect yourself from injuries. Failure to heed this caution may result in an accident and/or injury. connections. ≥ To prevent damage to the unit, be sure to follow the connection diagram. ≥ Do not connect the power connector to the unit until the wiring is completed. ≥ When connecting stripped wires, be sure to wrap them securely with electrical tape to prevent shorts. ≥ Bundle all cables and keep cable terminals free from touching any metal parts. Observe the following cautions when using this unit or installing. Contents E N G L I Safety Information Page 2 S H Before Installation 14 q If an RCA or similar cord is to be connected to the product, adjust its position and length so that it will not become entangled or come Safety Installation Diagram 14 Open the Display Unit 15 into contact with your body. After use, be Close the Display Unit 15 absolutely sure to disconnect it from the product. Failure to heed this caution may result in an Display Unit Lateral Angle Adjustment 15 accident and/or injury. q Before connecting the product with another device, consult the operating instructions Installation Guide 16 Overview 16 of the device concerned to ensure that the Supplied Hardware 17 product and device will be connected properly. Incorrect connections may cause accidents and/or malfunctioning. Required Tools 17 Identify All Leads 18 Observe the following cautions when replacing the bulb of the dome light. ≥ Have the dome light replaced by a qualified Connect All Leads 19 Final Installation 19 Final Checks 19 specialist. ≥ While you are replacing a bulb, be absolutely sure to keep the dome light switch at OFF. Installation 20 Introduction 20 Otherwise, you may burn yourself. Work Flow 21 ≥ The bulb is very hot to touch while it is lighted and immediately after it has gone off. ≥ Before attempting to replace it, turn the dome Installation Procedures 22 Electrical Connections 30 light switch off, wait several minutes and then check that it cooled off. ≥ Use a bulb with the specified ratings (12 V/5 W). Do not use any other bulb. Wiring Diagram (Simple System)....... 30 Wiring Diagram (Recommended System 32 ≥ Gripping the bulb with too much force may break it. Wear fingerstalls or use some other anti-slip method when replacing it. Wiring Diagram (Advanced System 34 Note: ≥ For replacing the bulb of the dome light, please refer to page 73 in the Operating Instructions. 4 CY-VHD9401U/L CY-VHD9401U/L 5
-
 1
1 -
 2
2 -
 3
3 -
 4
4 -
 5
5 -
 6
6 -
 7
7 -
 8
8 -
 9
9 -
10
-
11
-
12
-
13
-
14
-
15
-
16
-
17
-
18
-
19
-
20
-
21
-
22
-
23
-
24
-
25
-
26
-
27
-
28
-
29
-
30
-
31
-
32
-
33
-
34
-
35
-
36
-
37
-
38
-
39
-
40
-
41
 |
 |