Panasonic SLPR300 SLPR300 User Guide - Page 25
Fade In/Fade Out Recording analog only, Automatic and manual track marking
 |
View all Panasonic SLPR300 manuals
Add to My Manuals
Save this manual to your list of manuals |
Page 25 highlights
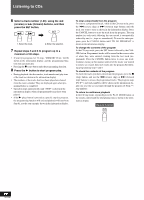
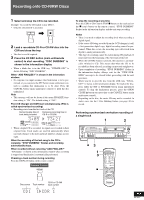
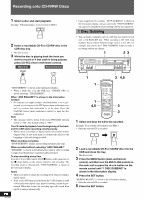
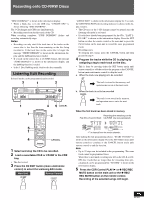
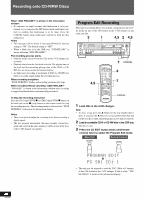
English Recording onto CD-R/RW Discs 3 Press 1REC/REC MUTE to put the CDR in recording pause mode. • The disc is read and OPC performed if required. • The remaining recording time on the CD-R or CD-RW disc is shown in the information display. 4 When analog signals are to be recorded, adjust the recording level while playing the source. MULTI JOG REC LEVEL - + • Press the MENU button first and turn the MULTI JOG to adjust the recording level. Then press the SET button. • Adjust the volume in such a way that the 0 dB display is not exceeded when the loudest sound is applied. OVER L 40 30 20 15 10 6 3 0 dB R The OVER indicator should not be made to light as this may cause distortion in the recording. • When CD ANALOG recording is selected, the recording level is set automatically to the CD in the 3-CD changer. 5 Press the CDR Control PLAY p button to start recording. 6 Play the sound of the source to be recorded. When recording is complete Press the CDR Control STOP s button to stop. The p indicator in the display window flashes and operation stops. Notes • You cannot record from multiple CDs. If create a program that changes CDs, a blank track of a few seconds will be added and recording will stop. • When "UNLOCK" is shown in the information display, the DIGITAL IN terminal is not connected properly to the source unit. • Upon completion of recording, the p indicator flashes in the display window. Operating any button while this indicator is flashing may render the disc being recorded unusable. Always wait until the p indicator stops flashing before proceeding with the next operation. • When digital input signals are supplied, they will be recorded in their original digital form as long as the source signal is not from a first-generation digital copy (refer to SCMS on see page 48). There is no need to adjust the recording level. To record silence in the recording POWER COMPACT DISC RECORDER SL-PR300 PHONES MIN MAX PLAY MODE CD EDIT CD REC DISC 3 DISC 2 DISC 1 OPEN / CLOSE DISC SELECTOR 3 2 1 OPEN / CLOSE MULTI JOG REC LEVEL - + DIGITAL CD LINE REC SELECTOR SYNCHRO FINALIZE MENU SET CANCEL REC/ REC MUTE MIX BALANCE LINE CD 1 •REC REC MUTE FADE SYNCHRO 1 RSEECLECTOR PITCH+ SET PITCH 0 PITCH- MENU CANCEL COMPACT DISC RECORDER RAK-PR300 1 Press the 1REC/REC MUTE button where you want record a four-second silence. • To record a silence longer than four seconds, keep pressing the 1REC/REC MUTE button as long as you want. Notes • Four seconds of silence will be recorded regardless of whether or not the button is held down for fewer or more than four seconds. After the four seconds of silence, the unit stops in the recording pause mode after the button is released. • The REC MUTE function cannot be used at the beginning of recording started from the recording pause mode Fade In/Fade Out Recording (analog only) This feature can be used to record analog sound other than CD ANALOG. Located immediately below the CONTROL CD button on the remote control is a special button (FADE) that allows you to perform fade in and fade out of sound at the beginning and end of tracks when you are recording analog signals. To fade in at the beginning of a track, put the CDR into the recording pause mode and press the FADE button to start recording. To fade out at the end of a track, press the FADE button during the recording process. The signal will fade out and the CDR will stop in the recording pause mode. • This function cannot be used when recording digital signals. Automatic and manual track marking A track mark specifies the end of one track and the beginning of another. The unit inserts track marks automatically when the AUTO TRACK function is turned on, or you can turn off the function and insert them manually. AUTO TRACK function on • Tracks are automatically marked in the recording. For digital sources, the track information recorded in the digital source signal is used. For analog recording, periods of silence (no audio input from the recording source) are interpreted as track separations and a track mark is inserted. # RQT6087
-
 1
1 -
2
-
3
-
4
-
5
-
6
-
7
-
8
-
9
-
10
-
11
-
12
-
13
-
14
-
15
-
16
-
17
-
18
-
19
-
 20
20 -
 21
21 -
 22
22 -
 23
23 -
 24
24 -
 25
25 -
 26
26 -
 27
27 -
 28
28 -
 29
29 -
 30
30 -
31
-
32
-
33
-
34
-
35
-
36
-
37
-
38
-
39
-
40
-
41
-
42
-
43
-
44
-
45
-
46
-
47
-
48
-
49
-
50
 |
 |