Panasonic SLPR300 SLPR300 User Guide - Page 32
Setting The Unit For High-speed Recording, Setting The Auto Track Spacing Function
 |
View all Panasonic SLPR300 manuals
Add to My Manuals
Save this manual to your list of manuals |
Page 32 highlights
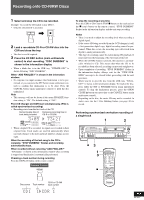
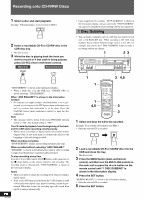
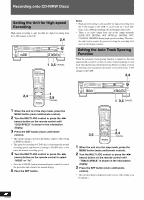
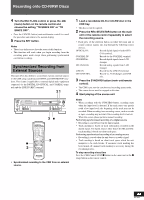
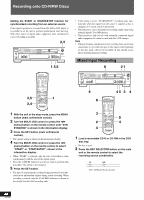
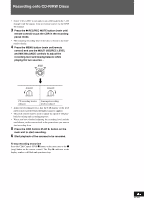
Recording onto CD-R/RW Discs Setting the Unit for High-speed Recording High-speed recording is only possible for digital recording from the 3-CD changer to the CD. 2,4 POWER COMPACT DISC RECORDER SL-PR300 PHONES MIN MAX PLAY MODE CD EDIT CD REC DISC 3 DISC 2 DISC 1 OPEN / CLOSE DISC SELECTOR 3 2 1 OPEN / CLOSE MULTI JOG REC LEVEL - + DIGITAL CD LINE REC SELECTOR SYNCHRO FINALIZE MENU SET CANCEL REC/ REC MUTE MIX BALANCE LINE CD 1 3,5 CANCEL DISC SELECTOR CD1 CD2 CD3 CD REC CD EDIT FINALIZE DISPLAY 1 2 3 4 5 6 7 8 9 0 PLAY MODE >_10 CONTROL REPEAT CD CD-R/RW •REC REC MUTE FADE SYNCHRO 2,4 RSEECLECTOR PITCH+ SET PITCH 0 PITCH- MENU CANCEL COMPACT DISC RECORDER RAK-PR300 1 3,5 CANCEL 1 When the unit is in the stop mode, press the MENU button (main unit/remote control). 2 Turn the MULTI JOG control or press the P/p (menu) button on the remote control until "DUB-SPEED" is shown in the information display. 3 Press the SET button (main unit/remote control). • The current setting is shown in the display window. (The setting is HIGH by default.) • The speed for recording to CD-R discs is four times the normal recording speed, and that for recording to CD-RW discs is two times the normal recording speed. 4 Turn the MULTI JOG control or press the P/p (menu) button on the remote control to select "HIGH" or "1x". • Press the CANCEL button (main unit/remote control) to cancel the procedure and return to the normal display. 5 Pess the SET button. Notes • High-speed recording is only possible for digital recording from the 3-CD changer to the CDR. It can be used for 1-track dubbing, 1-disc dubbing, listening edit and program edit modes. • There is no audio output from any of the output terminals (LINE OUT, DIGITAL OUT OPTICAL, DIGITAL OUT, COAXIAL, PHONES) during high-speed recording. Therefore, the only way to monitor the process is using the recording level meter in the display window. Setting the Auto Track Spacing Function When the automatic track spacing function is turned on, the unit automatically records 2 seconds of silence at the beginning of each track when performing synchronized one-button recording or using the listening edit or program edit modes to record from the 3-CD changer to the CDR. 2,4 POWER COMPACT DISC RECORDER SL-PR300 PHONES MIN MAX PLAY MODE CD EDIT CD REC DISC 3 DISC 2 DISC 1 OPEN / CLOSE DISC SELECTOR 3 2 1 OPEN / CLOSE MULTI JOG REC LEVEL - + DIGITAL CD LINE REC SELECTOR SYNCHRO FINALIZE MENU SET CANCEL REC/ REC MUTE MIX BALANCE LINE CD 1 3,5 CANCEL DISC SELECTOR CD1 CD2 CD3 CD REC CD EDIT FINALIZE DISPLAY 1 2 3 4 5 6 7 8 9 0 PLAY MODE >_10 CONTROL REPEAT CD CD-R/RW •REC REC MUTE FADE SYNCHRO 3,5 RSEECLECTOR PITCH+ SET PITCH 0 PITCH- MENU CANCEL 1 2,4 CANCEL COMPACT DISC RECORDER RAK-PR300 1 When the unit is in the stop mode, press the MENU button (main unit/remote control). 2 Turn the MULTI JOG control or press the P/p (menu) button on the remote control until "TRACK SPACE" is shown in the information display. 3 Press the SET button (main unit/remote control). • The current setting is displayed on the screen. (The setting is on by default.) ! RQT6087
-
 1
1 -
2
-
3
-
4
-
5
-
6
-
7
-
8
-
9
-
10
-
11
-
12
-
13
-
14
-
15
-
16
-
17
-
18
-
19
-
20
-
21
-
22
-
23
-
24
-
25
-
26
-
 27
27 -
 28
28 -
 29
29 -
 30
30 -
 31
31 -
 32
32 -
 33
33 -
 34
34 -
 35
35 -
 36
36 -
 37
37 -
38
-
39
-
40
-
41
-
42
-
43
-
44
-
45
-
46
-
47
-
48
-
49
-
50
 |
 |