Panasonic SLPR300 SLPR300 User Guide - Page 29
Listening Edit Recording
 |
View all Panasonic SLPR300 manuals
Add to My Manuals
Save this manual to your list of manuals |
Page 29 highlights
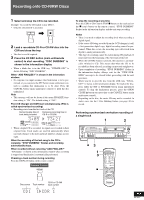
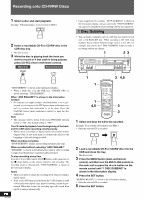
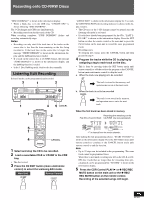
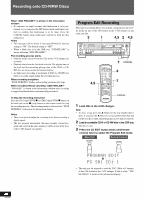
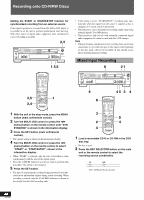
Recording onto CD-R/RW Discs English "DISC DUBBING?" is shown in the information display. • When a blank disc is in the CDR tray, "UPDATE OPC" is shown following "DISC DUBBING". The 3-CD changer and CDR start simultaneously. • Recording starts from the first track of the CD. When recording completes, "STOP DUBBING" flashes and recording automatically stops. Notes • Recording can only start if the total time of the tracks on the source disc is less than the time remaining on the disc being recorded to. If the track time on the source disc is longer, the message "SHORT REMAIN" is shown in the information display and the dubbing function is ended. • If a track on the source disc is of SCMS format, the message "SCMS PROTECT" is shown in the information display, and the dubbing function is ended. • In the 1 Disc Dubbing mode, finalize the disc manually. Listening Edit Recording Selected tracks can be programmed and recorded. 3 1 2 POWER COMPACT DISC RECORDER SL-PR300 PHONES MIN MAX PLAY MODE CD EDIT CD REC DISC 3 DISC 2 DISC 1 OPEN / CLOSE DISC SELECTOR 3 2 1 OPEN / CLOSE MULTI JOG REC LEVEL - + DIGITAL CD LINE REC SELECTOR SYNCHRO FINALIZE MENU SET CANCEL REC/ REC MUTE MIX BALANCE LINE CD 1 4 5 CANCEL 1 5 1 4 DISC SELECTOR CD1 CD2 CD3 CD REC CD EDIT FINALIZE DISPLAY 1 2 3 4 5 6 7 8 9 0 PLAY MODE >_10 REPEAT CONTROL CD CD-R/RW •REC REC MUTE FADE SYNCHRO RSEECLECTOR PITCH+ SET PITCH 0 PITCH- MENU CANCEL COMPACT DISC RECORDER RAK-PR300 3 CANCEL 1 Select and stop the CD to be recorded. 2 Load a recordable CD-R or CD-RW in the CDR tray. • The disc is read. 3 Press the CD EDIT button (main unit/remote control) to select the Listening Edit mode. Main Unit Remote Control CD EDIT CD EDIT "LISTEN EDIT" is shown in the information display for 3 seconds, the LISTENING EDIT edit recording indicator is shown in the display window. • The CD trays of the 3-CD changer cannot be opened once the listening edit mode is activated. • If tracks have already been programmed for the CDs, "LAST L- PG OK?" is shown in the information display. Press the SET button on either the remote control or the main unit or press the PLAY button on the main unit to record the same programmed tracks. Recording starts. To program new tracks, press the CANCEL button and then proceed to step 4. 4 Program the tracks while the CD is playing by assigning a tag to each track on the disc. • This is done by pressing either the SET button (main unit/ remote control) to add the track to the program or the CANCEL button (main unit/remote control) to skip the track. a. When the track now playing is to be recorded SET The track is stored in the memory, and operation moves on to the next track. b. When the track is not to be recorded CANCEL The track is not stored in the memory, and operation moves on to the next track. When the first track has been stored in memory Recording time remaining on the Play time of second track CD-R/RW disc (pre-calculated) CD PLAYER LISTENING EDIT CD REC 23 4 5 6 7 8 9 10 DIGITAL 44.1kHz SYNCHRO REC HIGH SPEED AUTO TRACK CD-R LR- 40 30 20 15 10 6 3 0 dB "1" is cleared from the music calendar. After making the last programming choice, "START TO DUB?" is shown in the information display. Press the SET button (main unit/ remote control) to continue or the CANCEL button (main unit/ remote control) to end the function. Note • Up to 32 steps can be included in the programming. The same track cannot be programmed twice. When there is not much recording time left on the CD-R or CDRW disc, tracks that are longer than the remaining time (precalculated) can be programmed but "NO REM" is shown in the information display. 5 Press the CDR Control PLAY p or 1 REC/REC MUTE button on the main unit or the 1 REC/ REC MUTE button on the remote control. Recording of the selected songs will begin. ' RQT6087
-
 1
1 -
2
-
3
-
4
-
5
-
6
-
7
-
8
-
9
-
10
-
11
-
12
-
13
-
14
-
15
-
16
-
17
-
18
-
19
-
20
-
21
-
22
-
23
-
 24
24 -
 25
25 -
 26
26 -
 27
27 -
 28
28 -
 29
29 -
 30
30 -
 31
31 -
 32
32 -
 33
33 -
 34
34 -
35
-
36
-
37
-
38
-
39
-
40
-
41
-
42
-
43
-
44
-
45
-
46
-
47
-
48
-
49
-
50
 |
 |