Pentax PZ-10 PZ-10 Manual - Page 13
responsibilities
 |
View all Pentax PZ-10 manuals
Add to My Manuals
Save this manual to your list of manuals |
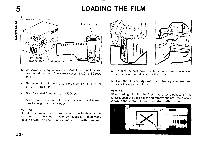
Page 13 highlights
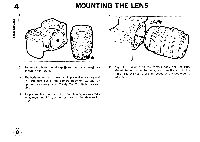
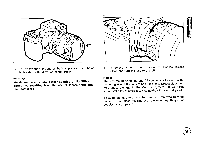
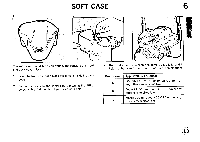
3 ♦ I O 3. To remove the front cap of the lens, press in the tabs on both sides in the direction of the arrow. Warning: We do not assume any responsibilities or liabilities for difficulties resulting from the use of lenses from other manufacturers. * To remove the ens, press down on the lens-lock-release button and turn the lens to the left. Notes: The lens mounting flange and AF coupler are located on the mounting side of the camera body and lens. Dirt, dust, or mold may cause damage to the electrical system. If your lens should get dirty or smudged, wipe gently with a soft, dry cloth. To avoid damage to a lens that has been removed from the camera body, place the lens with the mounting flange and coupler facing upward.
-
 1
1 -
2
-
3
-
4
-
5
-
6
-
7
-
 8
8 -
 9
9 -
 10
10 -
 11
11 -
 12
12 -
 13
13 -
 14
14 -
 15
15 -
 16
16 -
 17
17 -
 18
18 -
19
-
20
-
21
-
22
-
23
-
24
-
25
-
26
-
27
-
28
-
29
-
30
-
31
-
32
-
33
-
34
-
35
-
36
-
37
-
38
-
39
-
40
-
41
-
42
-
43
-
44
-
45
-
46
-
47
-
48
-
49
-
50
-
51
-
52
-
53
-
54
-
55
-
56
-
57
-
58
-
59
-
60
-
61
-
62
-
63
-
64
-
65
-
66
-
67
-
68
-
69
-
70
-
71
-
72
 |
 |

3
♦
I
3.
To
remove
the
front
cap
of
the
lens,
press
in
the
tabs
on
both
sides
in
the
direction
of
the
arrow.
Warning:
We
do
not
assume
any
responsibilities
or
liabilities
for
difficulties
resulting
from
the
use
of
lenses
from
other
manufacturers.
O
*
To
remove
the
ens,
press
down
on
the
lens
-lock
-release
button
and
turn
the
lens
to
the
left.
Notes:
The
lens
mounting
flange
and
AF
coupler
are
located
on
the
mounting
side
of
the
camera
body
and
lens.
Dirt,
dust,
or
mold
may
cause
damage
to
the
electrical
system.
If
your
lens
should
get
dirty
or
smudged,
wipe
gently
with
a
soft,
dry
cloth.
To
avoid
damage
to
a
lens
that
has
been
removed
from
the
camera
body,
place
the
lens
with
the
mounting
flange
and
coupler
facing
upward.