Pfaff creative stylist MN 110 Manual - Page 11
Preparation
 |
View all Pfaff creative stylist MN 110 manuals
Add to My Manuals
Save this manual to your list of manuals |
Page 11 highlights
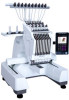
PREPARATION UNPACK YOUR EMBROIDERY MACHINE It is recommended to keep all shipping materials. Practice safety by using two (2) people to carry the embroidery machine. 1. Carefully remove the box by pulling upwards, using the cutouts found on the sides of the box. 2. Identify all of the accessories encased within the exterior of the styrofoam surrounding the embroidery machine. 3. Remove the accessories: • Cap driver • Thread stand • Flat hoop support • Toolbox • Ethernet cable • Cap station • Thread cone holders • Embroidery hoops • Connecting cable • Power cord ! 4. Remove the styrofoam. 5. Remove the Velcro tie from the plastic bag covering the embroidery machine. 6. Pull the plastic cover down. 7. Lift the embroidery machine from the bottom and place it on top of the stand. Use caution. 8. Remove the protection film. ADJUST AND SECURE YOUR EMBROIDERY MACHINE To avoid accidents or injuries, lift the embroidery machine between two (2) people. Keep the embroidery machine two inches (50 mm) away from the wall. Do not block the embroidery machine's ventilation. • Set up the embroidery machine on top of a leveled, balanced, and durable surface. Make sure to remove all packaging materials from the embroidery machine. • Adjust the height of the base feet by rotating the adjusting nuts (1) clockwise or counter clockwise. Once desired height has been achieved, lock the base feet by tightening the lock nut (2). Make sure all feet have the same height. • Adjust the length of the display arm, by loosening the adjusting knobs (3). 2 • Tilt the display by loosening the panel adjusting 1 knob (4), then tighten it again to hold the panel in place. 3 4 PREPARATIONS - 11
-
 1
1 -
2
-
3
-
4
-
5
-
 6
6 -
 7
7 -
 8
8 -
 9
9 -
 10
10 -
 11
11 -
 12
12 -
 13
13 -
 14
14 -
 15
15 -
 16
16 -
17
-
18
-
19
-
20
-
21
-
22
-
23
-
24
-
25
-
26
-
27
-
28
-
29
-
30
-
31
-
32
-
33
-
34
-
35
-
36
-
37
-
38
-
39
-
40
-
41
-
42
-
43
-
44
-
45
-
46
-
47
-
48
-
49
-
50
-
51
-
52
-
53
-
54
-
55
-
56
 |
 |
