Pfaff creative stylist MN 110 Manual - Page 47
Error Messages
 |
View all Pfaff creative stylist MN 110 manuals
Add to My Manuals
Save this manual to your list of manuals |
Page 47 highlights
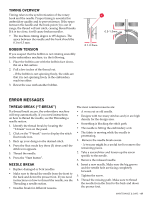
TIMING OVERVIEW Timing refers to the synchronization of the rotary 1 hook and the needle. Proper timing is essential for embroidery quality and to prevent issues. If the space between the needle and the hook point (1) is out of range, the thread will not catch, causing thread breaks. If it is too close, it will cause broken needles. • The machines timing degree is 195 degrees. The space between the needle and the hook should be 0.1 to 0.3 mm. BOBBIN TENSION If you suspect that the bobbin is not rotating smoothly in the embroidery machine, try the following. 1. Place the bobbin case with the bobbin face down, flat on a flat surface. 2. Pull a few inches of the thread out. - If the bobbin is not spinning freely, the odds are that it is not spinning freely in the embroidery machine either. 3. Retest the case with another bobbin. ERROR MESSAGES THREAD BREAK ("T-BREAK") If a thread break occurs, the embroidery machine will stop automatically. If you need instructions on how to thread the needle, see the Threading a needle section. 1. Identify the thread break by locating the "T-break" icon on the panel. 2. Click on the "T-break" icon to display the stitch float mode icon. 3. Back up your design to the desired stitch. 4. Press the float mode key three (3) times until the stitch icon appears. 5. Thread the needle. 6. Press the "Start button". NEEDLE BREAK • Replace damaged or bent needles. • Make sure to thread the needle from the front to the back and down the presser foot. If you need instructions on how to thread the needle, see the Threading a needle section. • Needles break for different reasons. The most common reasons are: • A worn out or old needle. • Designs with too many stitches and/or are high density for the design area. • Something is blocking the stitch path. • The needle is hitting the embroidery unit. • The fabric is moving while the needle is penetrating. 1. Remove the needle break excess. - A tweezer might be a useful tool to remove the remaining pieces. 2. Take a screwdriver and loosen up the screw specific to the needle. 3. Remove the released needle. 4. Insert a new needle. Make sure the big groove and the needle hole are facing completely forward. 5. Tighten the screw. 6. Thread the missing path. Make sure to thread the needle from the front to the back and down the presser foot. MAINTENANCE & CARE - 47
-
 1
1 -
2
-
3
-
4
-
5
-
6
-
7
-
8
-
9
-
10
-
11
-
12
-
13
-
14
-
15
-
16
-
17
-
18
-
19
-
20
-
21
-
22
-
23
-
24
-
25
-
26
-
27
-
28
-
29
-
30
-
31
-
32
-
33
-
34
-
35
-
36
-
37
-
38
-
39
-
40
-
41
-
 42
42 -
 43
43 -
 44
44 -
 45
45 -
 46
46 -
 47
47 -
 48
48 -
 49
49 -
 50
50 -
 51
51 -
 52
52 -
53
-
54
-
55
-
56
 |
 |
