Pfaff creative stylist MN 110 Manual - Page 52
Anatomy Of A Needle, Needle Lifetime, When To Change The Needle, Selecting A Needle, Topping, Poly
 |
View all Pfaff creative stylist MN 110 manuals
Add to My Manuals
Save this manual to your list of manuals |
Page 52 highlights
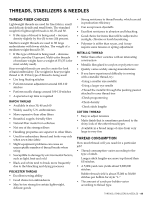
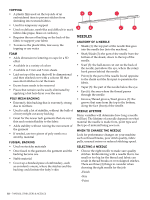
TOPPING • A plastic film used on the top side of an embroidered item to prevent stitches from shrinking into textured fabrics • Used for temporary support • Used on delicate, mesh-like and difficult to mark fabrics like pique, fleece or corduroy • Requires the use of backing on the back of the fabric to support your fabric • To remove the plastic film, tear-away the topping or use water FOAM • Adds dimension to lettering on caps for a 3D effect • Available in a variety of colors • Available in 2 mm and 3 mm sheets • Laid on top of the area that will be dimensional and then stitched over with a column fill that uses short stitches to cut the foam • Excess foam needs to be removed • Pieces that remain can be easily eliminated by applying a hot hair dryer over the area POLY MESH BACKING • Extremely thin backing that is extremely strong due to its fibers • Used to add a lot of stability, without the bulk of a heavyweight cut-away backing • Great for the newer tech garments that are very thin and contain fluidity to the fabric • Adds stability without ruining the movement of the garment • If needed, use two pieces of poly mesh on a stretchy material FUSIBAL BACKING • Used on stretchy materials • Once fused to the garment, the garment and the backing become one • Stable material • Cover up a finished piece of embroidery, such as an infant's onesie, where the stitches and the backing could irritate the baby's skin 56 7 4 3 2 1 NEEDLES ANATOMY OF A NEEDLE • Shank (1): the top part of the needle that goes into the needle bar (into the machine). • Shaft/blade (2): the part of the needle from the bottom of the shank, down to the top of the needle. • Scarf (3): the half-moon cut out on the back of the needle, just above the eye, where the rotary hook passes behind the needle. • Point (4): the part of the needle found opposite to the shank and the first part to penetrate the fabric. • Taper (5): the part of the needle below the eye. • Eye (6): the area where the thread passes through the needle. • Groove/thread groove/front groove (7): the groove that runs from the top to the bottom, along the face (front) of the needle. NEEDLE LIFETIME Many variables will determine how long a needle will last. The lifetime of a needle depends on what material the needle is made from, point type and the type of material being sewn on. WHEN TO CHANGE THE NEEDLE Look for performance changes on your machine such as thread breaks, poor stitch quality, fabric pulls, unusual noises or reduced stitching speed. SELECTING A NEEDLE • Choose the right needle to make sure quality stitches. Embroidering with a needle that is too small or too big for the thread and fabric can result in thread breaks or even skipped stitches. There are three (3) things to consider when choosing the right needle for the job: -Finish -Size -Point 52 - THREADS, STABILIZERS & NEEDLES
-
 1
1 -
2
-
3
-
4
-
5
-
6
-
7
-
8
-
9
-
10
-
11
-
12
-
13
-
14
-
15
-
16
-
17
-
18
-
19
-
20
-
21
-
22
-
23
-
24
-
25
-
26
-
27
-
28
-
29
-
30
-
31
-
32
-
33
-
34
-
35
-
36
-
37
-
38
-
39
-
40
-
41
-
42
-
43
-
44
-
45
-
46
-
 47
47 -
 48
48 -
 49
49 -
 50
50 -
 51
51 -
 52
52 -
 53
53 -
 54
54 -
 55
55 -
 56
56
 |
 |
