Pioneer AVH-X4800BS Owner s Manual - Page 47
Audio adjustments, Theme menu - custom background
 |
View all Pioneer AVH-X4800BS manuals
Add to My Manuals
Save this manual to your list of manuals |
Page 47 highlights
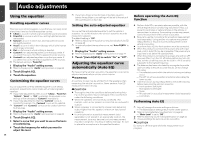
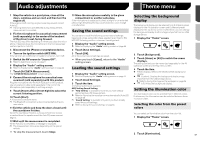
Audio adjustments Theme menu 1 Stop the vehicle in a quiet place, close all the doors, windows and sun roof, and then turn the engine off. If the engine is left running, engine noise may prevent correct Auto EQ. p If driving restrictions are detected during measurement, measurement is canceled. 2 Fix the microphone for acoustical measurement (sold separately) in the center of the headrest of the driver's seat, facing forward. The Auto EQ may differ depending on where you place the microphone. If desired, place the microphone on the front passenger seat and perform Auto EQ. 13 Store the microphone carefully in the glove compartment or another safe place. If the microphone is subjected to direct sunlight for an extended period, high temperatures may cause distortion, color change or malfunction. Saving the sound settings You can save to recall the following current sound settings: bass boost, slope, subwoofer phase, speaker level, Graphic EQ, HPF/LPF, listening position, crossover, time alignment. 1 Display the "Audio" setting screen. Refer to Displaying the "Audio" setting screen on page 44 Selecting the background display The background display can be selected from 9 different preset displays for the AV operation screen and 6 different preset displays for the Top menu screen. Furthermore, you can change the background display to other images imported from an USB storage device. 1 Display the "Theme" screen. 3 Disconnect the iPhone or smartphone device. 2 Touch [Save Settings]. 4 Turn on the ignition switch (ACC ON). If the vehicle's air conditioner or heater is turned on, turn it off. 5 Switch the AV source to "Source OFF". Refer to Selecting a source on page 11 6 Display the "Audio" setting screen. Refer to Displaying the "Audio" setting screen on page 44 7 Touch [A-EQ&TA Measurement]. The "A-EQ&TA Measurement" screen appears. 8 Connect the microphone for acoustical measurement (sold separately) with this product. Plug the microphone into the AUX input jack on this product. Use an extension cable (sold separately) if the cord of the Microphone (sold separately) is not long enough. 9 Touch [Front Left] or [Front Right] to select the current listening position. 10 Touch [Start]. A 10-second countdown starts. p The Bluetooth connection is disconnected before the pro- cess starts. 11 Exit the vehicle and keep the doors closed until the countdown finishes. When the countdown finishes, a measurement tone (noise) is emitted from the speakers and the Auto EQ measurement begins. 3 Touch [OK]. All of the current sound settings are saved. When you touch [Cancel], return to the "Audio" setting screen. Loading the sound settings 1 Display the "Audio" setting screen. Refer to Displaying the "Audio" setting screen on page 44 2 Touch [Load Settings]. 3 Touch the item. The following items are available: AEQ Setting,Sound Setting. p "AEQ Setting" is available only when you have already performed Auto EQ measurement. Refer to Adjusting the equalizer curve automatically (Auto EQ) on page 46 p "Sound Setting" is available only when you have already saved the sound settings. Refer to Saving the sound settings on page 47 2 Touch [Background]. 3 Touch [Home] or [AV] to switch the screen displays. The setting contents can be memorized separately for the AV operation screen and the Top menu screen. 4 Touch the item. Preset displays: Selects the desired preset background display. (custom): Displays the background display image imported from the USB storage device. Refer to Saving the image as the wallpaper on page 26 (off): Hides the background display. Setting the illumination color The illumination color can be selected from 7 different colors. Furthermore, the illumination can be switched between these 7 colors in order. Selecting the color from the preset colors You can select an illumination color from the color list. 1 Display the "Theme" screen. 12 Wait until the measurement is completed. When Auto EQ is completed, a message is displayed. p The measurement time varies depending on the type of vehicle. To stop the measurement, touch [Stop]. 2 Touch [Illumination]. 47
-
 1
1 -
2
-
3
-
4
-
5
-
6
-
7
-
8
-
9
-
10
-
11
-
12
-
13
-
14
-
15
-
16
-
17
-
18
-
19
-
20
-
21
-
22
-
23
-
24
-
25
-
26
-
27
-
28
-
29
-
30
-
31
-
32
-
33
-
34
-
35
-
36
-
37
-
38
-
39
-
40
-
41
-
 42
42 -
 43
43 -
 44
44 -
 45
45 -
 46
46 -
 47
47 -
 48
48 -
 49
49 -
 50
50 -
 51
51 -
 52
52 -
53
-
54
-
55
-
56
-
57
-
58
-
59
-
60
-
61
-
62
-
63
-
64
-
65
-
66
-
67
-
68
-
69
-
70
-
71
-
72
-
73
-
74
-
75
-
76
-
77
-
78
-
79
-
80
-
81
-
82
-
83
-
84
-
85
-
86
-
87
-
88
-
89
-
90
-
91
-
92
-
93
-
94
-
95
-
96
-
97
-
98
-
99
-
100
-
101
-
102
-
103
-
104
-
105
-
106
-
107
-
108
-
109
-
110
-
111
-
112
-
113
-
114
-
115
-
116
-
117
-
118
-
119
-
120
-
121
-
122
-
123
-
124
-
125
-
126
-
127
-
128
-
129
-
130
-
131
-
132
-
133
-
134
-
135
-
136
-
137
-
138
-
139
-
140
-
141
-
142
-
143
-
144
-
145
-
146
-
147
-
148
-
149
-
150
-
151
-
152
-
153
-
154
-
155
-
156
-
157
-
158
-
159
-
160
-
161
-
162
-
163
-
164
-
165
-
166
-
167
-
168
-
169
-
170
-
171
-
172
-
173
-
174
-
175
-
176
-
177
-
178
-
179
-
180
-
181
-
182
-
183
-
184
-
185
-
186
-
187
-
188
-
189
-
190
-
191
-
192
-
193
-
194
-
195
-
196
-
197
-
198
-
199
-
200
-
201
-
202
-
203
-
204
-
205
-
206
-
207
-
208
-
209
-
210
-
211
-
212
-
213
-
214
-
215
-
216
 |
 |
