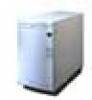
Pioneer DRM-1004 Operating Instructions - Page 10
Install, Exchanging, Discs
 |
View all Pioneer DRM-1004 manuals
Add to My Manuals
Save this manual to your list of manuals |
Page 10 highlights
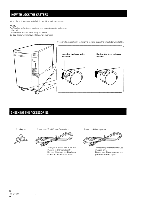
HOW TO INSTALL OR EXCHANGING DISCS Method of inserting discs one by one issu- Method of inserting discs one by one by ing commands from the host computer operating the Changer control panel The disc installation, removal and exchanging methods are basically identical. To simply install a disc, place a disc on the tray. To simply remove a disc, remove the disc from the tray. To exchange a disc, remove the disc on the tray and place another disc on it. 1. Issue the POSITION TO ELEMENT command from the host computer. • The mail slot opens. 2. Place a disc on the disc tray, with the label side facing up. Only one disc can be loaded in the tray of the mail slot, Do not load more than one disc to prevent malfunction. When placing a disc on the mail slot tray, place the disc with the label side up so that it comes below the black parts on the left and right of the deep of the tray. • To exchange discs Remove the disc on the tray and place the replacement disc on the tray. • To install a disc Place the disc on the tray. • To remove a disc CD Take out the disc on the tray. 3. Press the MAIL SLOT OPEN/CLOSE button. • The MAIL SLOT closes. The disc installation, removal and exchanging methods are basically identical. To simply install a disc, place a disc on the tray. To simply remove a disc, remove the disc from the tray. To exchange a disc, remove the disc on the tray and place another disc on it. 1. Insert the key into the Key switch and turn it clockwise to the UNLOCK position. • The switch is usually in the LOCK position while the key is not inserted. 0000 000 Lap • UNLOCK 2. Specify the address to insert the disc with the numeric buttons of the control panel. • The address is originally a hex code between 0001h and 0064h. However, in this case, specify it with a decimal number between 1 and 100. • For example, pressing key "1" means address #1 and CH 1 appears on the mode indicator,. 78 9 OOO 4 5 n 1 23 OOO 0 ESC ENT n oaa0000 4. Issue the MOVE MEDIUM command from the host computer. • The disc in the MAIL SLOT is stroed in the magazine. It is possible to install 100 discs by repeating the above steps, but this requires to operate both the host computer and Changer. Meanwhile, the following method allows to install discs by operating only the control panel of the Changer. 3. Press the ENT (ENTER) button of the control panel. • The mail slot opens. 4. Place a disc on the disc tray, with the label side facing up. Only one disc can be loaded in the tray of the mail slot. Do not load more than one disc to prevent malfunction, When placing a disc on the mail slot tray, place the disc with the label side up so that it comes below the black parts on the left and right of the deep of the tray. • To exchange discs Remove the disc on the tray and place the replacement disc on the tray. • To install a disc Place the disc on the tray. • To remove a disc Take out the disc on the tray. 10 En
-
 1
1 -
2
-
3
-
4
-
 5
5 -
 6
6 -
 7
7 -
 8
8 -
 9
9 -
 10
10 -
 11
11 -
 12
12 -
 13
13 -
 14
14 -
 15
15 -
16
-
17
-
18
-
19
-
20
-
21
-
22
-
23
-
24
-
25
-
26
-
27
-
28
-
29
-
30
-
31
-
32
-
33
-
34
-
35
-
36
-
37
-
38
-
39
-
40
-
41
-
42
-
43
-
44
-
45
-
46
-
47
-
48
-
49
-
50
-
51
-
52
 |
 |
