Pioneer DRM-1004 Operating Instructions - Page 8
Optional, Drive, Installation
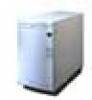 |
View all Pioneer DRM-1004 manuals
Add to My Manuals
Save this manual to your list of manuals |
Page 8 highlights
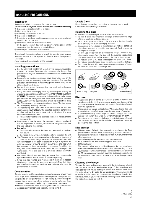
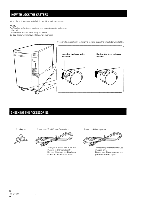
PANEL FACILITIES REAR VIEW SIGNAL GND 20V 100V 230V r © SCSI connector © Function switches for Changer 1: When components are connected through the SCSI connection, the terminator should be attached to the last component in the OFF 11-10. ON connection. In case this Changer is the last SCSI TERMINATOR component, set this switch to the ON position. 2: Reserved ® SCSI ID switch for Changer Assign the ID number of the machine. Assign a unique SCSI ID to each unit when several units are used on a same SCSI bus (in a daisy chain). Be careful to never assign the same number to more than one component. If an identical number is assigned to more than one component, system operation will be impossible. NOTE: When setting the SCSI IDs, be carefulnot to leave the pointer arrow of the SCSI ID switch between two figures; be sure to set the switch so that the arrow points a single figure. ® Drive 1 installation location ® Drive 2 installation location 0 Drive 3 installation location (D Drive 4 installation location ® Ground (GND) terminal ® VOLTAGE SELECTOR Refer to page 4. 10 AC inlet OPTIONAL DRIVE AND INSTALLATION The Optional Drive (Sold Separately) • DVD-ROM drive unit [DVD-D302] • CD-R drive unit [DR-R102] With this changer, customers have to separately purchase the optional drive that matches their specifications. The bay where the optional drive is installed is on the rear of the machine where up to four can be installed. (Because the maximum number that can be installed varies depending on the drive, refer to the instruction manual for the driver you are using for details.) For the latest information about the types and model numbers of the drives that are compatible with this machine, inquire at the dealer where you purchased it or at our home page. Caution: Installing the optional drive Because installing an optional drive requires considerable specialized expertise and must be done safely, our service department will install it for you. Please inquire at the dealer where you purchased the machine for details. 8 En
-
 1
1 -
2
-
 3
3 -
 4
4 -
 5
5 -
 6
6 -
 7
7 -
 8
8 -
 9
9 -
 10
10 -
 11
11 -
 12
12 -
 13
13 -
14
-
15
-
16
-
17
-
18
-
19
-
20
-
21
-
22
-
23
-
24
-
25
-
26
-
27
-
28
-
29
-
30
-
31
-
32
-
33
-
34
-
35
-
36
-
37
-
38
-
39
-
40
-
41
-
42
-
43
-
44
-
45
-
46
-
47
-
48
-
49
-
50
-
51
-
52
 |
 |
