Pioneer PDP-5016HD Owner's Manual - Page 25
FAVORITE CH, Tuner Setup, Edit Channel List, CH DELETE, Scan Digital, Channel, Strength, Store
 |
View all Pioneer PDP-5016HD manuals
Add to My Manuals
Save this manual to your list of manuals |
Page 25 highlights
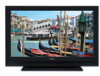
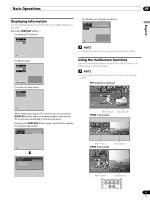
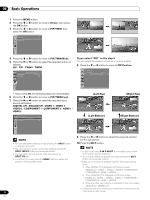
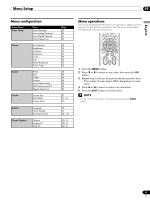
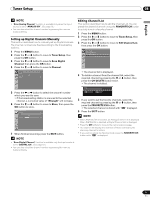
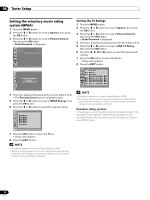
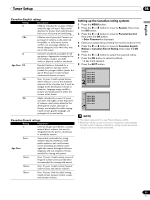
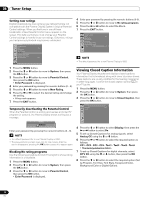
Tuner Setup 08 English • "Scan Analog Channel" function is available only when the input source is set to "ANALOG CH". (See page 19.) • You can also select the channel number by pressing the numeric buttons directly. Setting up Digital Channels Manually This section describes how to manually set up Digital channels. The channel numbers are fixed according to the broadcasting stations. 1 Press the MENU button. 2 Press the c or d button to move to Tuner Setup, then press the OK button. 3 Press the c or d button to move to Scan Digital Channel, then press the OK button. 4 Press the c or d button to move to Channel. Scan Digital Channel Channel Store 6 - 1 Strength DTV 6 30% 5 Press the [ or \ button to select the channel number which you want to scan. • If the broadcasting station is scanned to the selected channel, a numerical value of "Strength" will increase. 6 Press the c or d button to move to Store, then press the OK button to store. Scan Digital Channel Channel Store 6 - 1 Strength DTV 6 30% 7 When finished scanning, press the EXIT button. Editing Channel List This section describes how to edit the Channel List. You can preset the desired channels using the FAVORITE CH button to quickly tune in a favorite channel. 1 Press the MENU button. 2 Press the c or d button to move to Tuner Setup, then press the OK button. 3 Press the c or d button to move to Edit Channel List, then press the OK button. Tuner Setup Scan Channels Scan Analog Channel Scan Digital Channel Edit Channel List • The channel list is displayed. 4 To delete a channel from the channel list, select the required channel by pressing the c or d button, then press the CH DELETE button twice. • The channel is deleted. FAV Favorite Channel DEL Delete FAV FAV 5 If you want to set the favorite channels, select the required channel by pressing the c or d button, then press the FAVORITE CH button. • The selected channel is stored with " FAV " displayed. 6 Press the EXIT button. • When ANALOG CH is selected, an Analog Channel List is displayed. When DIGITAL CH is selected, a Digital Channel List is displayed. • Press the CH buttons to move to the next or previous page. • The channel list displays the channels of those scanned by the scanning channel functions. • If you want to cancel the Favorite mode, press the FAVORITE CH button while " FAV " is displayed. • "Scan Digital Channel" function is available only the input source is set to "DIGITAL CH". (See page 19.) • You can also select the channel number by pressing the numeric buttons directly. 25 En
-
 1
1 -
2
-
3
-
4
-
5
-
6
-
7
-
8
-
9
-
10
-
11
-
12
-
13
-
14
-
15
-
16
-
17
-
18
-
19
-
 20
20 -
 21
21 -
 22
22 -
 23
23 -
 24
24 -
 25
25 -
 26
26 -
 27
27 -
 28
28 -
 29
29 -
 30
30 -
31
-
32
-
33
-
34
-
35
-
36
-
37
-
38
-
39
-
40
-
41
-
42
-
43
-
44
-
45
-
46
-
47
-
48
-
49
-
50
-
51
-
52
-
53
-
54
-
55
-
56
-
57
-
58
-
59
-
60
-
61
-
62
-
63
-
64
-
65
-
66
-
67
-
68
-
69
-
70
-
71
-
72
-
73
-
74
-
75
-
76
-
77
-
78
-
79
-
80
-
81
-
82
-
83
-
84
-
85
-
86
-
87
-
88
-
89
-
90
-
91
-
92
-
93
-
94
-
95
-
96
-
97
-
98
-
99
-
100
-
101
-
102
-
103
-
104
-
105
-
106
-
107
-
108
-
109
-
110
-
111
-
112
-
113
-
114
-
115
-
116
-
117
-
118
-
119
-
120
-
121
-
122
-
123
-
124
-
125
-
126
-
127
-
128
-
129
-
130
-
131
-
132
-
133
-
134
 |
 |