Pioneer PDP-5016HD Owner's Manual - Page 32
Adjustments and Settings
 |
View all Pioneer PDP-5016HD manuals
Add to My Manuals
Save this manual to your list of manuals |
Page 32 highlights
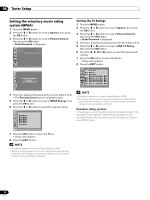
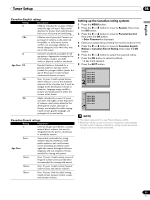
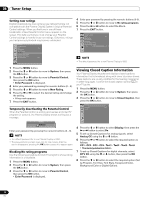
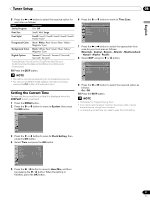
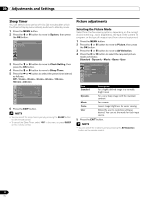
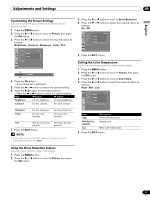
09 Adjustments and Settings Sleep Timer You can select a time period of 10 to 240 minutes after which the Plasma Display automatically switches to standby mode. 1 Press the MENU button. 2 Press the c or d button to move to System, then press the OK button. System Language Clock Setting Parental Control English 3 Press the c or d button to move to Clock Setting, then press the OK button. 4 Press the c or d button to move to Sleep Timer. 5 Press the b or a button to select the preset time interval as follows: Off - 10 min - 20 min - 30 min - 60 min - 120 min 180 min - 240 min Clock Setting Time Time Zone DST On Timer Off Timer Auto Power Off Sleep Timer am 9 : 30 Hawaii On On am 7 : 00 On am 11 : 00 On Off 6 Press the EXIT button. • You can select the sleep time by simply pressing the SLEEP button on the remote control. • To cancel the Sleep Timer, select "Off" in the menu or press SLEEP on the remote control. Picture adjustments Selecting the Picture Mode Select from the five viewing options, depending on the current environment (e.g., room brightness), the type of the current TV program, or the type of images input from external equipment. 1 Press the MENU button. 2 Press the c or d button to move to Picture, then press the OK button. 3 Press the c or d button to move to AV Selection. 4 Press the b or a button to select the required picture mode as follows: Standard - Dynamic - Movie - Game - User Picture AV Selection Brightness Contrast Sharpness Color Tint Noise Reduction Color Temp Standard 30 30 30 30 30 Off Item Standard Description For a highly defined image in a normally bright room Dynamic For a very sharp image with the maximum contrast Movie For a movie Game Lowers image brightness for easier viewing. User Allows the user to customize setting as desired. You can set the mode for each input source. 5 Press the EXIT button. • You can select the modes by simply pressing the AV Selection button on the remote control. 32 En
-
 1
1 -
2
-
3
-
4
-
5
-
6
-
7
-
8
-
9
-
10
-
11
-
12
-
13
-
14
-
15
-
16
-
17
-
18
-
19
-
20
-
21
-
22
-
23
-
24
-
25
-
26
-
 27
27 -
 28
28 -
 29
29 -
 30
30 -
 31
31 -
 32
32 -
 33
33 -
 34
34 -
 35
35 -
 36
36 -
 37
37 -
38
-
39
-
40
-
41
-
42
-
43
-
44
-
45
-
46
-
47
-
48
-
49
-
50
-
51
-
52
-
53
-
54
-
55
-
56
-
57
-
58
-
59
-
60
-
61
-
62
-
63
-
64
-
65
-
66
-
67
-
68
-
69
-
70
-
71
-
72
-
73
-
74
-
75
-
76
-
77
-
78
-
79
-
80
-
81
-
82
-
83
-
84
-
85
-
86
-
87
-
88
-
89
-
90
-
91
-
92
-
93
-
94
-
95
-
96
-
97
-
98
-
99
-
100
-
101
-
102
-
103
-
104
-
105
-
106
-
107
-
108
-
109
-
110
-
111
-
112
-
113
-
114
-
115
-
116
-
117
-
118
-
119
-
120
-
121
-
122
-
123
-
124
-
125
-
126
-
127
-
128
-
129
-
130
-
131
-
132
-
133
-
134
 |
 |