Pioneer VSX-55TXi Owner's Manual - Page 57
Video Select, Adjusting the Brightness of the Display DIMMER
 |
View all Pioneer VSX-55TXi manuals
Add to My Manuals
Save this manual to your list of manuals |
Page 57 highlights
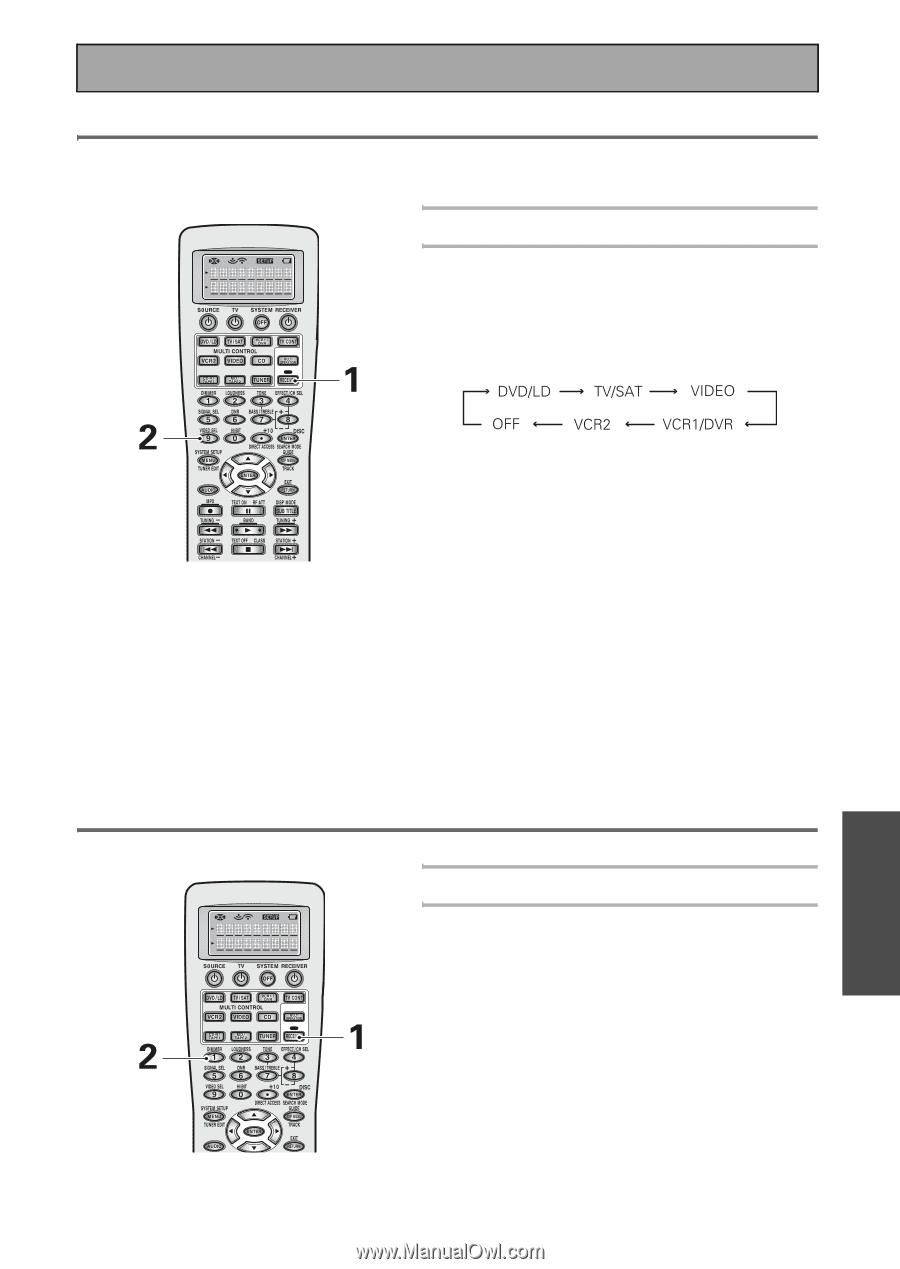
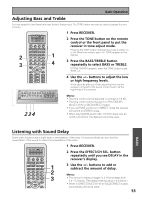
Basic Operation Video Select This function allows you to listen to one sound source while you watch a different video source on your TV. The sound source is set in the normal fashion as explained on page 45. You then change the video input with the VIDEO SEL button. 1 Press RECEIVER. 2 Press the VIDEO SEL button on the remote control to cycle through the different possible video inputs. The first press shows the video input you are currently using. After that pressing VIDEO SELECT cycles though the possibilities in the following order: The OFF setting means you are listening without a video signal. (Also, when you select CD, CD-R/TAPE1, MD/ TAPE2, TUNER, PHONO, USB or unassigned i.LINK components the VIDEO SELECT will be set to off.) Memo: • The VIDEO SELECT remains set to the input you chose until you change the audio input. • If you change audio functions the receiver will reset itself to make the video and audio inputs correspond. Also, if you switch the power of the receiver off when you turn it back on the video and audio inputs will reset so that they correspond. Adjusting the Brightness of the Display (DIMMER) Use the display DIMMER button to adjust the brightness of the fluorescent display. 1 Press RECEIVER. 2 Use the display DIMMER button on the remote control to alternate between the different levels of brightness for the display. Four levels of brightness ranging from very dim to very bright can be selected. Also, when set to very dim, the i.LINK and MCACC indicators will turn off. Memo: It is a feature of this unit that the fluorescent display will be brighter for a few seconds after you choose a function (like DVD/LD, CD, etc.) and then get softer. This will still happen when you adjust the brightness but the new setting will be the one the display softens to. 57 BASIC
-
 1
1 -
2
-
3
-
4
-
5
-
6
-
7
-
8
-
9
-
10
-
11
-
12
-
13
-
14
-
15
-
16
-
17
-
18
-
19
-
20
-
21
-
22
-
23
-
24
-
25
-
26
-
27
-
28
-
29
-
30
-
31
-
32
-
33
-
34
-
35
-
36
-
37
-
38
-
39
-
40
-
41
-
42
-
43
-
44
-
45
-
46
-
47
-
48
-
49
-
50
-
51
-
 52
52 -
 53
53 -
 54
54 -
 55
55 -
 56
56 -
 57
57 -
 58
58 -
 59
59 -
 60
60 -
 61
61 -
 62
62 -
63
-
64
-
65
-
66
-
67
-
68
-
69
-
70
-
71
-
72
-
73
-
74
-
75
-
76
-
77
-
78
-
79
-
80
-
81
-
82
-
83
-
84
-
85
-
86
-
87
-
88
-
89
-
90
-
91
-
92
-
93
-
94
-
95
-
96
-
97
-
98
-
99
-
100
-
101
-
102
-
103
-
104
-
105
-
106
-
107
-
108
-
109
-
110
-
111
-
112
-
113
-
114
-
115
-
116
-
117
-
118
-
119
 |
 |