Pioneer VSX81TXV Owner's Manual - Page 12
Connecting your equipment, When making cable connections, About the video converter - subwoofer
 |
UPC - 012562811048
View all Pioneer VSX81TXV manuals
Add to My Manuals
Save this manual to your list of manuals |
Page 12 highlights
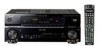
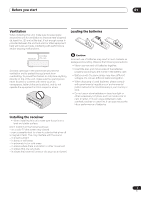
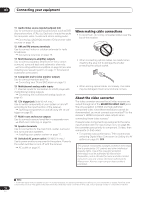
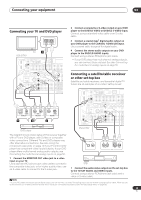
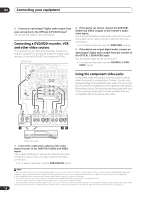
03 Connecting your equipment 11 Audio/video source inputs/(outputs) (x6) Use for connection to audio/visual sources, such as DVD players/recorders, VCRs, etc. Each set of inputs has jacks for composite video, S-video and stereo analog audio. Connecting a DVD/HDD recorder, VCR and other video sources on page 14. 12 AM and FM antenna terminals Use to connect indoor or outdoor antennas for radio broadcasts. Connecting antennas on page 19. 13 Multichannel pre-amplifier outputs Use to connect separate amplifiers for front, center, surround, surround back and subwoofer channels. Connecting additional amplifiers on page 52 (see also Installing your speaker system on page 17 for powered subwoofer connection). 14 Composite and S-video monitor outputs Use to connect monitors and TVs. Connecting your TV and DVD player on page 13. 15 Multichannel analog audio inputs 7.1 channel inputs for connection to a DVD player with multichannel analog outputs. Connecting the multichannel analog inputs on page 50. 16 12V trigger jack (total 50 mA max.) Use to switch components in your system on and off according to the input function of the receiver. Switching components on and off using the 12 volt trigger on page 55. 17 Multi-room and source outputs Use to connect a second amplifier in a separate room. Multi-room listening on page 53. 18 Speaker terminals Use for connection to the main front, center, surround and surround back speakers. Installing your speaker system on page 17. 19 Switched AC power outlet (100 W/0.8 A max.) Use to power another component in the system. Power to the outlet switches on and off with the receiver. AC outlet on page 20. When making cable connections • To avoid hum, do not lay connected cables over the top of the receiver. • When connecting optical cables, be careful when inserting the plug not to damage the shutter protecting the optical socket. • When storing optical cable, coil loosely. The cable may be damaged if bent around sharp corners. About the video converter The video converter ensures that all video sources are output through all of the MONITOR VIDEO OUT jacks. The only exception is HDMI and high-definition component video: since these resolutions cannot be downsampled, you must connect your monitor/TV to the receiver's HDMI/component video outputs when connecting these video sources.1 If several video components are assigned to the same input function (see The Input Setup menu on page 58), the converter gives priority to component, S-video, then composite (in that order). • For optimal video performance, THX recommends switching Digital Video Conversion (in Setting the AV options on page 61) OFF. This product incorporates copyright protection technology that is protected by U.S. patents and other intellectual property rights. Use of this copyright protection technology must be authorized by Macrovision Corporation, and is intended for home and other limited consumer uses only unless otherwise authorized by Macrovision. Reverse engineering or disassembly is prohibited. Note 1 If the video signal does not appear on your TV or plasma display, try adjusting the resolution settings on your component or display. Note that some components (such as video game units) have resolutions that may not be converted. In this case, use an (analog) S-video or composite connection. 12 En
-
 1
1 -
2
-
3
-
4
-
5
-
6
-
 7
7 -
 8
8 -
 9
9 -
 10
10 -
 11
11 -
 12
12 -
 13
13 -
 14
14 -
 15
15 -
 16
16 -
 17
17 -
18
-
19
-
20
-
21
-
22
-
23
-
24
-
25
-
26
-
27
-
28
-
29
-
30
-
31
-
32
-
33
-
34
-
35
-
36
-
37
-
38
-
39
-
40
-
41
-
42
-
43
-
44
-
45
-
46
-
47
-
48
-
49
-
50
-
51
-
52
-
53
-
54
-
55
-
56
-
57
-
58
-
59
-
60
-
61
-
62
-
63
-
64
-
65
-
66
-
67
-
68
-
69
-
70
-
71
-
72
-
73
-
74
-
75
-
76
-
77
-
78
-
79
-
80
-
81
-
82
-
83
-
84
 |
 |