Pioneer VSX81TXV Owner's Manual - Page 75
Remote control
 |
UPC - 012562811048
View all Pioneer VSX81TXV manuals
Add to My Manuals
Save this manual to your list of manuals |
Page 75 highlights
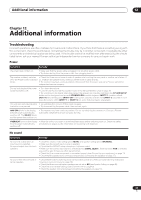
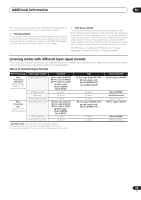
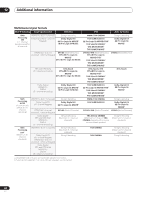
Additional information 12 Symptom Remedy When playing Dolby Digital or DTS sources, the receiver's format indicators do not light. • Check that the player is connected using a digital connection. • Make sure that the receiver is set to AUTO or DIGITAL (see Choosing the input signal on page 29). • Check that the player isn't set up so that Dolby Digital and DTS sources are converted to PCM. • Ensure that if there are several audio tracks on the disc, the Dolby Digital or DTS is selected. When playing certain discs, none • The disc may not contain 5.1/6.1 channel material. Check the disc packaging for more on what audio of the receiver's format tracks are recorded on the disc. indicators light. When playing a disc, the • Make sure that the receiver is set to AUTO or DIGITAL (see Choosing the input signal on page 29). 2 PL II or Neo:6 indicator lights • If a two channel soundtrack is currently playing (including Dolby Surround encoded), then this is not a on the receiver. malfunction. Check the disc packaging for details about the audio tracks available. During playback of a Surround • The source may be Dolby Surround EX / DTS ES software, but it has no flag to indicate it is 6.1 EX or DTS ES source on the SBch compatible. Set to SBch ON (see Using surround back channel processing on page 29) then switch to the AUTO setting, the EX and ES THX Surround EX or Standard EX listening mode (see Listening in surround sound on page 26). indicators don't light, or the signal is not properly processed. During playback of DVD-Audio, • This will occur when playing DVD-Audio material over the HDMI connection. This is not a malfunction. the display shows PCM. Remote control Symptom Remedy Cannot be remote controlled. • Try replacing the batteries in the remote control (see Loading the batteries on page 7). • Be sure to operate within 23 feet and a 30º angle of the remote sensor on the front panel (see Operating range of remote control unit on page 22). • Check that there are no obstacles between the receiver and the remote control. • Make sure that there is no fluorescent or other strong light shining on to the remote sensor. • Check the connections of the CONTROL IN jack (see Operating other Pioneer components with this unit's sensor on page 70). Other components can't be • If the battery ran down, the preset codes may have been cleared. Re-enter the preset codes. operated with the system remote. • The preset code may be incorrect. Redo the procedure for entering preset codes. The SR cable is connected, but • Reinsert the SR cable, making sure it's connected to the right jack (see Using this receiver with a Pioneer the connected components can't plasma display on page 55). be operated with the remote. • Make sure that there is an analog connection between the units. This is necessary for the SR feature to work. • Check that the other component is made by Pioneer. The SR feature only works with Pioneer equipment. • Check that the IR receiver setting in Multi-Room and IR receiver setup on page 59 is correct. HDMI Symptom The HDMI indicator blinks continuously. Remedy • Check all the points below. No picture or sound. No sound, or sound suddenly ceases. Noisy or distorted picture. • This receiver is HDCP-compatible. Check that the components you are connecting are also HDCPcompatible. If they are not, please connect them using the component, S-video or composite video jacks. • Depending on the connected source component, it's possible that it will not work with this receiver (even if it is HDCP-compatible). In this case, connect using the component, S-video or composite video jacks between source and receiver. • If the problem still persists when connecting your HDMI component directly to your monitor, please consult the component or monitor manual or contact the manufacturer for support. • To see the on-screen display, you must also connect the receiver and TV with a composite, component, or S-video cable. • Check that the HDMI AV setting is set to AMP/THROUGH. • If the component is a DVI device, use a separate connection for the audio. • Check the audio output settings of the source component. • If the problem still persists when connecting your HDMI component directly to your monitor, please consult the component or monitor manual or contact the manufacturer for support. 75 En
-
 1
1 -
2
-
3
-
4
-
5
-
6
-
7
-
8
-
9
-
10
-
11
-
12
-
13
-
14
-
15
-
16
-
17
-
18
-
19
-
20
-
21
-
22
-
23
-
24
-
25
-
26
-
27
-
28
-
29
-
30
-
31
-
32
-
33
-
34
-
35
-
36
-
37
-
38
-
39
-
40
-
41
-
42
-
43
-
44
-
45
-
46
-
47
-
48
-
49
-
50
-
51
-
52
-
53
-
54
-
55
-
56
-
57
-
58
-
59
-
60
-
61
-
62
-
63
-
64
-
65
-
66
-
67
-
68
-
69
-
 70
70 -
 71
71 -
 72
72 -
 73
73 -
 74
74 -
 75
75 -
 76
76 -
 77
77 -
 78
78 -
 79
79 -
 80
80 -
81
-
82
-
83
-
84
 |
 |