Ricoh Aficio SP 4410SF User Guide - Page 130
Using the Embedded Web Server for fax setup, Setting the date and time, Continue, Enter, Settings
 |
View all Ricoh Aficio SP 4410SF manuals
Add to My Manuals
Save this manual to your list of manuals |
Page 130 highlights
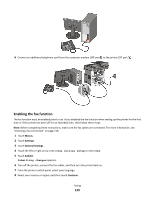
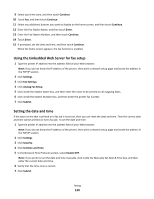
9 Select your time zone, and then touch Continue. 10 Touch Fax, and then touch Continue. 11 Select any additional buttons you want to display on the home screen, and then touch Continue. 12 Enter the Fax Station Name, and then touch Enter. 13 Enter the Fax Station Number, and then touch Continue. 14 Touch Enter. 15 If prompted, set the date and time, and then touch Continue. When the home screen appears, the fax function is enabled. Using the Embedded Web Server for fax setup 1 Type the printer IP address into the address field of your Web browser. Note: If you do not know the IP address of the printer, then print a network setup page and locate the address in the TCP/IP section. 2 Click Settings. 3 Click Fax Settings. 4 Click Analog Fax Setup. 5 Click inside the Station Name box, and then enter the name to be printed on all outgoing faxes. 6 Click inside the Station Number box, and then enter the printer fax number. 7 Click Submit. Setting the date and time If the date or time that is printed on a fax job is incorrect, then you can reset the date and time. Then the correct date and time will be printed on every fax job. To set the date and time: 1 Type the printer IP address into the address field of your Web browser. Note: If you do not know the IP address of the printer, then print a network setup page and locate the address in the TCP/IP section. 2 Click Settings. 3 Click Security. 4 Click Set Date and Time. 5 In the Network Time Protocol section, select Enable NTP. Note: If you prefer to set the date and time manually, click inside the Manually Set Date & Time box, and then enter the current date and time. 6 Verify that the time zone is correct. 7 Click Submit. Faxing 130
-
 1
1 -
2
-
3
-
4
-
5
-
6
-
7
-
8
-
9
-
10
-
11
-
12
-
13
-
14
-
15
-
16
-
17
-
18
-
19
-
20
-
21
-
22
-
23
-
24
-
25
-
26
-
27
-
28
-
29
-
30
-
31
-
32
-
33
-
34
-
35
-
36
-
37
-
38
-
39
-
40
-
41
-
42
-
43
-
44
-
45
-
46
-
47
-
48
-
49
-
50
-
51
-
52
-
53
-
54
-
55
-
56
-
57
-
58
-
59
-
60
-
61
-
62
-
63
-
64
-
65
-
66
-
67
-
68
-
69
-
70
-
71
-
72
-
73
-
74
-
75
-
76
-
77
-
78
-
79
-
80
-
81
-
82
-
83
-
84
-
85
-
86
-
87
-
88
-
89
-
90
-
91
-
92
-
93
-
94
-
95
-
96
-
97
-
98
-
99
-
100
-
101
-
102
-
103
-
104
-
105
-
106
-
107
-
108
-
109
-
110
-
111
-
112
-
113
-
114
-
115
-
116
-
117
-
118
-
119
-
120
-
121
-
122
-
123
-
124
-
 125
125 -
 126
126 -
 127
127 -
 128
128 -
 129
129 -
 130
130 -
 131
131 -
 132
132 -
 133
133 -
 134
134 -
 135
135 -
136
-
137
-
138
-
139
-
140
-
141
-
142
-
143
-
144
-
145
-
146
-
147
-
148
-
149
-
150
-
151
-
152
-
153
-
154
-
155
-
156
-
157
-
158
-
159
-
160
-
161
-
162
-
163
-
164
-
165
-
166
-
167
-
168
-
169
-
170
-
171
-
172
-
173
-
174
-
175
-
176
-
177
-
178
-
179
-
180
-
181
-
182
-
183
-
184
-
185
-
186
-
187
-
188
-
189
-
190
-
191
-
192
-
193
-
194
-
195
-
196
-
197
-
198
-
199
-
200
-
201
-
202
-
203
-
204
-
205
-
206
-
207
-
208
-
209
-
210
-
211
-
212
-
213
-
214
-
215
-
216
-
217
-
218
-
219
-
220
-
221
-
222
-
223
-
224
-
225
-
226
-
227
-
228
-
229
-
230
-
231
-
232
-
233
-
234
-
235
-
236
-
237
-
238
-
239
-
240
-
241
-
242
-
243
-
244
-
245
-
246
-
247
-
248
-
249
-
250
-
251
-
252
-
253
-
254
-
255
-
256
-
257
-
258
-
259
-
260
-
261
-
262
-
263
-
264
-
265
-
266
-
267
-
268
-
269
-
270
-
271
-
272
-
273
-
274
-
275
-
276
-
277
-
278
-
279
-
280
-
281
-
282
-
283
-
284
-
285
-
286
-
287
-
288
-
289
-
290
-
291
-
292
-
293
-
294
-
295
-
296
-
297
-
298
-
299
-
300
-
301
-
302
-
303
-
304
-
305
-
306
-
307
-
308
 |
 |
