Ricoh CL3500N Quick Installation Guide
Ricoh CL3500N - Aficio Color Laser Printer Manual
 |
UPC - 026649024344
View all Ricoh CL3500N manuals
Add to My Manuals
Save this manual to your list of manuals |
Ricoh CL3500N manual content summary:
- Ricoh CL3500N | Quick Installation Guide - Page 1
) Toner Cartridge (Magenta) Photo Conductor Unit (Black) Photo Conductor Unit (Color) Waste Toner Bottle Ferrite Core (2) Color Calibration Sample Sheet Image density adjusting card User registration card Additional Documentation Remove the plastic bag. Position the printer where it is to be used - Ricoh CL3500N | Quick Installation Guide - Page 2
color photo conductor unit. ZHBH380E Lower the inner cover carefully. ZHBH400E ZHBH410E Push the left and right edge of the inner cover to secure it. AJT085S Close the printer's right cover carefully. INSTALLING THE TONER CARTRIDGE Warning • Do not incinerate spilled toner or used toner.Toner - Ricoh CL3500N | Quick Installation Guide - Page 3
Enter} key. List/Test Print: Config.Page The following message appears and the configuration page is printed. Printing... Note ❒ If printing is not normal, check to see if an error message appears on the display. If there is an error message, see "Troubleshooting", Maintenance Guide. ❒ For details - Ricoh CL3500N | Quick Installation Guide - Page 4
window of the CD-ROM to install PCL and RPCS printer drivers. To install the PostScript 3 printer driver, click the [PostScript 3 Printer Driver] button. For more information about the PostScript 3 printer driver, see Software Guide on the CD-ROM labeled "Display-Version Manuals (HTML)" or "Print - Ricoh CL3500N | Quick Installation Guide - Page 5
paper feed unit 15 Loading Paper in the Bypass Tray 20 Switching between Paper Trays 26 Replacing Consumables and Maintenance Kit Replacing the Toner Cartridge 28 Replacing the Waste Toner Bottle 32 Replacing the Photo Conductor Unit 35 Replacing the Fusing Unit 44 When "Replace Fusing Unit - Ricoh CL3500N | Quick Installation Guide - Page 6
Y: Paper Tray" Appears 102 When "Remove Misfeed Z: Duplex Unit" Appears 104 Appendix Moving and Transporting the Printer 106 Moving the Printer 106 Transporting the Printer 107 Consumables ...108 Toner Cartridge ...108 Waste Toner Bottle 109 Photo Conductor Unit 109 Intermediate Transfer Unit - Ricoh CL3500N | Quick Installation Guide - Page 7
This First Trademarks Microsoft, Windows and Windows NT are registered trademarks of Microsoft Corporation in the United States and/or other countries. IPS-PRINT Printer Language Emulation Copyright© 1999-2000 Oak Technology, Inc., All rights reserved. Bluetooth® is a registered trademark of the - Ricoh CL3500N | Quick Installation Guide - Page 8
Read This First How to Read This Manual The following set of symbols is used in this manual. This symbol indicates a potentially hazardous situation that might result in death or serious injury when you misuse the machine without following the instructions under this symbol. Be sure to read the - Ricoh CL3500N | Quick Installation Guide - Page 9
Media Paper and Other Media Supported by This Printer This section describes the paper size, feed direction, and the maximum amount of paper that can be loaded into each paper tray in this printer. ❒ The following symbols and terminology are used to represent the feed direction. In this manual - Ricoh CL3500N | Quick Installation Guide - Page 10
(mm) Bypass Tray Tray 1 Paper Feed Unit (Tray 2/3) C6 Env (4.49 × 6.38 inches) K 114 × 162 DL Env (4.33 × 8.66 inches) K 110 × 220 Monarch Env (3 7/8 × 7 1/2 inches) K 98.4 × 190.5 Custom Size - - 16K (7.68 × 101/2 inches) K 195 × 267 • The size is supported and the printer selects it - Ricoh CL3500N | Quick Installation Guide - Page 11
Media Feed direction Size (inch) Bypass Tray Tray 1 Paper Feed Unit (Tray 2/3) A5 K 5.83" × 8.26 using the control panel. The supported size may differ depending on the printer language you use. Set as a custom size setting using the control panel. The following sizes are supported: • Bypass Tray - Ricoh CL3500N | Quick Installation Guide - Page 12
and Other Media The size is not supported. ❖ Paper weight and number of sheets to be set Tray 1 Paper Feed Unit (Tray 2, Tray 3) Bypass Tray Supported paper weight Maximum number of sheets (plain paper) 60.2 - 104.7 g/m2 (16 - 28 530 (80 g/m2, 20 lb.) lb.) 60.2 - 199 g/m2 (16 - 53 100 (80 - Ricoh CL3500N | Quick Installation Guide - Page 13
following two settings using the control panel: • Press [Paper Input] menu, [Paper Type], and then [Plain Paper]. • Press [Maintenance] menu, and then [Thin] or [Normal]. Printer driver setup Click [Plain] or [Plain & Recycled] in the [Type:] list. Enabled paper feeding tray Any input tray can be - Ricoh CL3500N | Quick Installation Guide - Page 14
guides inside the bypass tray. Not possible • Print speed is slightly slower than when using plain paper. Printer setup Press [Paper Input] menu, [Paper Type], and then [Labels] on the control panel. Printer driver setup Click [Labels] in the [Type:] list. Enabled paper feeding tray Bypass Tray - Ricoh CL3500N | Quick Installation Guide - Page 15
[Paper Input] menu, [Paper Type], and then [Thick Paper 1] or [Thick Paper 2] on the control panel. Printer driver setup Click [Thick1] or [Thick2]in the [Type:] list. Enabled paper feeding tray Bypass Tray: 10 Both-sided printing ❒ Make sure paper is not stacked higher than the paper guides - Ricoh CL3500N | Quick Installation Guide - Page 16
when using paper printed on by other than a laser printer (e.g. monochrome and color copiers, ink-jet printers, etc.) • Special paper, such as thermal paper, aluminum foil, carbon paper and conductive paper • Paper whose weight is heavier or lighter than the limitation • Paper with windows, holes - Ricoh CL3500N | Quick Installation Guide - Page 17
sure to set the print margins correctly by the application. ❖ Paper A Print area B Feed direction C Approx. 5 mm (0.2 inches) D Approx. 5 mm (0.2 inches) ❒ The print area may vary depending on the paper size, printer language and printer driver settings. ❖ Envelope A Print area B Feed direction 13 - Ricoh CL3500N | Quick Installation Guide - Page 18
Paper and Other Media C Approx. 5 mm (0.2 inches) D Approx. 5 mm (0.2 inches) ❒ The print area may vary depending on the paper size, printer language and printer driver settings. 14 - Ricoh CL3500N | Quick Installation Guide - Page 19
the standard paper tray (Tray 1). The same procedure can be used for the optional paper feed unit. ❒ Make sure paper is not stacked above the limit mark inside the tray. Misfeeds might occur. ❒ Do not put different types of paper in a single paper tray. A Pull the paper tray out of the printer until - Ricoh CL3500N | Quick Installation Guide - Page 20
"Push", and then adjust the rear guide to the paper size you want to load. C Adjust the side guides to the paper size you want to load. D Load paper print side up in the paper tray. ❒ Make sure the top of the stack is not higher than the limit mark inside the tray. ❒ To avoid misfeeds, set the side - Ricoh CL3500N | Quick Installation Guide - Page 21
the paper tray fully into the printer. ❒ Misfeeds can occur if the paper tray is not fully inserted. Make sure it is fully inserted. Changing paper size of the paper tray A Pull the paper tray out of the printer until it stops. Lift it slightly, and then pull it fully out. Place the paper tray on - Ricoh CL3500N | Quick Installation Guide - Page 22
Paper and Other Media B Remove the paper. C Press "Push", and then adjust the rear guide to the paper size you are using. D Adjust the side guides to the paper size you want to load. 18 - Ricoh CL3500N | Quick Installation Guide - Page 23
Specifying a paper type for Tray 1 and the optional paper feed unit Improve printer performance by selecting the optimum paper type for the tray. You can select from the following paper types: • Plain Paper, Recycled Paper, Special Paper, Color Paper, Letterhead, Pre- printed A Press the {Menu} key - Ricoh CL3500N | Quick Installation Guide - Page 24
{T} key to display the target paper tray, and then press the {# Enter} key. When the optional paper feed units are installed in the printer, [Tray 2] and [Tray 3] appears (depending on how many units are installed). Paper Type: Tray 2 The paper type selection menu appears. E Press the {U} or {T} key - Ricoh CL3500N | Quick Installation Guide - Page 25
using the control panel or the printer driver. Make sure the settings do not conflict. Conflicting settings can cause paper jams or loss of print quality. ❒ Load paper print side down and in the short-edge feed direction. A Open the bypass tray. B Extend the bypass tray. C Slide the side guides - Ricoh CL3500N | Quick Installation Guide - Page 26
D Adjust the side guides to the paper width. ❒ Check the top of the stack is not higher than the limit mark inside the tray. ❒ To avoid multi-sheet feeds, fan the paper before loading it onto the paper tray. E Set the paper size using the control panel. Press the {Menu} key. The [Menu]screen appears - Ricoh CL3500N | Quick Installation Guide - Page 27
, make settings for thick paper or OHP transparencies using the control panel and printer driver. ❒ The number of pages that can be loaded in the bypass tray differs depending on paper type. Make sure paper is not stacked above the paper guides inside the bypass tray. For details about control - Ricoh CL3500N | Quick Installation Guide - Page 28
Paper Input], and then press the {# Enter} key. Menu: Paper Input The paper selection menu appears. C Check [Bypass Size] appears, and then press the {# Enter} key. The paper size selection menu the {U} or {T} key to set the vertical value, and then press the {# Enter} key. Custom Size: Vert - Ricoh CL3500N | Quick Installation Guide - Page 29
bypass tray. ❒ The paper type selected using the printer driver overrides that selected using the control panel. A Press the {Menu} key. The [Menu]screen appears. B Press the {U} or {T} key to display [Paper Input], and then press the {# Enter} key. Menu: Paper Input The paper selection menu appears - Ricoh CL3500N | Quick Installation Guide - Page 30
] is set with the printer driver, paper will be fed from the standard tray when you start printing. To print on paper loaded in the paper feed unit, switch the tray to be used to the paper feed unit using [Tray Priority] in the [Paper Input] menu. A Press the {Menu} key. The [Menu]screen appears. 26 - Ricoh CL3500N | Quick Installation Guide - Page 31
press the {# Enter} key. Menu: Paper Input The paper selection menu appears. C Press the {U} or {T} key to display [Tray Priority], and then press the {# Enter} key. The paper tray selection menu appears. D Press the {U} or {T} key to select the tray type you want to use, and then press the {# Enter - Ricoh CL3500N | Quick Installation Guide - Page 32
density, number of pages printed at a time, paper type and size, and environmental conditions such as temperature and humidity. Toner quality degrades over time. You may have to replace the toner cartridge prematurely. We recommend you prepare a new toner cartridge beforehand. The color of the lit - Ricoh CL3500N | Quick Installation Guide - Page 33
, magenta, or yellow toner runs out, you can print in black and white using black toner. Change the color mode setting to "Black and White" using the printer driver. ❒ If black toner runs out, you cannot print in black and white or color until the black toner cartridge is replaced. A Open the upper - Ricoh CL3500N | Quick Installation Guide - Page 34
Replacing Consumables and Maintenance Kit D Shake the toner cartridge from side to side about 10 times. ❒ Do not open the shutter at the bottom of the toner cartridge. Toner may leak. ❒ The illustration uses the black cartridge as an example. E Check the toner color and location correspond, and - Ricoh CL3500N | Quick Installation Guide - Page 35
Replacing Consumables and Maintenance Kit F Insert the toner cartridge in the direction of the arrow. ❒ Do not install and remove toner cartridges unless necessary. Excessive handling results in toner leakage. ❒ All four cartridges are installed using the same procedure. G Close the printer's upper - Ricoh CL3500N | Quick Installation Guide - Page 36
and Maintenance Kit Replacing the Waste Toner Bottle • Do not incinerate spilled toner or used toner. Toner dust is flammable and might ignite when exposed to an open flame. Disposal should take place at an authorized dealer or an appropriate collection site. If you dispose of the used toner - Ricoh CL3500N | Quick Installation Guide - Page 37
Replacing Consumables and Maintenance Kit D Unlock the waste toner bottle by sliding the green arrow to the position shown. ❒ Do not lock the removed waste toner bottle. Toner may leak. E Remove the used waste toner bottle carefully. 33 - Ricoh CL3500N | Quick Installation Guide - Page 38
Replacing Consumables and Maintenance Kit F Place the new waste toner bottle in the position shown in the illustration. G Lock the waste toner bottle by sliding the green arrow to the position shown. ❒ Be sure to lock the waste toner bottle to prevent toner from leaking inside the printer. H Close - Ricoh CL3500N | Quick Installation Guide - Page 39
and Maintenance Kit Replacing the Photo Conductor Unit Replace the black photo conductor unit when the following message appears on the display: Replace Black PCU Replace the three color photo conductor units when the following message appears on the display: Replace Color PCU Color photo conductor - Ricoh CL3500N | Quick Installation Guide - Page 40
Replacing Consumables and Maintenance Kit ❖ Photo Conductor Unit Color A Turn off the power, and then unplug the power cable. B Open the right cover. C Pull out the green levers on the left and right that are securing the inner cover. 36 - Ricoh CL3500N | Quick Installation Guide - Page 41
Replacing Consumables and Maintenance Kit D Lift the inner cover until it stays up. E Remove the photo conductor unit. F Pinch the green lever to unlock the unit. G Pull out the photo conductor unit carefully. 37 - Ricoh CL3500N | Quick Installation Guide - Page 42
Replacing Consumables and Maintenance Kit H Pinch the green lever to unlock the unit. I Pull out the photo conductor unit carefully until it stops. J Pinch the green part to release the unit. K Pull out the photo conductor unit carefully. ❒ Be sure to hold the unit with both hands, and pull it out - Ricoh CL3500N | Quick Installation Guide - Page 43
Replacing Consumables and Maintenance Kit M Remove the cap attached to the photo conductor unit. ❒ The cap is no longer needed and can be disposed of. N Remove the tape from around Photo Conductor Unit by peeling it down- ward, and then remove the unit's top cover. ❒ Do not remove the cover attached - Ricoh CL3500N | Quick Installation Guide - Page 44
Replacing Consumables and Maintenance Kit ❒ After you take the new Photo Conductor Unit out of the bag, quickly install it. O Check the locations for each Photo Conductor Unit. A Photo Conductor Unit (Black) B Photo Conductor Unit (Color) P Align the green arrow at the tip of the photo conductor - Ricoh CL3500N | Quick Installation Guide - Page 45
Replacing Consumables and Maintenance Kit ❖ Photo Conductor Unit Black ❖ Photo Conductor Unit Color Q Push the front of the photo conductor unit carefully in sliding the unit from its cover until it stops. ❖ Photo Conductor Unit Black 41 - Ricoh CL3500N | Quick Installation Guide - Page 46
Replacing Consumables and Maintenance Kit ❖ Photo Conductor Unit Color ❒ If the photo conductor unit is not correctly installed, print quality will be lost. For example, certain colors may not print. R Lower the inner cover slowly. S Push the left and right edge of the inner cover to secure it. 42 - Ricoh CL3500N | Quick Installation Guide - Page 47
Replacing Consumables and Maintenance Kit T Close the right cover carefully. U Plug in the power cable, and then turn on the power. The printer starts calibration. Wait until it stops. The following message appears on the display: Calibrating... Wait until [Ready] appears on the display panel. ❒ Do - Ricoh CL3500N | Quick Installation Guide - Page 48
and Maintenance Kit Replacing the Fusing Unit • The inside of this machine gets very hot. Do not touch parts labelled "v"(hot surface). Touching "v" labelled parts (hot surface) could result in burns. • The fusing unit gets very hot. When installing a new fusing unit, turn off the printer and - Ricoh CL3500N | Quick Installation Guide - Page 49
Consumables and Maintenance Kit ❖ Transfer Roller ❒ Be sure to make the maintenance setting using the control panel after replacing the fusing unit. The procedure is complete only when the maintenance setting is made. A Turn off the power, and then unplug the power cable. ❒ After power off, wait - Ricoh CL3500N | Quick Installation Guide - Page 50
Replacing Consumables and Maintenance Kit D Push the green release buttons on the left and right outwards to unlock the fusing unit. E Remove the fusing unit carefully. F Take the new fusing unit from out from its box. G Place the unit as shown, and then carefully insert the new fusing unit. 46 - Ricoh CL3500N | Quick Installation Guide - Page 51
Replacing Consumables and Maintenance Kit H Carefully push in the fusing unit until it clicks into position, and then check that the unit is locked. I Push in the connector. J Open the transfer roller cover. 47 - Ricoh CL3500N | Quick Installation Guide - Page 52
Replacing Consumables and Maintenance Kit K Turn the green part in the direction of the arrow, and then remove the transfer roller. L Take out the new transfer roller. ❒ Do not touch the roller part. M Hold the green part as shown, and then insert the transfer roller into the printer. ❒ The end with - Ricoh CL3500N | Quick Installation Guide - Page 53
Consumables and Maintenance Kit N Close the transfer roller cover. O Close the front cover carefully. P Turn on the power. Q Make the maintenance setting using the control panel. When "Replace Fusing Unit" Appears on the Display A If the following message appears on the control panel, hold down - Ricoh CL3500N | Quick Installation Guide - Page 54
and Maintenance Kit B Press the {U} or {T} key to display [Maintenance], and then press the {# Enter} key. Menu: Maintenance C Press the {U} or {T} key to display [Maint. Reset], and then press the {# Enter} key. Maintenance: Maint. Reset D Press the {U} or {T} key to display [Fusing Unit], and - Ricoh CL3500N | Quick Installation Guide - Page 55
Maintenance Kit Replacing the Intermediate Transfer Unit • The inside of this machine gets very hot. Do not touch parts labelled "v" (hot surface). Touching "v" labelled parts could result in burns. Replace the transfer belt when the following message appears on the display: Replace Transfer Belt - Ricoh CL3500N | Quick Installation Guide - Page 56
Replacing Consumables and Maintenance Kit B Open printer's right cover. C Remove the waste toner bottle. See p.32 "Replacing the Waste Toner Bottle". D Pull out the green levers on the left and right that are securing the inner cover. E Lift the inner cover until it stays up. 52 - Ricoh CL3500N | Quick Installation Guide - Page 57
Replacing Consumables and Maintenance Kit F Unlock the waste toner bottle by sliding the green arrow to the position shown. ❒ Do not lock the removed waste toner bottle. Toner may leak. G Remove the waste toner bottle carefully. 53 - Ricoh CL3500N | Quick Installation Guide - Page 58
Replacing Consumables and Maintenance Kit H Loosen the green screws on the left and right by turning them the direc- tion of the arrows. Do not remove the screws. I Pinch the both screws, and then carefully pull out the transfer belt slow- ly until it stops. J Raise the green cover, hold the - Ricoh CL3500N | Quick Installation Guide - Page 59
Replacing Consumables and Maintenance Kit L Holding the transfer belt as shown, carefully slide the transfer belt into the printer. M Close the green cover, and then push it in until it stops. N Tighten the green screws on the left and right by turning them the direc- tion of the arrows. 55 - Ricoh CL3500N | Quick Installation Guide - Page 60
Replacing Consumables and Maintenance Kit O Place the waste toner bottle in the position shown in the illustration. P Lock the waste toner bottle by sliding the green arrow to the position shown. ❒ Be sure to lock the waste toner bottle to prevent toner from leaking inside the printer. Q Lower the - Ricoh CL3500N | Quick Installation Guide - Page 61
Consumables and Maintenance Kit R Push the left and right edge of the inner cover to secure it. S Close the right cover. T Turn on the power. U Make the setting using the control panel. When "Replace Transfer Belt" Appears on the Display A If the following message appears on the control panel - Ricoh CL3500N | Quick Installation Guide - Page 62
Consumables and Maintenance Kit When "Replace Transfer Belt soon" Appears on the Display A Press the {Menu} key. The [Menu] screen appears. B Press the {U} or {T} key to display [Maintenance], and then press the {# Enter} key. Menu: Maintenance C Press the {U} or {T} key to display [Maint. Reset - Ricoh CL3500N | Quick Installation Guide - Page 63
, explosion or loss of sight. If the machine has laser systems, there is a risk of serious eye damage. • When removing misfed paper, do not touch the fusing unit because it could be very hot. Clean the printer periodically to maintain fine printing. Dry wipe the exterior with a soft cloth. If dry - Ricoh CL3500N | Quick Installation Guide - Page 64
the printer is moved, perform automatic color adjustment. A Press the {Menu} key. The [Menu] screen appears. B Press the {U} or {T} key to display [Maintenance], and then press the {# Enter} key. Menu: Maintenance The maintenance menu appears. C Press the {U} or {T} key to display [Color Regist - Ricoh CL3500N | Quick Installation Guide - Page 65
Cleaning and Adjusting the Printer Automatic color adjustment takes about 30 seconds. A confirmation message appears when complete. Completed E Press the {Escape} key. Return to the maintenance menu. F Press the {Online} key. The initial screen appears. 61 - Ricoh CL3500N | Quick Installation Guide - Page 66
cannot be obtained after a single operation, repeat the cor- rection several times, as needed. ❒ Corrections to color gradation will be applied to all user jobs. ❒ Use the same paper when printing a run of gradation corrections. If a different type of paper is used, corrections may not be apparent - Ricoh CL3500N | Quick Installation Guide - Page 67
Cleaning and Adjusting the Printer A Press the {Menu} key. The [Menu]screen appears. B Press the {U} or {T} key to display [Maintenance], and then press the {# Enter} key. Menu: Maintenance The maintenance menu appears. C Press the {U} or {T} key to display [Color Calibrate], and then press the {# - Ricoh CL3500N | Quick Installation Guide - Page 68
(cyan), and Y (yel- low) using the same procedure as for the K (black). I If you finished all settings, ensure color is changed to 2. J Check [Yes] is displayed, and press the {# Enter} key to print the changes will not be applied to subsequent print jobs. Calibrate 1: Save and exit Calibrate 1: - Ricoh CL3500N | Quick Installation Guide - Page 69
Adjusting the Printer M Check [Yes] is displayed, and then press the {# Enter} key to print grada- tion correction sheet 2. N Perform the same operations as used for setting the gradation correc- tion value using correction 1 to set the gradation correction value of the middle part using correction - Ricoh CL3500N | Quick Installation Guide - Page 70
value setting sheet over the color sample of gradation correction 1 of the Color Calibration Sample Sheet and search for a corrected color closest to that of the color sample, and then set its correction value using the operation panel. The currently set correction value is printed in red. 66 - Ricoh CL3500N | Quick Installation Guide - Page 71
❒ XXXX represents the printer model name. A K (black) correction values Adjust the printed color when only black toner is used. The currently set correction value is printed in red. B M (magenta) correction values Adjust the printed color when only magenta toner is used. The currently set correction - Ricoh CL3500N | Quick Installation Guide - Page 72
Cleaning and Adjusting the Printer A Press the {Menu} key. The [Menu]screen appears. B Press the {U} or {T} key to display [Maintenance], and then press the {# Enter} key. Menu: Maintenance The maintenance menu appears. C Press the {U} or {T} key to display [Color Calibrate], and then press the {# - Ricoh CL3500N | Quick Installation Guide - Page 73
of the page appears shaded or the print image is patchy. ❒ Extreme settings may create output that appears dirty. ❒ Image density settings should be made from the application or the printer driv- er whenever possible. ❒ Changing the image density setting can result in deterioration of color balance - Ricoh CL3500N | Quick Installation Guide - Page 74
Printing... E Compare the colors on the printed image density test sheet with those on the Image Density Adjusting Card. ❒ If the image density of the Image Density Adjusting Card is equal to the framed part the color you want to adjust, and then press the {# Enter} key. Image Density: Black G - Ricoh CL3500N | Quick Installation Guide - Page 75
and Adjusting the Printer Adjusting Tray Registration You can adjust the registration of each tray. The vertical adjustment is used for all trays. Normally, you need not update the registration. But when the optional paper feed unit or the duplex unit is installed, updating is useful in some cases - Ricoh CL3500N | Quick Installation Guide - Page 76
Cleaning and Adjusting the Printer F Confirm the position of the image on the test sheet, and then adjust the registration value. In this setting, press the {# Enter} key. Adjustment: Horiz: Tray 2 I Press the {U} or {T} key to set the registration value (mm). Horiz: Tray 2: (-15 +15) 0 72 - Ricoh CL3500N | Quick Installation Guide - Page 77
the Printer Increase the value to shift the print area in the positive direction, and decrease to shift in the negative direction. A : Print Area {# Enter} key. The display returns to the print area [Adjustment] menu. Registration: Adjustment K Print the test sheet to confirm the adjustment result. - Ricoh CL3500N | Quick Installation Guide - Page 78
Off On / Call Service if error reoccurs Cannot check Signal in Ad hoc Description Recommended Action The printer is out of toner (Black). Replace the toner cartridge (Black). See p.28 "Replacing the Toner Cartridge". The printer is out of toner (Cy- Replace the toner cartridge an). (Cyan - Ricoh CL3500N | Quick Installation Guide - Page 79
Troubleshooting Messages Change Setting Tray # / Paper Size: Paper Type: Close Front and/ or Right Cover Close Upper Left Cover DHCP assigned Cannot change Energy Save Mode Error: Enter 10 or 26 characters Error: Enter 5 or 13 characters Hardware Problem Ethernet Hardware Problem HDD Description - Ricoh CL3500N | Quick Installation Guide - Page 80
-ROM labeled "Printer Drivers and Utilities": UTILITY 1394 The printer detected an error in the black photo conductor unit. ❒ For details about using the utility tool for IEEE 1394, see the README file in the same directory in the CD-ROM. If the message appears again, contact your sales or service - Ricoh CL3500N | Quick Installation Guide - Page 81
Troubleshooting Messages Hardware Problem Color PCU Hardware Problem Option RAM Hardware Problem Parallel I/F Hardware Problem Printer font Hardware Problem USB Hardware Problem Wireless Board Description The printer detected an error in the color photo conductor unit. The printer identified an - Ricoh CL3500N | Quick Installation Guide - Page 82
and size loaded in the tray which the printer searched using Tray Locking is invalid for Duplex Print. Change the setting of the indicated paper input tray, or press {Job Reset} key. Form Feed is not possible here. The printer is loading toner. Wait a while. The menu is protected and the Wait - Ricoh CL3500N | Quick Installation Guide - Page 83
Tray Remove Misfeed Z: Duplex Unit Remove Paper Standard Tray Replace Black PCU Replace Black PCU soon Replace Color PCU Description Recommended Action There are no files available for Wait for two seconds until the Sample Print job or Locked previous display appears. Print job. The printer - Ricoh CL3500N | Quick Installation Guide - Page 84
Troubleshooting Messages Replace Color PCU soon Replace Fusing Unit Replace Fusing Unit soon Replace Transfer Belt Replace Transfer Belt soon Replace Used Toner Bottle Reset Fusing Unit correctly Reset Paper Bypass Tray Reset PCU correctly XXX/XXX Reset Toner XXX/XXX Reset Tray # or Form Feed - Ricoh CL3500N | Quick Installation Guide - Page 85
Set transfer belt or waste toner bottle is not set correctly, or er bottle correctly. not set. This message appears if the Enter the SSID. SSID has not been entered. Supply order has failed. The use is required to reset the job. The printer is almost out of ton- Prepare to replace the toner er - Ricoh CL3500N | Quick Installation Guide - Page 86
Troubleshooting Messages Waiting... Warming up... Description Recommended Action The printer is waiting for the Wait a while. next data to print. The printer is warming up and Wait until the printer signals not ready. Ready. 82 - Ricoh CL3500N | Quick Installation Guide - Page 87
? Load paper into the paper tray or onto the bypass tray. See p.15 "Loading Paper". Can you print a configura- If you cannot print a configuration page, it probably indicates a tion page? printer malfunction. Contact your sales or service representative. See "Test Printing", Setup Guide. Is - Ricoh CL3500N | Quick Installation Guide - Page 88
Troubleshooting Possible Cause Solutions How is the signal strength when using Bluetooth ? Try the following: • Check the Bluetooth interface unit is installed properly. • Check there are no obstructions between computer, printer and other devices. • Change the location of the computer. • Change - Ricoh CL3500N | Quick Installation Guide - Page 89
Troubleshooting • For a IEEE 1394 (SCSI print) port connection, port 1394_00 (n) *1 should be set. *1 (n) is the number of printers connected. Windows 95/98/Me A Click [Start], point to [Settings] and then click [Printers]. B Click to select the icon of the printer. Next, on the [File] menu, click [ - Ricoh CL3500N | Quick Installation Guide - Page 90
Troubleshooting D Click to select the icon of the printer. Next, on the [File] menu, click [Prop- erties]. E Click the [Port] tab. F Check the [Print to the following port(s).] box to confirm that the correct port is selected. Windows NT 4.0 A Click [Start], point to [Settings] and then click [ - Ricoh CL3500N | Quick Installation Guide - Page 91
and Other Media". • Check the printer driver's paper settings. See the printer driver Help. When [Replace Black PCU] or [Replace Color PCU] appears on the display, replace the photo conductor unit. See p.35 "Replacing the Photo Conductor Unit". Confirm that the paper is not curled or bent. Envelopes - Ricoh CL3500N | Quick Installation Guide - Page 92
p.44 "Replacing the Fusing Unit". Paper is not fed from the select- When you are using a Windows operating system, the printer ed tray. driver settings override those set using the control panel. Set the desired input tray using the printer driver. See the printer driver Help. A printed image - Ricoh CL3500N | Quick Installation Guide - Page 93
or glossy paper is being used, printing takes more time to start. It takes too much time to complete the print job. Photographs and other data intensive pages take a long time for the printer to process, so simply wait when printing such data. Changing the settings with printer driver may help - Ricoh CL3500N | Quick Installation Guide - Page 94
p.28 "Replacing the Toner Cartridge". When [Replace Black PCU] or [Replace Color PCU] appears on the display, replace the photo conductor unit. See p.35 "Replacing the Photo Conductor Unit". Condensation may have collected. If rapid change in temperature or humidity occurs, use this printer only - Ricoh CL3500N | Quick Installation Guide - Page 95
empty: XXX] message appears on the display panel, or the toner end LED on the control panel is lit, replace the toner cartridge of the displayed color. See p.28 "Replacing the Toner Cartridge". When [Replace Black PCU] or [Replace Color PCU] appears on the display, replace the photo conductor unit - Ricoh CL3500N | Quick Installation Guide - Page 96
size. For example, When a PDF file set to A4 size paper is printed using PDF Direct Print and letter size paper is installed in the paper tray, the file will print out. This applies similarly to the opposite case. If the problem cannot be solved, contact your sales or service representative. 92 - Ricoh CL3500N | Quick Installation Guide - Page 97
noise persists, contact your sales or service representative. No e-mail is received when an Alert occurs, and after resolving an Alert. Confirm [Notify by Email] is [On] using the System Menu on the Control Panel. See "System Menu", Software Guide. Access the printer through the Web browser, log - Ricoh CL3500N | Quick Installation Guide - Page 98
or client computer if necessary. ❒ When you use a Bluetooth connection, print jobs are transmitted relatively slowly. If the machine is still not operating satisfactorily, contact your sales or service representative. Consult with the store where the printer was purchased for information about the - Ricoh CL3500N | Quick Installation Guide - Page 99
Misfed Paper An error message appears if a paper misfeed occurs. The error message gives the location of the misfeed. ❒ Misfed paper may be covered in toner. Be careful not to get toner on your hands or clothes. ❒ Toner on prints made after removing misfed paper may be loose (inadequately fused - Ricoh CL3500N | Quick Installation Guide - Page 100
. A Open the front cover by pushing the front cover release button. ❒ Close the bypass tray if it is extended. If the bypass tray is extended, the front cover does not open. B Carefully remove any misfed paper. ❒ If misfed paper is difficult to move or stuck, proceed to the next step. Do not pull - Ricoh CL3500N | Quick Installation Guide - Page 101
Removing Misfed Paper C Pull part "A" in the direction of the arrow, and then open the cover. D Remove any misfed paper. E Close the cover. 97 - Ricoh CL3500N | Quick Installation Guide - Page 102
Removing Misfed Paper F Close the front cover carefully. 98 - Ricoh CL3500N | Quick Installation Guide - Page 103
Misfed Paper When "Remove Misfeed B: Fusing Unit" Appears • The inside of this machine gets very hot. Do not touch parts labelled "v" (hot surface). Touching "v" labelled parts could result in burns. A Open the front cover by pushing the front cover release button. ❒ Close the bypass tray if - Ricoh CL3500N | Quick Installation Guide - Page 104
Removing Misfed Paper C Remove any misfed paper. ❒ If misfed paper is difficult to move or stuck, proceed to the next step. Do not pull forcefully on stuck or jammed paper. D Pull part "B2" toward the front, and then open the guide board. E Remove any misfed paper. 100 - Ricoh CL3500N | Quick Installation Guide - Page 105
Removing Misfed Paper F Return the guide board. G Return levers "B1" on the left and right. H Close the front cover carefully. 101 - Ricoh CL3500N | Quick Installation Guide - Page 106
Removing Misfed Paper When "Remove Misfeed Y: Paper Tray" Appears A Pull out the tray. ❒ Do not pull the tray out forcefully. If you do, the tray might fall and cause an injury. B Remove any misfed paper. ❖ Tray 1 ❖ Tray 2/3 102 - Ricoh CL3500N | Quick Installation Guide - Page 107
Removing Misfed Paper C Slide the paper tray fully into the printer. ❒ Misfeeds can occur if the paper tray is not fully inserted. Make sure it is fully inserted. D Open the front cover by pushing the front cover release button, and then close it - Ricoh CL3500N | Quick Installation Guide - Page 108
labelled parts could result in burns. A Open the front cover by pushing the front cover release button. ❒ Close the bypass tray if it is extended. If the bypass tray is extended, the front cover does not open. B Pull the lever marked "PULL" on the duplex unit ( ), and then pull up the duplex unit - Ricoh CL3500N | Quick Installation Guide - Page 109
Removing Misfed Paper C Remove any misfed paper. D Close the front cover carefully. 105 - Ricoh CL3500N | Quick Installation Guide - Page 110
damaging the cord and causing a fire or an electric shock. • When moving the printer after use, do not take out any of the Toners, Photo Conductor Units, nor the waste toner bottle to prevent toner spill inside the machine. Repack the printer in its original packing materials for transporting. ❒ The - Ricoh CL3500N | Quick Installation Guide - Page 111
, move the printer slowly. ❒ If the optional paper feed unit is installed, remove it from the printer, and then move them separately. Transporting the Printer When transporting the printer, leave consumables such as the toner cartridge, photoconductor unit, and waste toner bottle in place inside - Ricoh CL3500N | Quick Installation Guide - Page 112
first use this printer, use the four toner cartridges packaged with the printer. ❒ Numbers of pages that can be printed using the toner cartridge supplied with this printer are as follows: Toner Cartridge Black, Cyan, Magenta, Yellow Average printable number of pages per bottle 2,500 pages 108 - Ricoh CL3500N | Quick Installation Guide - Page 113
waste toner bottles are not changed when necessary, printing will become impossible. We recommend keeping a stock of bottles or purchasing them soon. Photo Conductor Unit Name Photo Conductor Unit Type 165 Black Photo Conductor Unit Type 165 Color *1 A4/letter 5% test chart, 3 pages/ job. Average - Ricoh CL3500N | Quick Installation Guide - Page 114
Appendix ❒ If the transfer unit is not changed when necessary, the quality of printing is not guaranteed. We recommend keeping a stock of transfer unit or purchasing one soon. 110 - Ricoh CL3500N | Quick Installation Guide - Page 115
Print Process: Laser beam scanning & Electrophotographic printing 4 drums tandem method ❖ First Print Speed: Monochrome: 13.5 sec or less (A4K) Color: 14.5 sec or less (A4K) ❒ If the printer has not been used for a while, there may be a short delay before the first page starts printing. ❖ Printing - Ricoh CL3500N | Quick Installation Guide - Page 116
no error. ❖ Dimensions: Width Printer only (tray not 419 mm (16.5 inch- extended) es) Depth 536 mm (21.1 inches) Height 398 mm (15.7 inches) ❖ Weight: Approximately 32 kg (70.5 lb.) (toner cartridges and power cord included) ❖ Noise Emission *1 : Sound Power Level Stand-by During Printing - Ricoh CL3500N | Quick Installation Guide - Page 117
support USB 2.0. Optional: • IEEE 1394 (SCSI print, IP over 1394) • IEEE 802.11b (Wireless LAN) • Parallel (Bidirectional IEEE1284) • Bluetooth ❖ Printer 21.1 × 5.8 inches) ❖ Paper weight: 60.2 - 104.7 g/m2, (16 - 28 lb.) ❖ Weight: Less than 7.5 kg (16.4 lb) AD440 (Duplex Unit) ❖ Dimensions (W × D × - Ricoh CL3500N | Quick Installation Guide - Page 118
Sample Print/Locked Print data • Store PostScript fonts • Store log data ❒ You can install PostScript fonts with this optional hard disk drive. With Mac OS, types of fonts supported are PostScript Type 1 and PostScript Type 2. To download them, use Printer Utility for Mac. User Account Enhance Unit - Ricoh CL3500N | Quick Installation Guide - Page 119
Do not use a cable Unit Type H ❖ Transmission Spec.: Based on IEEE 802.11b (Wireless LAN) ❖ Protocol: TCP/IP, NetBEUI, IPX/SPX, AppleTalk ❒ SmartDeviceMonitor and Web Image Monitor are supported. ❖ Data Transfer These figures are a guideline for outdoor use. In general, the transmittable distance - Ricoh CL3500N | Quick Installation Guide - Page 120
1284 ❖ Required cable: Standard IEEE 1284 compliant Micro Centronics 36 pin cable Bluetooth Interface Unit Type 3245 ❖ Supported Profiles: • SPP (Serial Port Profile) • HCRP (Hardcopy Cable Replacement Profile) • BIP (Basic Imaging Profile) ❖ Frequency Range: 2 GHz ISM band ❖ Data Transmission Speed - Ricoh CL3500N | Quick Installation Guide - Page 121
Introduction This manual contains detailed instructions and notes on the operation and use of this machine. For your safety and benefit, read this manual carefully before using the machine. Keep this manual in a handy place for quick reference. Power Source 120 V, 60 Hz, 11 A or more Please be sure - Ricoh CL3500N | Quick Installation Guide - Page 122
Safety Information When using your printer, the following safety precautions should always be followed. In this manual, the following important symbols are used: Indicates a potentially hazardous situation which, if instructions are not followed, could result in death or serious injury. Indicates a - Ricoh CL3500N | Quick Installation Guide - Page 123
a paper jam or replacing toner. If your skin comes into contact with toner, wash the affected area thoroughly with soap and water. • If toner gets on your clothing, wash with cold water. Hot water will set the toner into the fabric and may make removing the stain impossible. • Keep toner (used or - Ricoh CL3500N | Quick Installation Guide - Page 124
the wall outlet to avoid a fire or an electric shock. • When moving the printer after use, do not take out any of the Toners, Photo Conductor Units, nor the Waste Toner Cartridge to prevent toner spill inside the machine. • When lifting the machine, use the inset grips on both sides. Otherwise the - Ricoh CL3500N | Quick Installation Guide - Page 125
RCAUTION at the positions shown below. For safety, please follow the instructions and handle the machine as indicated. AJT086S High temperature parts. Turn off the main power and be careful when replacing fusing unit / removing misfed paper. The inside of this printer becomes very hot. Do not touch - Ricoh CL3500N | Quick Installation Guide - Page 126
be used for RF interference suppression. Declaration of Conformity Product Name: Laser Printer Model Number: Aficio CL3500N/C7521n/CLP22/LP222cn Responsible party: Ricoh Corporation Address: 5 Dedrick Place, West Caldwell, NJ 07006 Telephone number: 973-882-2000 This device complies with Part 15 - Ricoh CL3500N | Quick Installation Guide - Page 127
ICES- 003. IEEE 802.11b Interface Unit Type H (R-WL11B): This device complies with RSS 210 of Industry Canada. To prevent radio interference to the licensed service, this device must be operated indoors only and should be kept away from windows to provide maximum shielding. Remarque concernant les - Ricoh CL3500N | Quick Installation Guide - Page 128
- Ricoh CL3500N | Quick Installation Guide - Page 129
Inside...14 Control Panel...15 Setting Up Where to Put the Printer 17 Checking the Contents of the Box 20 Unpacking...22 Installing the Waste Toner Bottle and Photo Conductor Unit 23 Installing the Toner Cartridge 29 Loading Paper ...33 Turning the Power On 36 Selecting the Display Language 38 - Ricoh CL3500N | Quick Installation Guide - Page 130
Chart 44 Installing Options...45 Attaching Paper Feed Unit Type 3000 47 Attaching AD440 (Duplex Unit 52 Attaching Memory Unit Type D 128MB, Memory Unit Type E 256MB (SDRAM Module) ...55 Attaching Printer Hard Disk Type 3000 60 Formatting the Printer Hard Disk 64 Attaching User Account Enhance - Ricoh CL3500N | Quick Installation Guide - Page 131
This First Trademarks Microsoft, Windows and Windows NT are registered trademarks of Microsoft Corporation in the United States and/or other countries. IPS-PRINT Printer Language Emulation Copyright© 1999-2000 Oak Technology, Inc., All rights reserved. Bluetooth® is a registered trademark of the - Ricoh CL3500N | Quick Installation Guide - Page 132
Read This First Safety Information When using your printer, the following safety precautions should always be followed. In this manual, the following important symbols are used: Indicates a potentially hazardous situation which, if instructions are not followed, could result in death or serious - Ricoh CL3500N | Quick Installation Guide - Page 133
source described in the manual. • Avoid multi- spilled toner or used toner. Toner dust laser systems, there is a risk of serious eye damage. • The supplied power cord is for use with this equipment only. Do not use with other appliances. Doing so may result in fire, electric shock, or injury. • Keep - Ricoh CL3500N | Quick Installation Guide - Page 134
a paper jam or replacing toner. If your skin comes into contact with toner, wash the affected area thoroughly with soap and water. • If toner gets on your clothing, wash with cold water. Hot water will set the toner into the fabric and may make removing the stain impossible. • Keep toner (used or - Ricoh CL3500N | Quick Installation Guide - Page 135
the wall outlet to avoid a fire or an electric shock. • When moving the printer after use, do not take out any of the Toners, Photo Conductor Units, nor the Waste Toner Cartridge to prevent toner spill inside the machine. • When lifting the machine, use the inset grips on both sides. Otherwise the - Ricoh CL3500N | Quick Installation Guide - Page 136
. For safety, please follow the instructions and handle the machine as indicated. High temperature parts. Turn off the main power and be careful when replacing fusing unit / removing misfed paper. The inside of this printer becomes very hot. Do not touch parts labelled "v" (indicating a hot surface - Ricoh CL3500N | Quick Installation Guide - Page 137
operation has been completed. To exit Low-power (Energy Saver) mode, press any key on the control panel. For more information about how to configure Energy Saver mode, see "Making Printer Settings with Control Panel", Software Guide as a HTML file on the CD-ROM. ❖ Specifications Energy Saver mode - Ricoh CL3500N | Quick Installation Guide - Page 138
Read This First How to Read This Manual The following set of symbols is used in this manual. This symbol indicates a potentially hazardous situation that might result in death or serious injury when you misuse the machine without following the instructions under this symbol. Be sure to read the - Ricoh CL3500N | Quick Installation Guide - Page 139
. 5. Front Cover Open this to replace the fusing unit or transfer roller, install the duplex unit, or remove misfed paper. 6. Bypass Tray Use this to print onto thick paper, OHP transparencies, custom size paper, and envelopes, as well as plain paper. Special printer driver settings must be made in - Ricoh CL3500N | Quick Installation Guide - Page 140
any way obstructed. 2. Right Cover Open this to replace photo conductor units, the transfer belt , or the waste toner bottle. 3. Power Switch Use this to turn the power on and off. 4. Standard Tray Extension Pull this out when printing on paper that is longer than A4 or 8 1/2" × 11". 5. Controller - Ricoh CL3500N | Quick Installation Guide - Page 141
Guide to the Printer 8. USB Port Use a USB cable to connect the printer to a host computer. 9. Ethernet Port Use a network interface cable to connect the printer to a network. 10. Ventilator The ventilator helps keep Paper Feed Unit Connector Use this to connect the printer to the paper feed unit. - Ricoh CL3500N | Quick Installation Guide - Page 142
Duplex Unit (optional for Basic Model Printer) Use to print on both sides of paper. 4. Toner Cartridges When the "Add Toner (color)" message appears on the display, replace the toner cartridge of the indicated color. 5. Photo Conductor Unit Color/Black When the "Replace Color PCU" or "Replace Black - Ricoh CL3500N | Quick Installation Guide - Page 143
the toner cartridge needs to be replaced. 4. {Job Reset} key When the printer is online, press this key to cancel an ongoing print job. 5. {Form Feed} key When the printer is offline, press this to print all data left in the printer's input buffer. You can use this to force the printer to print data - Ricoh CL3500N | Quick Installation Guide - Page 144
from the host computer. Press to return to the ready condition. 10. {Menu} key Press this key to make and check the current printer settings. For details, See "Making Printer Settings Using the Control Panel", Software Guide. 11. {Escape} key Press this key to return to the previous condition - Ricoh CL3500N | Quick Installation Guide - Page 145
Printer The printer in the manual. • Avoid use with other appliances. Doing so may result in fire, electric shock, or injury. • Do not handle the plug with wet hands. Doing so might cause an electrical shock. • Keep the machine in an area that is within optimum environmental conditions. Operating - Ricoh CL3500N | Quick Installation Guide - Page 146
Setting Up ❖ Space Required for Installation Leave enough space around the printer. This space is necessary to operate the printer. The recommended (or minimum) space requirements are as follows: A: 13 cm (5.2 inches) or more B: 11 cm (4.4 inches) or more C: 35 cm (14.0 inches) or more D: - Ricoh CL3500N | Quick Installation Guide - Page 147
. ❒ When you use this machine for a long time in a confined space without good ventilation, you may detect an odd smell. To keep the workplace comfortable, we recommend you keep it well ventilated. the power cable to a power source of the following specification: • 120 V, 60 Hz, 11 A or more 19 - Ricoh CL3500N | Quick Installation Guide - Page 148
Quick Installation Guide CD-ROM "Printer Drivers and Utilities" CD-ROM "Display-Version Manuals (HTML)" CD-ROM "Print-Version Manuals (PDF)" CD-ROM "Document Management Utility" ❖ Parts Power Cable Toner Cartridges: Black (K), Magenta (M), Cyan (C), Yellow (Y) Photo Conductor Unit: Black ( ), Color - Ricoh CL3500N | Quick Installation Guide - Page 149
Setting Up Waste Toner Bottle Ferrite Core × 2 Color Calibration Sample Sheet Image density adjusting card User registration card Additional Documentation ❒ This package does not include an interface cable. Please purchase one to use with your host computer. See "Appendix", Maintenance Guide. 21 - Ricoh CL3500N | Quick Installation Guide - Page 150
to where it will be installed. • When lifting the machine, use the inset grips on both sides. The printer could break or cause an injury if dropped. • Place no objects on the right cover. ❒ Be sure to remove all four strips of tape from the photo conductor unit to avoid malfunction. ❒ Removed tape - Ricoh CL3500N | Quick Installation Guide - Page 151
Up Installing the Waste Toner Bottle and Photo Conductor Unit The following procedure describes installing the waste toner bottle and photo conductor unit. A Open the printer's right cover. B Place the waste toner bottle in the position shown in the illustration. C Lock the waste toner bottle by - Ricoh CL3500N | Quick Installation Guide - Page 152
on the left and right that are securing the inner cover, and then unlock. E Lift the inner cover until it stays up. F Take out the black photo conductor unit. G Remove the cap attached to the photo conductor unit. ❒ The cap is no longer needed and should be disposed of. 24 - Ricoh CL3500N | Quick Installation Guide - Page 153
Setting Up H Remove the tape from around Photo Conductor Unit by peeling it down- ward, and then remove unit's top cover. ❒ Do not remove the unit's bottom cover yet. ❒ Install the new Photo Conductor Unit as soon as you take it out of the bag. 25 - Ricoh CL3500N | Quick Installation Guide - Page 154
Setting Up I Check the locations for each Photo Conductor Unit. A Photo Conductor Unit (Black) B Photo Conductor Unit (Color) J Align the green arrow at the tip of the photo conductor unit with the rail inside the printer. ❒ Make sure the green arrow fits securely to the rail before proceeding to - Ricoh CL3500N | Quick Installation Guide - Page 155
of the photo conductor unit carefully in, sliding the unit from its cover, until it clicks into place. ❒ If the photo conductor unit is not correctly installed, print quality will be lost. For example, certain colors may not print. L Repeat steps F to K to install the color photo conductor unit. 27 - Ricoh CL3500N | Quick Installation Guide - Page 156
Setting Up M Lower the inner cover carefully. N Push the left and right edge of the inner cover to secure it. O Close the printer's right cover carefully. 28 - Ricoh CL3500N | Quick Installation Guide - Page 157
use this printer, use the four toner cartridges packaged with the printer. ❒ The toner cartridges that comes with the printer will allow you to print up to about 2,500 pages. These numbers were obtained from printing A4 K5% charts, but the actual number of pages will vary depending on the paper - Ricoh CL3500N | Quick Installation Guide - Page 158
printer's upper left cover. B Take out the toner cartridge. C Hold the toner cartridge horizontally as illustrated, and then shake it in the plastic bag from side to side about 10 times. ❒ Do not open the shutter on the bottom of the toner cartridge. Toner may leak. ❒ The illustration uses the black - Ricoh CL3500N | Quick Installation Guide - Page 159
tapes. F Check the toner color and location are correct, and then carefully insert the toner cartridge vertically. ❒ You can check the location for each toner cartridge by reading the labels on the printer. ❒ The illustration uses the yellow cartridge as an example. G Push the toner cartridge in the - Ricoh CL3500N | Quick Installation Guide - Page 160
Setting Up I Close the printer's upper left cover. ❒ If the toner cartridge is not set properly, you cannot close the upper left cover. 32 - Ricoh CL3500N | Quick Installation Guide - Page 161
might fall and cause personal injury. ❒ To avoid paper jams, make sure paper is not stacked above the limit mark in- side the tray. Misfeeds might occur. ❒ Do not mix different types of paper in a single paper tray. A Pull the paper tray out of the printer until it stops. Lift it slightly, and then - Ricoh CL3500N | Quick Installation Guide - Page 162
Setting Up B Remove the adhesive tape and packing material. C Press "PUSH", and then adjust the rear guide to the paper size you want to load. D Adjust the side guides to the paper size you want to load. 34 - Ricoh CL3500N | Quick Installation Guide - Page 163
Setting Up E Load paper print side up in the paper tray. ❒ Make sure the top of the stack is not higher than the limit mark inside the tray. ❒ To avoid misfeeds, set the rear and side to the exact paper size. F Slide the paper tray fully into the printer. 35 - Ricoh CL3500N | Quick Installation Guide - Page 164
electric shock. ❒ Be sure to connect the power plug to the socket or the wall outlet firmly. ❒ The printer power must be off when plugging in and removing the power cord. A Check the printer's power switch is set to Off ("b"). If it is set to On ("a"). Turn it off. B Attach the power - Ricoh CL3500N | Quick Installation Guide - Page 165
Setting Up D Turn the power switch to On ("a"). The power indicator on the control panel lights. ❒ Wait until [Ready ] appears on the display panel. ❒ The machine may make a noise while initializing. This noise does not indi- cate a malfunction. ❒ Do not turn off the power switch until initializing - Ricoh CL3500N | Quick Installation Guide - Page 166
appear on the display. If you want to use the display in English, the following procedures are unnecessary. ❒ The default setting is English. A Press the {Menu} key. The [Menu] screen appears. B Press the {U} or {T} key to display [Language]. Menu: Language C Press the {# Enter} key. The following - Ricoh CL3500N | Quick Installation Guide - Page 167
Setting Up E Press the {# Enter} key. Wait for two seconds. [Menu] appears on the display. F Press the {Online} key. The initial screen appears. Ready 39 - Ricoh CL3500N | Quick Installation Guide - Page 168
page. Test print in order to verify that the printer is working normally. Test printing checks printer performance only; it does not test the connection to the computer. A Press the {Menu} key. The [Menu] screen appears. Menu: Paper Input B Press the {U} or {T} key to display [List/Test Print - Ricoh CL3500N | Quick Installation Guide - Page 169
Up ❒ If printing is not normal, check to see if an error message appears on the display. If there is an error message, see "Troubleshooting", Maintenance Guide. D Check the options. ❒ For details about the configuration page, see "Interpreting the Configuration Page", Software Guide. E Press the - Ricoh CL3500N | Quick Installation Guide - Page 170
Adjusting the Image Density To use the printer in its best condition, adjust the image density. A Press the {Menu} key. The [Menu] screen appears. Menu: Paper Input B Press the {U} or {T} key to display [Maintenance], and then press the {# Enter} key. Menu: Maintenance C Press the {U} or {T} key to - Ricoh CL3500N | Quick Installation Guide - Page 171
Sheet Press # to start Printing... G Compare the colors on the printed image density test sheet with part of the test sheet, you do not need to adjust the image density value. H Press the {U} or {T} key to select the color you want to adjust, and then press the {# Enter} key. Image Density: Black - Ricoh CL3500N | Quick Installation Guide - Page 172
Available Options This section describes how to install options. By installing options, you can improve the printer performance and have an expanded variety of features to use. For the specifications of each option, see Maintenance Guide. • Before installing options, the machine should be turned off - Ricoh CL3500N | Quick Installation Guide - Page 173
card slot on the controller board. Installing Options Install options in the positions shown in the illustration. ❖ Exterior 1. AD440 (Duplex Unit) Install this behind the front cover. Makes duplex prints. See p.52 "Attaching AD440 (Duplex Unit)". 2. Paper Feed Unit Type 3000 Loads up to 530 sheets - Ricoh CL3500N | Quick Installation Guide - Page 174
Up to two paper feed units, can be installed on the printer. Installed tray units are identified as "Tray 2" and "Tray 3". See p.47 "Attaching Paper Feed Unit Type 3000". ❖ Interior 1. Printer Hard Disk Type 3000 See p.60 "Attaching Printer Hard Disk Type 3000". 2. Memory Unit Type D 128MB/Memory - Ricoh CL3500N | Quick Installation Guide - Page 175
16.5 lb). ❒ Up to two paper feed units can be attached to the printer. ❒ When two paper feed units are installed, they are identified as "Tray 2" and "Tray 3" starting from the upper unit. ❒ Before using the new paper feed unit, you must make settings in the printer driver. A Turn off the power, and - Ricoh CL3500N | Quick Installation Guide - Page 176
shown in the illustration, and then place it on a flat surface near where the machine is to be installed. ❒ Make sure you have enough space to access the back of the printer. E Pull the paper tray out of the paper feed unit until it stops. Lift it slightly, and then pull it fully out. Place the - Ricoh CL3500N | Quick Installation Guide - Page 177
Installing Options H Lift using the inset grips on both sides of the printer. I Align the printer with the two upright pins on the paper feed unit, and then lower it slowly. ❒ Be sure not to place the printer on the paper feed unit cable. 49 - Ricoh CL3500N | Quick Installation Guide - Page 178
Printer" in the Maintenance Guide. ❒ When moving the printer, remove the paper feed unit. ❒ After finishing installation, check the paper feed unit is installed properly: print the configuration page from the "List/Test Print" menu. If it is installed properly, you will see "Tray 2" or "Tray 2, Tray - Ricoh CL3500N | Quick Installation Guide - Page 179
Installing Options When adjusting the printing position, see "Adjusting Tray Registration", Maintenance Guide. 51 - Ricoh CL3500N | Quick Installation Guide - Page 180
Installing Options Attaching AD440 (Duplex Unit) • The inside of this machine gets very hot. Do not touch labelled "v" (hot surface). Touching "v" labelled parts could result in burns. ❒ Before using the duplex unit, you must make settings in the printer driver. A Turn off the power, and then unplug - Ricoh CL3500N | Quick Installation Guide - Page 181
the front cover. ❒ After finishing installation, check the duplex unit is installed properly: print the configuration page from the "List/Test Print" menu. If it is installed properly, you will see "Duplex Unit" for "Options". ❒ If the duplex unit is not installed properly, reinstall it from the - Ricoh CL3500N | Quick Installation Guide - Page 182
Installing Options For details about printing the configuration page, see p.40 "Test Printing". 54 - Ricoh CL3500N | Quick Installation Guide - Page 183
any static electricity. Static electricity can damage the memory unit. ❒ Do not subject the memory unit to physical shocks. ❒ Available memory varies depending on model type. ❒ Before using the new memory unit, you must make settings in the printer driv- er. A Turn off the power, and then unplug - Ricoh CL3500N | Quick Installation Guide - Page 184
Installing Options C Hold the machine with one hand, grasp the handle with the other hand, and then slowly pull out the Hold the handles with both hands, and then pull the controller board completely out. There are two slots for the Memory Unit. Use the available slot to install an optional Memory - Ricoh CL3500N | Quick Installation Guide - Page 185
E Adjust the notch of the Memory Unit to the slot, and then insert vertical- ly. F Press the Memory Unit down until it clicks into place. G When replacing the default SDRAM module, press down the levers on both sides ( ) to remove the default module ( ). Install a new SDRAM module. ❒ To increase - Ricoh CL3500N | Quick Installation Guide - Page 186
properly. K Secure the controller board to the printer using the two screws removed in step B. ❒ After finishing installation, check the memory unit is installed properly: print the configuration page from the "List/Test Print" menu. If it is installed properly, you will see the memory capacity for - Ricoh CL3500N | Quick Installation Guide - Page 187
256 MB 256 MB 512 MB ❒ If the memory unit is not properly installed, reinstall it from the start of the procedure. If you cannot install it properly even after attempting reinstallation, contact your sales or service representative. For details about printing the configuration page, see p.40 "Test - Ricoh CL3500N | Quick Installation Guide - Page 188
. Static electricity can damage the printer hard disk. ❒ Do not subject the printer hard disk to physical shocks. ❒ Before using the new printer hard disk, you must make the settings in the printer driver. A Check the package contains the following: ❖ Printer Hard Disk Type 3000 ❖ Screw B Turn off - Ricoh CL3500N | Quick Installation Guide - Page 189
Installing Options C Remove the two screws securing the controller board to the back of the printer. ❒ These screws will be used again in step K to secure the controller board. D Hold the machine with one hand, grasp the handle with the other hand, and then slowly pull - Ricoh CL3500N | Quick Installation Guide - Page 190
controller board slot. Slide it in the direction of the arrow, and then connect it to the connector on the controller board. G Secure the printer hard disk using the supplied screw. H When installing other options on the controller board, do not close the controller board, but go to the steps for - Ricoh CL3500N | Quick Installation Guide - Page 191
Installing Options I Align the controller board with the top and bottom rails, and the controller board is not set properly. K Secure the controller board to the printer using the two screws removed in step C. When the power is turned on, the printer hard disk will be formatted automatically. 63 - Ricoh CL3500N | Quick Installation Guide - Page 192
After finishing installation, check the printer hard disk is installed properly: print the configuration page from the "List/Test Print" menu. If it is installed properly, you will see "Printer Hard Disk Drive" for "Controller Option". ❒ If the printer hard disk is not installed properly, reinstall - Ricoh CL3500N | Quick Installation Guide - Page 193
Format] is not displayed on the display, the printer hard disk is not in- stalled properly. Repeat the procedure from step A. See p.60 "Attaching Printer Hard Disk Type 3000". If you still cannot install it properly, contact your sales or service representative. ❒ To avoid malfunction, do not turn - Ricoh CL3500N | Quick Installation Guide - Page 194
shocks. A Check the package contains the following: ❖ User Account Enhance Unit Type E B Turn off the power, and then unplug the power cable. C Remove the two screws securing the controller board to the back of the printer. ❒ These screws will be used again in step J to secure the controller board - Ricoh CL3500N | Quick Installation Guide - Page 195
board. ❒ The controller board may be difficult to pull out. E Hold the handles with both hands, and then pull the controller board completely out. The user account enhance unit is to be installed to the position shown in the illustration. 67 - Ricoh CL3500N | Quick Installation Guide - Page 196
Installing Options F Align the notch of the user account enhance unit, and then insert it into the controller board, pressing it down until it clicks into place. G Make sure that the user account enhance unit is firmly connected to the controller board. H Align the controller board with the top and - Ricoh CL3500N | Quick Installation Guide - Page 197
. J Secure the controller board to the printer using the two screws removed in step C. ❒ After finishing installation, check the user account enhance unit is installed properly: print the configuration page from the "List/Test Print" menu. If it is installed properly, you will see "Accounting Module - Ricoh CL3500N | Quick Installation Guide - Page 198
/98 and Windows NT 4.0): • Windows Me "IP over 1394" • Windows 2000 "SCSI print" • Windows XP, Windows Server 2003 "IP over 1394", "SCSI print" ❒ Under Windows 2000, the 1394 interface board can only be used with Service Pack 1 or later. The client cannot install the printer driver without using an - Ricoh CL3500N | Quick Installation Guide - Page 199
Cable (6 × 4 pins) B Turn off the power, and then unplug the power cable. C Loosen the two screws and remove the cover of the 1394 interface board installation unit. The removed cover and two screws are not used when installing the 1394 interface board. D Fully insert the 1394 interface board. 71 - Ricoh CL3500N | Quick Installation Guide - Page 200
Tighten the two screws to secure the 1394 interface board. ❒ After finishing installation, check the 1394 interface board is installed properly: print the configuration page from the "List/Test Print" menu. If it is installed properly, you will see "IEEE1394 " for "Controller Option". ❒ If the 1394 - Ricoh CL3500N | Quick Installation Guide - Page 201
Installing Options Attaching IEEE 802.11b Interface Unit Type H • Do not touch the inside of the controller board compartment. Doing so may cause a machine malfunction or a burn. ❒ Before touching the 802.11b interface unit, touch something metal to discharge any static electricity. Static - Ricoh CL3500N | Quick Installation Guide - Page 202
• Antenna Cap B Turn off the power, and then unplug the power cable. C Loosen the two screws and remove the cover of the 802.11b interface unit installation unit. The removed cover and two screws are not used when installing the interface unit. D Fully insert the 802.11b interface - Ricoh CL3500N | Quick Installation Guide - Page 203
Installing Options E Tighten the two screws to secure the interface unit. F Attach the antenna to the card with the label facing down and the un- even side of the antenna facing up. G With the antenna and indented end toward the printer front cover, slowly insert the interface card until it stops. - Ricoh CL3500N | Quick Installation Guide - Page 204
with the two cut off corners toward the printer front cover, fit the cap over the card. ❒ After finishing installation, check the 802.11b interface unit is installed properly: print the configuration page from the "List/Test Print" menu. If it is installed properly, you will see "IEEE 802.11b" for - Ricoh CL3500N | Quick Installation Guide - Page 205
. Doing so may cause a machine malfunction or a burn. ❒ When using the printer with the Bluetooth interface unit installed, Bluetooth needs to be installed on the computer. ❒ Before manipulating the Bluetooth interface unit, touch something metal to discharge static electricity. Static electricity - Ricoh CL3500N | Quick Installation Guide - Page 206
Options • Antenna Cap B Turn off the power, and then unplug the power cable. C Loosen the two screws and remove the cover of the Bluetooth interface unit installation unit. The removed cover and two screws are not used when installing the interface unit. D Fully insert the Bluetooth interface - Ricoh CL3500N | Quick Installation Guide - Page 207
Installing Options E Tighten the two screws to secure the interface unit. F With the "INSERT" side toward the printer front cover, slowly insert the card into the Bluetooth interface unit until it stops. G Press the antenna to extend it. 79 - Ricoh CL3500N | Quick Installation Guide - Page 208
with the two cut off corners toward the printer front cover, fit the cap over the card. ❒ After finishing installation, check the Bluetooth interface unit is installed properly: print the configuration page from the "List/Test Print" menu. If it is installed properly, you will see "Bluetooth" for - Ricoh CL3500N | Quick Installation Guide - Page 209
Installing Options Attaching IEEE 1284 Interface Board Type A • Do not touch inside the controller board compartment . C Loosen the two screws and remove the cover of the 1284 interface board installation unit. The removed cover and two screws are not used when installing the 1284 interface board. 81 - Ricoh CL3500N | Quick Installation Guide - Page 210
the 1284 interface board. ❒ Use the supplied adaptor to make the connection with the computer. ❒ After finishing installation, check the 1284 interface board is installed prop- erly: print the configuration page from the "List/Test Print" menu. If it is installed properly, you will see "Parallel - Ricoh CL3500N | Quick Installation Guide - Page 211
Installing Options Attaching Network Data Protection Unit Type C ❒ Protect the network data protection unit from physical shocks. ❒ Use the under slot for the data protection unit. A Check the package contains the following: ❖ Network Data Protection Unit Type C B Turn off the power, and then unplug - Ricoh CL3500N | Quick Installation Guide - Page 212
Installing Options D Carefully insert the network data protection unit, until the card clicks into the place. E Reattach the cover over the network data protection unit. Fasten the screw to secure the cover. ❒ Do not touch the network data protection unit while the machine is in use. It may come - Ricoh CL3500N | Quick Installation Guide - Page 213
printer to the computer through the network. Prepare the hub and other network devices before connecting the 10 BASE-T or 100 BASE-TX cable to the machine's Ethernet port. ❒ Use end of the cable to the printer's network, such as a hub. For details about network environment settings, see Software - Ricoh CL3500N | Quick Installation Guide - Page 214
Connecting the Printer - Reading the LED Lamps 1. Yellow: lit when 100 BASE-TX is being used. Unlit when 10 BASE-T is being used. 2. Green: lit when the printer is properly connected to the network. 86 - Ricoh CL3500N | Quick Installation Guide - Page 215
Printer USB Connection ❒ USB2.0 interface cable is not supplied. Obtain it separately, according to the computer you are using. ❒ USB connection is possible under Windows 98 SE/Me/2000/XP, Windows Server 2003, Mac OS X v10.3.3 or higher. ❒ Windows 98 SE/Me supports USB1.1 speeds. ❒ Mac OS X supports - Ricoh CL3500N | Quick Installation Guide - Page 216
host computer parallel port. ❒ Use shielded interface cable. Unshielded cables create electromagnetic interference that could cause malfunctions. A Turn off the printer and computer. B Connect port. Secure the cable. For details about settings for parallel connection printing, see Software Guide. 88 - Ricoh CL3500N | Quick Installation Guide - Page 217
use either connector. ❒ Either of the two connectors for the 1394 interface unit can be used. ❒ If you have an interface cable with a ferrite core, connect the ferrite core end to the printer. For details about settings for IEEE 1394(IP over 1394, SCSI print) connection printing, see Software Guide - Ricoh CL3500N | Quick Installation Guide - Page 218
environment. ❒ Configure the printer for the network using the control panel. ❒ The following table shows the control panel settings and their default values. These items appear in the [Host Interface] menu ❒ If DHCP is in use, the IP address, subnet mask, and gateway - Ricoh CL3500N | Quick Installation Guide - Page 219
} key, the screen returns to the network setup menu. ❒ The default is "Active". ❒ Leave unused protocols "Not Active". ❒ Enable TCP/IP to use the Pure IP environment of NetWare 5/5.1, NetWare 6/6.5. I If you use TCP/IP, assign the IP address to the printer. Press the {U} or {T} key to display [IP - Ricoh CL3500N | Quick Installation Guide - Page 220
Configuration To get the IP address for the printer, contact your network administrator. J Press the {U} or {T} key are made, about two seconds later, the screen returns to the network setup menu. L If you use TCP/IP, assign [Subnet Mask] and [Gateway Address] following the same procedure for entering the IP - Ricoh CL3500N | Quick Installation Guide - Page 221
. ❒ After about two seconds, the display returns to the network setup menu. P If you use NetWare, select the frame type for NetWare. Select one of the items below frame type detected by the printer is adopted. If your network can use more than two frame types, the printer may fail to select the - Ricoh CL3500N | Quick Installation Guide - Page 222
Configuration After the settings are made, about two seconds later, the screen returns to the network setup menu. S Press the {Online} key. The initial screen appears. T Print a configuration page to confirm the settings made. For details about printing the configuration page, see p.40 "Test - Ricoh CL3500N | Quick Installation Guide - Page 223
"Configuring the Printer for the Network", see Software Guide. ❒ The 802.11b interface unit cannot be used simultaneously with a standard ethernet interface. ❒ In the [SSID] menu, if blank is specified in 802.11 Ad hoc mode or Ad hoc mode, "ASSID" appears. A Press the {Menu} key. The [Menu] screen - Ricoh CL3500N | Quick Installation Guide - Page 224
SSID (Network Name) setting is not necessary, select [Ad hoc]. ❒ The transmission mode of IEEE 802.11b can also be set using a Web browser. For details, see Web browser, and "Configuring the Network Interface Board Using Web Browser", Software Guide. F If [802.11 Ad hoc] or [Ad hoc] is selected for - Ricoh CL3500N | Quick Installation Guide - Page 225
[Comm. Mode], set [SSID] to use for transmission. ❒ Confirm the network administrator for SSID to use. ❒ SSID can also be set using a Web browser Web Image Monitor Help, and "Configuring the Network Interface Board Using Web Browser", Software Guide. K Press the {U} or {T} key to display [SSID], - Ricoh CL3500N | Quick Installation Guide - Page 226
] AAAAAAAAAAAAAAAA After the settings are made, about two seconds later, the screen returns to the IEEE 802.11b setting menu. P In the case of using a WEP key on a network, activate the WEP setting to be used for communication along with WEP. ❒ Confirm the network administrator for the WEP Key to - Ricoh CL3500N | Quick Installation Guide - Page 227
using 64 bit WEP, up to 10 characters can be used for hexadecimal and up to five characters for ASCII. When using 128 bit WEP, up to 26 characters can be used 802.11b setting menu. V Press the {Online} key. The initial screen appears. W Print a configuration page to confirm the settings made. 99 - Ricoh CL3500N | Quick Installation Guide - Page 228
Configuration For details about printing the configuration page, see p.40 "Test Printing". 100 - Ricoh CL3500N | Quick Installation Guide - Page 229
to configure the printer for use in an IEEE 1394 environment. The following table shows the control panel settings and their default values. These items appear in the [Host Interface] menu. Setting Name DHCP IP Address1394 Subnet Mask1394 IP over 1394 SCSI print Bidi-SCSI print Value On 011 - Ricoh CL3500N | Quick Installation Guide - Page 230
returns to the IEEE 1394 setting menu. F Assign the IP address to the printer. Press the {U} or {T} key used for the Ethernet network settings or in the same subnet. Also, do not specify the same subnet mask. ❒ Do not set "011.022.033.044" as the IP address. ❒ To get the IP address for the printer - Ricoh CL3500N | Quick Installation Guide - Page 231
J Press the {Online} key. The initial screen appears. K Print a configuration page to confirm the settings made. For details about printing the configuration page, see p.40 "Test Printing". SCSI print A Press the {Menu} key. The [Menu] screen appears. B Press the {U} or {T} key to display - Ricoh CL3500N | Quick Installation Guide - Page 232
made, about two seconds later, the screen returns to the IEEE 1394 setting menu. G Set [Bidi-SCSI print] in the same way. H Press the {Online} key. The initial screen appears. I Print a configuration page to confirm the settings made. For details about printing the configuration page, see p.40 "Test - Ricoh CL3500N | Quick Installation Guide - Page 233
the Printer Driver Quick Install Windows 95/98/Me, Windows 2000/XP, Windows Server 2003, and Windows NT 4.0 users can easily install this software using the CD-ROM provided. Using Quick Install, the PCL printer driver and/or RPCS printer driver and SmartDeviceMonitor for Client is installed under - Ricoh CL3500N | Quick Installation Guide - Page 234
or printer drivers. ❒ Auto Run may not work with certain operating system settings. If this happens, launch "Setup.exe" on the CD-ROM root directory. ❒ Select a printer to whose IP address is displayed in [Connect To] to install SmartDeviceMonitor for Client when using TCP/IP. Quick Install is - Ricoh CL3500N | Quick Installation Guide - Page 235
hard disk drive, and then launch "Setup.exe" to start the installation. ❒ To uninstall the Operating Instructions Manual, select [Programs] in the [Start] menu, select your printer driver, and then click [uninstall]. You can uninstall each Manual Guide separately. ❒ If you are using an incompatible - Ricoh CL3500N | Quick Installation Guide - Page 236
- Ricoh CL3500N | Quick Installation Guide - Page 237
operations: • Logging in to Administrator mode in Web Image Monitor • Starting User Management Tool of SmartDeviceMonitor for Admin • Connecting to the printer via telnet • Connecting to the printer via ftp To use the default account, enter "admin" as the user name, and leave the password blank - Ricoh CL3500N | Quick Installation Guide - Page 238
This printer comes with the following administrator menus: ❖ Administrator menus under [Maintenance]: • Menu Protect • List Print Lock • File Locking • Unlock Files Note ❒ The "File Locking" and "Unlock Files" menus are displayed when the op- tional hard disk is installed. ❖ Administrator menus - Ricoh CL3500N | Quick Installation Guide - Page 239
[PCL Menu], [PS Menu], [PDF Menu], and [Language] menus. • Level 2 You can preserve settings for the [Paper Input], [Maintenance], [System], [Host Interface], [PCL Menu], [PS Menu], [PDF Menu], and [Language] menus. • Off Operation of menu items is unrestricted. Note ❒ Default: Off ❖ List Print Lock - Ricoh CL3500N | Quick Installation Guide - Page 240
Public ❒ This menu item is displayed if the optional Bluetooth interface unit is in- stalled. ❒ If the settings are changed to "Private" after registering computers that use this printer with the operating mode set to "PublicPrivate", only registered computers can use this printer via the Bluetooth - Ricoh CL3500N | Quick Installation Guide - Page 241
Operating Instructions Software Guide Read This First Manuals for This Printer 8 Preparing for Printing Quick Install...9 Confirming the Connection Method 11 Network Connection 11 Local Connection ...13 Using the SmartDeviceMonitor for Client Port 15 Installing SmartDeviceMonitor for Client 15 - Ricoh CL3500N | Quick Installation Guide - Page 242
49 When using the PostScript 3 Printer Driver 50 Form Feed...51 Banner Page ...51 Printing after Resetting the Printer 51 Installing the Printer Driver Using USB 52 Windows 98 SE/Me - USB 52 Windows 2000 - USB 54 Windows XP, Windows Server 2003 - USB 55 Troubleshooting USB 56 Printing with - Ricoh CL3500N | Quick Installation Guide - Page 243
the Error Log 109 Form Feed...111 Canceling a Print Job 112 Windows - Canceling a Print Job 112 Mac OS - Canceling a Print Job 113 Caution During Printing 115 Collate ...115 Spool Printing...115 Cover...117 Memory Capacity and Paper Size 117 Making Printer Settings Using the Control Panel Menu - Ricoh CL3500N | Quick Installation Guide - Page 244
PS menu 155 PS menu parameters 155 PDF Menu ...157 Changing the PDF menu 157 PDF menu parameters 157 Language Menu 160 Changing the language menu 160 Language menu parameters 160 Monitoring and Configuring the Printer Using Web Image Monitor 161 Displaying Top Page 162 About Menu and Mode - Ricoh CL3500N | Quick Installation Guide - Page 245
Understanding the Displayed Information 218 Print Job Information 218 Print Log Information 218 Configuring the Network Interface Board 219 Message List ...225 System Log Information 225 Using a Printer Server Preparing Printer Server 231 Printing notification via SmartDeviceMonitor for Client - Ricoh CL3500N | Quick Installation Guide - Page 246
the Printer 259 Using PostScript 3 260 Job Type ...260 Duplex Printing...262 Color Mode...263 Gradation ...263 Color Profile ...263 Color Setting ...264 CMYK Simulation Profile 265 Dithering ...265 Gray Reproduction 265 Color Matching ...265 Printer Utility for Mac 266 Installing Printer - Ricoh CL3500N | Quick Installation Guide - Page 247
Adobe PageMaker Version 6.0, 6.5, or 7.0 293 When Using Windows Terminal Service/MetaFrame 294 Operating Environment 294 Supported Printer Drivers 294 Limitations ...294 Cautions When Using Bluetooth Interface Unit 297 Information about Installed Applications 298 expat ...298 JPEG LIBRARY - Ricoh CL3500N | Quick Installation Guide - Page 248
about printer setup and options. ❖ Maintenance Guide (HTML) Provides information about paper, replacing supplies, and dealing with paper jams and error messages. ❖ Software Guide (HTML) (this manual) Provides basic information about installing the printer driver and software, using the printer in - Ricoh CL3500N | Quick Installation Guide - Page 249
Preparing for Printing Quick Install Windows 95/98/Me/2000/XP, Windows Server 2003, and Windows NT 4.0 users can easily install this software using the CD-ROM provided. Using Quick Install, the PCL printer driver and/or RPCS printer driver and SmartDeviceMonitor for Client is installed under network - Ricoh CL3500N | Quick Installation Guide - Page 250
may not work with certain operating system settings. If this hap- pens, launch "Setup.exe" on the CD-ROM root directory. ❒ Select a printer to whose IP address is displayed in [Connect To] to install SmartDeviceMonitor for Client when using TCP/IP. Quick Install is not available unless bidirectional - Ricoh CL3500N | Quick Installation Guide - Page 251
Before installing the printer driver, check how the printer is connected. Follow the driver installation procedure that is appropriate to the connection method. Network Connection This printer can be used as a Windows printing port or network printer. Using this printer as the Windows printing port - Ricoh CL3500N | Quick Installation Guide - Page 252
TCP/IP Available Ports SmartDeviceMonitor for Client port LPR port None See the explanation of how to install the printer driver for each type of port. For the SmartDeviceMonitor for Client port, see p.15 "Using the SmartDeviceMonitor for Client Port". For the Standard TCP/IP port, see p.32 - Ricoh CL3500N | Quick Installation Guide - Page 253
for Printing Using as a network printer This printer can be used as the Windows network printer, the NetWare print server, or the NetWare remote printer. See the explanation of how to install the printer driver for each type of network printer. For the Windows network printer, see p.42 "Using as - Ricoh CL3500N | Quick Installation Guide - Page 254
• USB, Parallel, IEEE 1394 (SCSI print), and Bluetooth connections • Windows NT 4.0: • Parallel connection See the explanation of how to install the printer driver for each method of connection. For the USB connection, see p.52 "Installing the Printer Driver Using USB". For the parallel connection - Ricoh CL3500N | Quick Installation Guide - Page 255
To install SmartDeviceMonitor for Client under Windows 2000/XP Professional, Windows Server 2003, and Windows NT 4.0, you must have an account that has Manage Printers permission. Log on as an Administrator. ❒ Install SmartDeviceMonitor for Client before installing the printer driver when using the - Ricoh CL3500N | Quick Installation Guide - Page 256
Chinese Traditional. Installing the PCL or RPCS Printer Driver (TCP/IP) ❒ To install this printer driver under Windows 2000/XP Professional, Windows Server 2003, and Windows NT 4.0, you must have an account that has Manage Printers permission. Log on as an Administrators or Power Users group member - Ricoh CL3500N | Quick Installation Guide - Page 257
is, you cannot install the printer driver using Auto Run. If you still want to install the printer driver, install using [Add Printer]. See p.70 "If a Message Appears during Installation". Installing the PCL or RPCS Printer Driver (IPP) ❒ To install printer driver under Windows 2000/XP Professional - Ricoh CL3500N | Quick Installation Guide - Page 258
for Printing The installer starts. Auto Run may not work with certain operating system settings. If this happens, launch "Setup.exe" on the CD-ROM root directory. C Select an interface language, and then click [OK]. The default interface language is English. D Click [PCL/RPCS Printer Drivers]. E The - Ricoh CL3500N | Quick Installation Guide - Page 259
, use [Add Printer]. See p.70 "If a Message Appears during Installation". Installing the PostScript 3 Printer Driver (Windows 95/98/Me TCP/IP) A Quit all applications currently running. B Insert the CD-ROM into the CD-ROM drive. The installer starts. Auto Run may not work with certain operating - Ricoh CL3500N | Quick Installation Guide - Page 260
as default. J Specify whether or not to print a test page, and then click [Finish]. K On the [Start] menu, point to [Settings], and then click [Printers]. The [Printers] window appears. L Click the icon of the printer you want to use. On the [File] menu, click [Properties]. M On the [Details] tab - Ricoh CL3500N | Quick Installation Guide - Page 261
Preparing for Printing S Restart the computer to complete installation. ❒ A User Code can be set after the printer driver installation. For information about User Code, see the printer driver Help. Installing the PostScript 3 Printer Driver (Windows 95/98/Me - IPP) A Quit all applications currently - Ricoh CL3500N | Quick Installation Guide - Page 262
Code can be set after the printer driver installation. For information about User Code, see the printer driver Help. Installing the PostScript 3 Printer Driver (Windows 2000 - TCP/IP) ❒ Installing this printer driver requires Administrators permission. Log on using an account that has Administrators - Ricoh CL3500N | Quick Installation Guide - Page 263
the printer as default. M Click [Next >]. N Specify whether or not to print a test page, and then click [Next>]. O Click [Finish]. The printer driver installation starts. ❒ A User Code can be set after the printer driver installation. For information about User Code, see the printer driver Help - Ricoh CL3500N | Quick Installation Guide - Page 264
Preparing for Printing Installing the PostScript 3 Printer Driver (Windows 2000 - IPP) ❒ Installing this printer driver requires Administrators permission. Log on using an account that has Administrators permission. A Quit all applications currently running. B Insert the CD-ROM into the CD-ROM drive - Ricoh CL3500N | Quick Installation Guide - Page 265
print a test page, and then click [Next >]. R Click [Finish]. The printer driver installation starts. ❒ A User Code can be set after the printer driver installation. For information about User Code, see the printer driver Help. Installing the PostScript 3 Printer Driver (Windows XP, Windows Server - Ricoh CL3500N | Quick Installation Guide - Page 266
print a test page, and then click [Next >]. O Click [Finish]. The printer driver installation starts. ❒ A User Code can be set after the printer driver installation. For information about User Code, see the printer driver Help. Installing the PostScript 3 Printer Driver (Windows XP, Windows Server - Ricoh CL3500N | Quick Installation Guide - Page 267
Preparing for Printing C Select an interface language, and then click [OK]. The default interface language is English. ❒ The printer driver with the selected language will be installed. The English printer driver is installed when the following language is selected: Cestina, Magyar, Polski, - Ricoh CL3500N | Quick Installation Guide - Page 268
or not to print a test page, and then click [Next >]. R Click [Finish]. The printer driver installation starts. ❒ A User Code can be set after the printer driver installation. For information about User Code, see the printer driver Help. Installing the PostScript 3 Printer Driver (Windows NT 4.0 TCP - Ricoh CL3500N | Quick Installation Guide - Page 269
Code can be set after the printer driver installation . For information about User Code, see the printer driver Help. Installing the PostScript 3 Printer Driver (Windows NT 4.0 - IPP) ❒ Installing this printer driver requires Administrators permission. Log on using an account that has Administrators - Ricoh CL3500N | Quick Installation Guide - Page 270
whether or not to print a test page, and then click [Finish]. The printer driver installation starts. P Restart the computer to complete installation. ❒ A User Code can be set after the printer driver installation. For information about User Code, see the printer driver Help. Changing the Port - Ricoh CL3500N | Quick Installation Guide - Page 271
Printing B In the [Printers] window, click the icon of the printer you want to use. On the [File] menu, click [Properties]. C Click the [Details] tab, and then click [Configure Port]. The [Port Settings] dialog box appears. Windows 2000 / Windows NT 4.0: A Open [Printers] window from [Start] menu - Ricoh CL3500N | Quick Installation Guide - Page 272
Preparing for Printing Using the Standard TCP/IP Port Installing the PCL or RPCS Printer Driver ❒ To install printer driver under Windows 2000/XP Professional, and Windows Server 2003, you must have an account that has Manage Printers permission. Log on as an Administrators or Power Users group - Ricoh CL3500N | Quick Installation Guide - Page 273
(Windows 2000) ❒ Installing this printer driver requires Administrators permission. Log on using an account that has Administrators permission. A Quit all applications currently running. B Insert the CD-ROM into the CD-ROM drive. The installer starts. Auto Run may not work with certain operating - Ricoh CL3500N | Quick Installation Guide - Page 274
print a test page, and then click [Next>]. P Click [Finish]. The printer driver installation starts. ❒ A User Code can be set after the printer driver installation . For information about User Code, see the printer driver Help. Installing the PostScript 3 Printer Driver (Windows XP, Windows Server - Ricoh CL3500N | Quick Installation Guide - Page 275
then click [Next >]. N Change the printer name if you want, and then click [Next >]. Select the [Yes] check box to configure the printer as default. O Click [Next >]. P Specify whether or not to print a test page, and then click [Next >]. Q Click [Finish]. The printer driver installation starts. 35 - Ricoh CL3500N | Quick Installation Guide - Page 276
Preparing for Printing ❒ A User Code can be set after the printer driver installation. For information about User Code, see the printer driver Help. 36 - Ricoh CL3500N | Quick Installation Guide - Page 277
for Printing Using the LPR Port Installing the PCL or RPCS Printer Driver ❒ To install this printer driver under Windows 2000/XP Professional, Windows Server 2003, and Windows NT 4.0, you must have an account that has Manage Printers permission. Log on as an Administrators or Power Users group - Ricoh CL3500N | Quick Installation Guide - Page 278
(Windows 2000) ❒ Installing this printer driver requires Administrators permission. Log on using an account that has Administrators permission. A Quit all applications currently running. B Insert the CD-ROM into the CD-ROM drive. The installer starts. Auto Run may not work with certain operating - Ricoh CL3500N | Quick Installation Guide - Page 279
print a test page, and then click [Next >]. O Click [Finish]. The printer driver installation starts. ❒ A User Code can be set after the printer driver installation. For information about User Code, see the printer driver Help. Installing the PostScript 3 Printer Driver (Windows XP, Windows Server - Ricoh CL3500N | Quick Installation Guide - Page 280
print a test page, and then click [Next >]. O Click [Finish]. The printer driver installation starts. ❒ A User Code can be set after the printer driver installation. For information about User Code, see the printer driver Help. Installing the PostScript 3 Printer Driver (Windows NT 4.0) ❒ Installing - Ricoh CL3500N | Quick Installation Guide - Page 281
printer as default. L Specify whether or not to print a test page, and then click [Finish]. The printer driver installation starts. M Restart the computer to complete installation. ❒ A User Code can be set after the printer driver installation. For information about User Code, see the printer driver - Ricoh CL3500N | Quick Installation Guide - Page 282
install printer driver under Windows 2000/XP Professional, Windows Server 2003, and Windows NT 4.0, you must have an account that has Manage Printers permission. For this, log on as an Administrators or Power Users group member. ❒ If you print with a print server connected to the printer using the - Ricoh CL3500N | Quick Installation Guide - Page 283
printer driver already installed. If there is, you cannot install the printer driver using Auto Run. If you still want to install the printer driver, use [Add Printer]. See p.70 "If a Message Appears during Installation". Installing the PostScript 3 Printer Driver (Windows 95/98/Me) ❒ If you print - Ricoh CL3500N | Quick Installation Guide - Page 284
about User Code, see the printer driver Help. Installing the PostScript 3 Printer Driver (Windows 2000) ❒ Installing a printer driver requires Administrators permission. Log on using an account that has Administrators permission. ❒ If you print from a print server connected to the printer using the - Ricoh CL3500N | Quick Installation Guide - Page 285
installation. ❒ A User Code can be set after the printer driver installation. For information about User Code, see the printer driver Help. Installing the PostScript 3 Printer Driver (Windows XP, Windows Server 2003) ❒ Installing this printer driver requires Administrators permission. Log on using - Ricoh CL3500N | Quick Installation Guide - Page 286
then click [Next]. G Click [Next]. H Double-click the computer name you want to use as a print server in the [Shared printers] window. I Select the printer you want to use, and then click [Next]. J The printer driver installation starts. K Click [Next >]. Select the [Yes] check box to configure the - Ricoh CL3500N | Quick Installation Guide - Page 287
. ❒ If you print from a print server connected to the printer using the SmartDeviceMonitor port, the client cannot use Recovery Printing and Parallel Printing. ❒ To print from a Windows NT 4.0 print server, install the printer driver before you connect the print server to the printer. A Quit all - Ricoh CL3500N | Quick Installation Guide - Page 288
Preparing for Printing ❒ A User Code can be set after the printer driver installation. For information about User Code, see the printer driver Help. 48 - Ricoh CL3500N | Quick Installation Guide - Page 289
for Printing Using as the NetWare Print Server/Remote Printer This explains how to set up the Windows computer used as the NetWare client. ❒ To install this printer driver under Windows 2000/XP Professional, Windows Server 2003, and Windows NT 4.0, you must have an account that has Manage Printers - Ricoh CL3500N | Quick Installation Guide - Page 290
Monitor or Telnet When using the PostScript 3 Printer Driver Follow the procedure below to set up the PostScript 3 printer driver. A In the [Printers] or [Printers and Faxes] window, open the printer properties. B Click the [PostScript] tab. ❒ When using Windows 2000/XP or Windows NT 4.0, click the - Ricoh CL3500N | Quick Installation Guide - Page 291
job] and [Send CTRL+D after job] check boxes, and then click [OK]. E Click [OK] to close the printer properties dialog box. Form Feed Do not use NetWare to configure form feed. Form feed is controlled by the printer driver on Windows. If NetWare form feed is configured, the printer may not print - Ricoh CL3500N | Quick Installation Guide - Page 292
computer's USB ports using the USB interface cable. Before installing, check that only the operating system is running on the computer and no print jobs are in progress. The printer drivers can be installed from the CD-ROM provided with this printer. Windows 98 SE/Me - USB ❒ Installation via USB is - Ricoh CL3500N | Quick Installation Guide - Page 293
location, and then click [Next]. USB Printing Support is installed. J Click [Finish]. If the printer driver has already been installed, plug and play is enabled, and the icon of the printer connected to the "USB001" port is added to the [Printers] window. K Click [Next >]. L Click [Search for the - Ricoh CL3500N | Quick Installation Guide - Page 294
USB Printing Support is installed. ❒ After installing USB Printing Support, if the printer driver is not installed, follow the plug-and-play instructions of the printer. ❒ Install the printer driver from the CD-ROM provided with the printer. Windows 2000 - USB ❒ Installing a printer driver requires - Ricoh CL3500N | Quick Installation Guide - Page 295
connected to the "USB" port is added to the [Printers] window. The printer drivers can be installed from the CD-ROM provided with this printer. If the printer driver is not installed, follow the plug-and-play instructions of the printer to install it from the CD-ROM provided. A Check that the - Ricoh CL3500N | Quick Installation Guide - Page 296
]. I Click [Finish]. If installation is successful, the icon of the printer connected to the "USB001" port is added to the [Printers] window. ❒ The number after "USB" varies depending on the number of printers connected. Troubleshooting USB Problem Solutions The printer is not recognized auto - Ricoh CL3500N | Quick Installation Guide - Page 297
Preparing for Printing Windows has already configured the USB settings. Open Windows' Device Manager, and then, under [ not to accidentally remove required devices. For details, see Windows Help. ❒ When using Windows 2000/XP or Windows Server 2003, an erroneous device is displayed under [USB - Ricoh CL3500N | Quick Installation Guide - Page 298
for Printing Printing with Parallel Connection To use a printer connected using a parallel interface, click [LPT1] when installing the printer driver. Installing the PCL or RPCS Printer Driver ❒ To install this printer driver under Windows 2000/XP Professional, Windows Server 2003, and Windows NT - Ricoh CL3500N | Quick Installation Guide - Page 299
driver, use [Add Printer]. See p.70 "If a Message Appears during Installation". Installing the PostScript 3 Printer Driver (Windows 95/98/Me) A Quit all applications currently running. B Insert the CD-ROM into the CD-ROM drive. The installer starts. Auto Run may not work with certain operating - Ricoh CL3500N | Quick Installation Guide - Page 300
to print a test page, and then click [Finish]. K Restart the computer to complete installation. ❒ A User Code can be set after the printer driver installation. For information about User Code, see the printer driver Help. Installing the PostScript 3 Printer Driver (Windows 2000) ❒ Installing this - Ricoh CL3500N | Quick Installation Guide - Page 301
for Printing ❒ A User Code can be set after the printer driver installation. For information about User Code, see the printer driver Help. Installing the PostScript 3 Printer Driver (Windows XP, Windows Server 2003) ❒ Installing this printer driver requires Administrators permission. Log on using an - Ricoh CL3500N | Quick Installation Guide - Page 302
Preparing for Printing ❒ A User Code can be set after the printer driver installation. For information about User Code, see the printer driver Help. Installing the PostScript 3 Printer Driver (Windows NT 4.0) ❒ Installing this printer driver requires Administrators permission. Log on using an - Ricoh CL3500N | Quick Installation Guide - Page 303
An mes- sage may appear if jobs from different computers collide. ❒ If jobs collide, the first received is printed first. ❒ When the printer driver is properly installed, connecting or disconnecting the optional IEEE 1394 cable causes the printer icon to change. Windows 2000 ❒ If [Found New Hardware - Ricoh CL3500N | Quick Installation Guide - Page 304
, delete the port and reinstall the printer driver. For details, see "Printer Does Not Print", Maintenance Guide. ❒ If you do not want to install the printer when Found New Hardware Wizard starts under an operating system that supports SCSI print, disable the device by following the procedure - Ricoh CL3500N | Quick Installation Guide - Page 305
. For details, see p.145 "Host Interface Menu". ❒ Installing this printer driver requires Administrators permission. Log on using an account that has Administrators permission. ❒ This printer can receive print data from one computer at a time only. If a job from a computer collides with other data - Ricoh CL3500N | Quick Installation Guide - Page 306
, delete the port and reinstall the printer driver. For details, see "Printer Does Not Print", Maintenance Guide. ❒ If you do not want to install the printer when Found New Hardware Wizard starts under an operating system that supports SCSI print, disable the device by following the procedure - Ricoh CL3500N | Quick Installation Guide - Page 307
. • User Codes are disabled for BIP. You cannot print if print functions are restricted. • Some printers do not support BIP. Printing with Bluetooth Connection To install the printer driver, follow the procedure used to install parallel interface. ❒ To install the printer driver under Windows 2000 - Ricoh CL3500N | Quick Installation Guide - Page 308
want to use. H On the [File] menu, click [Properties]. I Click the [Ports] tab. J Under [Port], select the [COMx:] check box. X indicates the COM port number used by Bluetooth. K Click [OK]. Close the [Printers] window. ❖ If a dialog box appears while transmitting a print job, reestablish network - Ricoh CL3500N | Quick Installation Guide - Page 309
password. For information about entering the password, see p.69 "Send the print job to the printer in use.". For all other security modes and custom settings, no password is required. ❒ For information about each mode, see the manuals provided with the utility. D Click [OK]. Close the [Security - Ricoh CL3500N | Quick Installation Guide - Page 310
installed using Auto Run. Install the printer driver using [Add Printer] or [>Install Printer]. For Windows 95/98/Me, Windows 2000 and Windows NT 4.0: A On the [Start] menu, point to [Settings], and then click [Printers]. B Double-click the Add Printer icon. C Follow the instructions in Add Printer - Ricoh CL3500N | Quick Installation Guide - Page 311
Windows 2000, the [Change Accessories] tab is unavailable. ❒ The RPCS printer driver supports bidirectional communications and updates the printer status automatically. ❒ The PCL printer driver supports bidirectional communications. You can update printer status manually. ❒ The PostScript 3 printer - Ricoh CL3500N | Quick Installation Guide - Page 312
be selected in the Bidi-SCSI print. • Under Windows 2000/XP or Windows Server 2003, [Enable bidirectional support] must be selected, and [Enable printer pooling] must not be selected on the [port] tab with RPCS printer driver. ❖ When connected with USB The printer must be connected to the computer - Ricoh CL3500N | Quick Installation Guide - Page 313
you are using the PS printer driver, click the [Device Settings] tab. E Select options installed from the [Option] area, and then make the neces- sary settings. F Select the total amount of the memory in [Total Memory:], when the option- al SDRAM module is added. G Under [Paper source tray settings - Ricoh CL3500N | Quick Installation Guide - Page 314
users. A On the [Start] menu, point to [Settings], and then click [Printers]. The [Printers] window appears. B Click the icon of the printer you want to use. C On the [File] menu, click [Properties]. D Make the necessary settings, and then click [OK]. ❒ With some applications, the printer driver - Ricoh CL3500N | Quick Installation Guide - Page 315
users can change the properties displayed in the [Print] dialog box of an application. Settings made here are used as defaults when printing from this application. For details, see the printer driver Help. Windows 2000 - Accessing the Printer Properties Making printer default settings - the printer - Ricoh CL3500N | Quick Installation Guide - Page 316
defaults when printing from this application. A On the [File] menu, click [Print...]. The [Print] dialog box appears. B Select the printer you want to use in the [Select Printer] list. C Make the necessary settings, and then click [Apply] to start printing. For details, see the printer driver Help - Ricoh CL3500N | Quick Installation Guide - Page 317
make here are used as the default settings for all applications. ❒ Do not make a setting for [Form to Tray Assignment]. For details, see the printer driver Help. Making printer default settings - Printing Preferences ❒ You cannot change the printer default settings for each user. Settings made in - Ricoh CL3500N | Quick Installation Guide - Page 318
application. A On the [File] menu, click [Print...]. The [Print] dialog box appears. B Select the printer you want to use in the [Select Printer] list. C Make the necessary settings, and then click [Apply] to start printing. For details, see the printer driver Help. Windows NT 4.0 - Accessing the - Ricoh CL3500N | Quick Installation Guide - Page 319
to Tray Assignment]. For details, see the printer driver Help. Making printer default settings - Default ❒ To change the printer default settings including option configuration settings, log on using an account that has Full Control permission. Members of the Administrators, Server Operators, Print - Ricoh CL3500N | Quick Installation Guide - Page 320
users can change the properties displayed in the [Print] dialog box of an application. Settings made here are used as defaults when printing from this application. A On the [File] menu, click [Print]. The [Print] dialog box appears. B Select the printer you want to use in the [Name] list, and - Ricoh CL3500N | Quick Installation Guide - Page 321
dialog box. "Multi-tab" is used as an example in this manual. For details about changing the dialog box types, see the printer driver Help. ❖ Multi-tab This dialog box type is designed for users who often change print settings to perform various printing operations. ❖ Custom Setting This dialog box - Ricoh CL3500N | Quick Installation Guide - Page 322
to use in the [Name] list, and then click [Prop- erties]. The printer properties dialog box appears. C Make the necessary settings, and then click [OK]. D Click [OK] to start printing. For details, see the printer driver Help. Windows 2000 - Accessing the Printer Properties Making printer default - Ricoh CL3500N | Quick Installation Guide - Page 323
make here are used as the default settings for all applications. ❒ Do not make a setting for [Form to Tray Assignment]. For details, see the printer driver Help. Making printer default settings - Printing Preferences ❒ You cannot change the printer default settings for each user. Settings made in - Ricoh CL3500N | Quick Installation Guide - Page 324
On the [File] menu, click [Print...]. The [Print] dialog box appears. B Select the printer you want to use in the [Select Printer] list. C Make the necessary settings, and then click [Apply] to start printing. For details, see the printer driver Help. Windows XP, Windows Server 2003 - Accessing the - Ricoh CL3500N | Quick Installation Guide - Page 325
make here are used as the default settings for all applications. ❒ Do not make a setting for [Form to Tray Assignment]. For details, see the printer driver Help. Making printer default settings - Printing Preferences ❒ You cannot change the printer default settings for each user. Settings made in - Ricoh CL3500N | Quick Installation Guide - Page 326
Setting Up the Printer Driver A On the [File] menu, click [Print...]. The [Print] dialog box appears. B Select the printer you want to use in the [Select Printer] list. C Make the necessary settings, and then click [Apply] to start printing. For details, see the printer driver Help. Windows NT 4.0 - - Ricoh CL3500N | Quick Installation Guide - Page 327
Up the Printer Driver Making printer default settings - Default ❒ To change the printer default settings including option configuration settings, log on using an account that has Full Control permission. Members of the Administrators, Server Operators, Print Operators, and Power Users groups have - Ricoh CL3500N | Quick Installation Guide - Page 328
Setting Up the Printer Driver B Select the printer you want to use in the [Name] list, and then click [Prop- erties]. The printer properties dialog box appears. C Make the necessary settings, and then click [Apply]. D Click [OK] to start printing. For details, see the printer driver Help. 88 - Ricoh CL3500N | Quick Installation Guide - Page 329
properties dialog box are applied to all users. ❒ With some applications, the printer driver settings are not used, and the application's own default settings are applied. A On the [Start] menu, point to [Settings], and then click [Printers]. The [Printers] window appears. B Click the icon of the - Ricoh CL3500N | Quick Installation Guide - Page 330
to use in the [Name] list, and then click [Prop- erties]. The printer properties dialog box appears. C Make the necessary settings, and then click [OK]. D Click [OK] to start printing. For details, see the printer driver Help. Windows 2000 - Accessing the Printer Properties Making printer default - Ricoh CL3500N | Quick Installation Guide - Page 331
dialog box are applied to all users. A On the [Start] menu, point to [Settings], and then click [Printers]. The [Printers] window appears. B Click the icon of the printer you want to use. C On the [File] menu, click [Printing Preferences...]. The [Printing Preferences] dialog box appears. D Make the - Ricoh CL3500N | Quick Installation Guide - Page 332
make here are used as the default settings for all applications. ❒ Do not make a setting for [Form to Tray Assignment]. For details, see the printer driver Help. Making printer default settings - Printing Preferences ❒ You cannot change the printer default settings for each user. Settings made in - Ricoh CL3500N | Quick Installation Guide - Page 333
application. A On the [File] menu, click [Print...]. The [Print] dialog box appears. B Select the printer you want to use in the [Select Printer] list. C Make the necessary settings, and then click [Print] to start printing. For details, see the printer driver Help. Windows NT 4.0 - Accessing the - Ricoh CL3500N | Quick Installation Guide - Page 334
to Tray Assignment]. For details, see the printer driver Help. Making printer default settings - Default ❒ To change the printer default settings including option configuration settings, log on using an account that has Full Control permission. Members of the Administrators, Server Operators, Print - Ricoh CL3500N | Quick Installation Guide - Page 335
[OK]. D Click [OK] to start printing. For details, see the printer driver Help. Mac OS - Setting Up for Printing Making paper settings from an application A Open the file you want to print. B On the [File] menu, click [Page Setup]. C Check that the printer you want to use is displayed in [Format for - Ricoh CL3500N | Quick Installation Guide - Page 336
the Printer Driver The [Page Setup] dialog box varies depending on the application you use. For details, see the manuals provided with the Mac OS. D Configure the settings, and then click [OK]. Setting up for printing from an application A Open the file you want to print. B On the [File] menu, click - Ricoh CL3500N | Quick Installation Guide - Page 337
can be sent directly to this printer for printing. ❒ The RPCS printer driver must be installed. ❒ PDF Direct Print is not available with some versions of DeskTopBinder Lite. Use DeskTopBinder Lite installed from the CD-ROM provided with this printer. ❒ PDF Direct Print settings can be made from - Ricoh CL3500N | Quick Installation Guide - Page 338
print Windows files, preview printouts, convert images, and register scanners for documents without having to open DeskTopBinder Lite. You can also use these functions simply by dragging a target file to the button corresponding to the required function and dropping it there. A On the [Start] menu - Ricoh CL3500N | Quick Installation Guide - Page 339
[Finish] to close the [Extended Features Wizard] screen. E Move the PDF file you want to print to the PDF Direct Printing icon on the palette using a drag-and-drop operation. F [Output File List-PDF Direct Print] is displayed. Select the PDF file you want to output to make it reverse video, and then - Ricoh CL3500N | Quick Installation Guide - Page 340
characters) 2. Change Icon... Change the icon displayed on the tool bar. 3. Printer name: Displays a list of RPCS drivers that support PDF direct printing. 4. Duplex Print on both sides of sheets. 5. Layout Print multiple pages on a single sheet. 6. Punch Punch holes in output sheets. 7. Staples - Ricoh CL3500N | Quick Installation Guide - Page 341
Other Print Operations 12. Range Specify the print area on each page. 13. Color/Black and White: Specify color or black-and-white printing. 14. Resolution Specify a print resolution. 15. PDF Password If the PDF file is password-protected, enter the password in this field. Otherwise, the file cannot - Ricoh CL3500N | Quick Installation Guide - Page 342
of misprints. ❒ To use this function, the optional hard disk must be installed on the printer. ❒ The number of pages the printer can save varies depending on the contents of the print images. At most, the printer can save 30 jobs or 1,100 pages for Sample Print and Locked Print. At most, the - Ricoh CL3500N | Quick Installation Guide - Page 343
Other Print Operations B Select the printer you want to use in the [Name] list, and then click [Prop- erties]. The printer properties dialog box appears. C In the [Job type:] box, click [Sample Print]. D In the [User ID:] box, enter a user ID using up to eight alphanumeric char- acters. This is used - Ricoh CL3500N | Quick Installation Guide - Page 344
job is printed, the job saved on the hard disk is deleted. Deleting a Sample Print File A Press the {Menu} key. The [Menu] screen appears. B Press the {U} or {T} key to display [Sample Print Error Log When a print job is not saved on the hard disk, it remains in the error log and can be checked using - Ricoh CL3500N | Quick Installation Guide - Page 345
logs will be deleted. A Press the {Menu} key. The [Menu] screen appears. B Press the {U} or {T} key to display [Sample Print], and then press the {# Enter} key. The user ID and the time when the job was stored appear. C Press the {U} or {T} key to display [Error File(s)], and then press the {# Enter - Ricoh CL3500N | Quick Installation Guide - Page 346
000 pages. ❒ You can identify the file you want to print by the user ID and the time when the job was stored. ❒ After the Locked Print file is printed, the job in the printer is deleted automatically. ❒ Follow the procedure below to use this function with the PCL or RPCS printer driver under Windows - Ricoh CL3500N | Quick Installation Guide - Page 347
Other Print Operations The [Print] dialog box appears. B Select the printer you want to use in the [Name] list, and then click [Prop- erties]. C In the [Job type:] box, click [Locked Print]. D In the [User ID:] box, enter a user ID using up to eight alphanumeric char- acters. This is used to - Ricoh CL3500N | Quick Installation Guide - Page 348
the {Escape} key. H Press the {# Enter} key. After the job is printed, the job saved on the hard disk is deleted. Deleting a Locked Print File A Press the {Menu} key. The [Menu] screen appears. B Press the {U} or {T} key to display [Locked Print], and then press the {# Enter} key. C Press the {U} or - Ricoh CL3500N | Quick Installation Guide - Page 349
Print Operations H Press the {# Enter} key. The message [Deleted] appears, and then the Locked Print job selection screen appears. Checking the Error Log When a print job is not saved on the hard disk, it remains in the error log and can be checked using the control panel. ❒ The latest 50 error - Ricoh CL3500N | Quick Installation Guide - Page 350
Other Print Operations The initial screen appears. 110 - Ricoh CL3500N | Quick Installation Guide - Page 351
there is no paper in the paper that does not agrees with the size and form specified by the printer driver, or there is no paper. You can form feed using tray. A Press the {Form Feed} key, and then select the paper tray on the screen. B Press the {# Enter} key. The job is printed from the selected - Ricoh CL3500N | Quick Installation Guide - Page 352
. Windows - Canceling a Print Job ❒ When the printer is connected to multiple computers, be careful not to accidentally cancel other users' print jobs. If the print job you want to cancel is being printed A Check if the print job you want to cancel is currently being printed. While the print job may - Ricoh CL3500N | Quick Installation Guide - Page 353
can also open the print job queue window by double-clicking the printer icon in the [Printer] window. B Select the name of the job you want to cancel. C On the [Document] menu, click [Cancel Printing]. ❒ When this printer is used as a network printer, other users' print jobs cannot be canceled from - Ricoh CL3500N | Quick Installation Guide - Page 354
for [I/O Timeout] on the [Host Interface] menu. If the print job you want to cancel is not being printed A Double-click the printer icon on the desktop. A window appears showing all print jobs that are currently queuing to be printed. Check the current status of the job you want to cancel. Under Mac - Ricoh CL3500N | Quick Installation Guide - Page 355
collate and job separation, see the printer driver Help. ❖ Collate Output can be assembled as sets in sequential order. ❒ To use these functions, an optional memory unit of at least 256 MB or the optional hard disk drive must be installed on the printer. ❒ Up to 150 pages can be sorted using RAM. If - Ricoh CL3500N | Quick Installation Guide - Page 356
the user name and password appears. D Enter the user name and password, and then click [OK]. Contact your network administrator for information about the settings. E In the menu area, click [Job]. A submenu will appear. F On the [Printer] menu, click [Spool Printing]. A list of spooled jobs appears - Ricoh CL3500N | Quick Installation Guide - Page 357
be different. For printing methods, see the printer driver Help. Memory Capacity and Paper Size Additional memory apart from standard memory may be required depending on the paper size and data type. ❒ When printing from bypass tray, duplex printing will not be supported regardless of the memory - Ricoh CL3500N | Quick Installation Guide - Page 358
(standard + 128 MB) • A5, B5 JIS, A4, Letter, and Legal sized paper printing is guaranteed. Duplex printing (600 x 600 dpi) ❖ 128 MB (standard) • B5 JIS sized paper printing is guaranteed. • A4, Letter and Legal sized paper can be printed. ❖ 256 MB (standard + 128 MB) • B5 JIS, A4, Letter, and Legal - Ricoh CL3500N | Quick Installation Guide - Page 359
Other Print Operations ❒ To duplex print at 1200 x 1200 dpi, the optional SDRAM module must be installed. High density images cannot be printed if the SDRAM module is not installed. 119 - Ricoh CL3500N | Quick Installation Guide - Page 360
is installed. ❒ For Details, see p.106 "Locked Print". ❖ Paper Input Menu Bypass Size Paper Type Tray Locking Tray Priority ❖ List/Test Print Menu Config.P/Er.Log Config. Page Error Log Menu List Color Demo Page PCL Config.Page PS Config. Page PDF Config.Page Hex Dump ❖ Maintenance Menu Color Regist - Ricoh CL3500N | Quick Installation Guide - Page 361
Repeat ❖ System Menu Prt. Err Report Auto Continue Memory Overflow Copies Printer Lang. Sub Paper Size Page Size Def.Print Lang. Duplex Blank Pages Energy Saver 1 Energy Saver 2 Auto Reset Time Unit of Measure B&W Page Detect Spool Printing Letterhead Mode Bypass Priority RAM Disk Notify by Email - Ricoh CL3500N | Quick Installation Guide - Page 362
802.11b] appears when the optional IEEE 802.11b interface unit is installed. ❖ PCL Menu Menu Orientation Form Lines Font Source Font Number Point Size Font Pitch Symbol Set Courier Font Ext. A4 Width Append CR to LF Resolution ❖ PS Menu Menu Data Format Resolution Color Setting Color Profile 122 - Ricoh CL3500N | Quick Installation Guide - Page 363
Making Printer Settings Using the Control Panel ❖ PDF Menu Menu PDF: Change PW PDF Group PW Resolution Color Setting Color Profile ❖ Language Menu English German French Italian Dutch Swedish Norwegian Danish Spanish Finnish Portuguese Czech Polish Hungarian 123 - Ricoh CL3500N | Quick Installation Guide - Page 364
Printer Settings Using the Control Panel Paper Input Menu This section explains about paper settings on the Paper Input menu such as paper sizes and types on each tray. Changing the paper input menu Tray locking Follow the procedure below to lock/unlock trays. A Press the {Menu} key. The [Menu - Ricoh CL3500N | Quick Installation Guide - Page 365
Making Printer Settings Using the Control Panel A Press the {Menu} key. The [Menu] screen appears. B Press the {U} or {T} key to display [Paper Input], and then press the {# Enter} key. C Press the {U} or {T} key to display [Tray Priority], and then press the {# Enter} key. D Press the {U} or {T} - Ricoh CL3500N | Quick Installation Guide - Page 366
Plain Paper ❒ Only the installed trays appear on the display panel. ❖ Tray Locking If you use various types of paper, you can lock a tray to prevent printing on different types of paper such as letterhead or colored paper. When [Auto Select] is selected in [Paper Source] from the printer driver, the - Ricoh CL3500N | Quick Installation Guide - Page 367
Making Printer Settings Using the Control Panel ❖ Tray Priority You can set a tray to be checked first when [Auto Tray Select] is selected in [Paper Source] from the printer driver. The tray selected here is used when no tray is selected for a print job. ❒ Default :Tray 1 ❒ Only installed trays - Ricoh CL3500N | Quick Installation Guide - Page 368
Printer Settings Using the Control Panel List/Test Print Menu You can print lists of configurations on printer or the paper printings. Also, you can check the types and characters of all the printable fonts. Printing a Configuration Page Follow the procedure below to print the configuration page - Ricoh CL3500N | Quick Installation Guide - Page 369
The version number of the printer language is displayed. ❖ Options The options installed are displayed. ❖ Paper Input Settings made on the [Paper Input] menu are displayed. For details, see p.125 "Paper input menu parameters". ❖ Maintenance Settings made on the [Maintenance] menu are displayed. For - Ricoh CL3500N | Quick Installation Guide - Page 370
printer. ❖ Error Log You can print an error report. ❖ Menu List You can print a menu list showing all available menus. ❖ Color Demo Page You can print a Color Demo Page. ❖ PCL Config.Page You can print the current PCL configuration. ❖ PS Config. Page You can print an installed PS font and the Disk - Ricoh CL3500N | Quick Installation Guide - Page 371
Making Printer Settings Using the Control Panel ❖ PDF Config.Page You can print an installed PS3 font and the Disk Directory List which shows the optional hard disk. ❖ Hex Dump You can print the data sent by the computer using Hex Dump. 131 - Ricoh CL3500N | Quick Installation Guide - Page 372
Making Printer Settings Using the Control Panel Maintenance Menu You can set printing conditions such as density and calibration, and printer management such as formatting the optional hard disk unit. Changing the maintenance menu This section explains changing the maintenance menu using examples. - Ricoh CL3500N | Quick Installation Guide - Page 373
disk unit, see Setup Guide. If you cannot install it properly even after attempting reinstallation, contact your sales or service representative. Displaying the signal strength Follow the procedure below to check the IEEE 802.11b (wireless LAN) signal on the [Maintenance] menu. A Press the {Menu - Ricoh CL3500N | Quick Installation Guide - Page 374
the {# Enter} key. The wireless LAN setting is reset. After about three seconds, the initial screen appears. Maintenance menu parameters This section explains about parameters that can be set on the Maintenance menu. ❖ Color Regist. You can specify Auto Adjust or Fuser Adjust for this feature. 134 - Ricoh CL3500N | Quick Installation Guide - Page 375
, see "Adjusting the Image Density", Maintenance Guide. ❖ Registration You can adjust the starting position of the printing page. ❖ Prt. Test Sheet You can print the registration test sheet. • Tray 2 • Tray 3 • Duplex.BackSide ❒ Only the installed trays appear on the display panel. ❖ Adjustment - Ricoh CL3500N | Quick Installation Guide - Page 376
the installed trays appear on the display panel. ❖ Plain Paper You can specify plain paper for each tray. • Tray 1 • Tray 2 • Tray 3 • Bypass Tray ❒ Default: Normal ❖ Maint. Reset Maintenance Reset allows the user to reset the counters of each internal unit, such as the Transfer Belt and Fusing Unit - Ricoh CL3500N | Quick Installation Guide - Page 377
Making Printer Settings Using the Control Panel For details about displaying the signal strength, see p.133 "Displaying the signal strength". ❖ WL.LAN Defaults Reset the wireless LAN to default. The menu appears when the 802.11b interface unit is installed. ❖ Image Area You can extend the printable - Ricoh CL3500N | Quick Installation Guide - Page 378
use the printer. The printer can be used on factory default, but the configuration can be changed depending on the condition of the user. The changed condition holds even if the printer is turned off. Changing the system menu to switch to the En- ergy Saver mode. F Press the {# Enter} key. Wait for - Ricoh CL3500N | Quick Installation Guide - Page 379
not print • Error Info. ❒ Default: Do not print ❖ Copies You can specify the number of pages to print. This setting is disabled if the number of pages to print is specified by command or the printer driver. • 1-999 ❖ Printer Lang. You can specify the printer language. • Auto Detect • PCL • PS • PDF - Ricoh CL3500N | Quick Installation Guide - Page 380
select [Auto], the printer uses an alternative paper size if the currently specified paper is not loaded. When you select [Off], the printer uses any size paper in the current specified paper tray. • Off • Auto ❒ Default: Off ❖ Page Size You can specify the default paper size. 8 1/2 x 14, 8 1/2 x 11 - Ricoh CL3500N | Quick Installation Guide - Page 381
Making Printer Settings Using the Control Panel ❒ Default: Off ❒ This menu appears only when the optional duplex unit is installed. ❖ Blank Pages You can specify whether or not to print blank pages. • Do not print • Print ❒ Default: Print ❖ Energy Saver 1 You can set On/Off for Energy Saver mode - Ricoh CL3500N | Quick Installation Guide - Page 382
the unit of measurement in "mm" or "inch" for the custom paper size. • mm • inch ❒ Default value is destination dependant. ❖ B&W Page Detect Specify whether to recognize black-and-white images. Use the black-andwhite recognition function to print all monochrome pages in monochrome mode even if color - Ricoh CL3500N | Quick Installation Guide - Page 383
Making Printer Settings Using the Control Panel ❒ Spooling stores a sent print job temporarily in the printer, and then prints it. ❒ This menu appears only when the optional hard disk is installed. ❖ Letterhead Mode You can select the letterhead printing mode. • Off • Auto Detect • On (Always) ❒ - Ricoh CL3500N | Quick Installation Guide - Page 384
Making Printer Settings Using the Control Panel • Off • On ❒ After changing the setting, turn off the power of the printer briefly, and then turn it on again. ❒ Default: On For information, see Web Image Monitor Help. 144 - Ricoh CL3500N | Quick Installation Guide - Page 385
can set configurations about network connections and communication when using parallel connection between the printer and the computer. The changed configuration holds even if the printer is turned off. Changing the Host Interface menu Follow the procedure below to change the I/O Timeout. A Press - Ricoh CL3500N | Quick Installation Guide - Page 386
Printer Settings Using the Control Panel • 256 KB • 512 KB ❒ Default: 128 KB ❖ I/O Timeout You can set how many seconds the printer should wait before ending a print job. If printing operation details, see "Configuration", Setup Guide. ❖ DHCP You can select [On] or [Off] to use DHCP with TCP/IP. • - Ricoh CL3500N | Quick Installation Guide - Page 387
Making Printer Settings Using the Control Panel ❒ When DHCP is set to on, the subnet mask cannot be changed. To • TCP/IP • NetWare • SMB • AppleTalk ❒ Default: All Active ❖ Ethernet Speed You can select the network speed to operate the printer. • Auto Select • 10Mbps Half D. • 10Mbps Full D. 147 - Ricoh CL3500N | Quick Installation Guide - Page 388
interface unit is installed. • Ethernet • IEEE 802.11b ❒ Default: Ethernet ❖ IEEE 1394 Setup You can make settings for IEEE 1394. This menu appears only when the optional IEEE 1394 board is installed. For details about IEEE 1394 Setup, see Setup Guide. ❖ DHCP You can select [On] or [Off] to use TCP - Ricoh CL3500N | Quick Installation Guide - Page 389
settings for wireless LAN. This menu appears only when the optional 802.11b interface unit is installed. ❖ Comm. Mode You can select the transmission mode for IEEE 802.11b. • 802.11 Ad hoc • Infrastructure • Ad hoc ❒ Default: 802.11 Ad hoc ❒ Comm. Mode can also be set using a Web Image Monitor. For - Ricoh CL3500N | Quick Installation Guide - Page 390
the 802.11 Ad hoc mode. Select [View] to check the SSID. Select [Enter ID] to set SSID. • View • Enter ID ❒ Select [?] to enter [/] for the SSID. Also, [¥] appears when printing the configuration page, read it as [/]. ❒ Default: blank (ASSID) ❒ Characters used are ASCII 0x20-0x7e (32 bytes). ❒ An - Ricoh CL3500N | Quick Installation Guide - Page 391
Making Printer Settings Using the Control Panel ❒ When using 64 bit WEP, up to 10 hexadecimal or 5 ASCII characters can be entered. When using 128 bit WEP, up to 26 hexadecimal or 13 ASCII characters can be entered. ❒ The WEP key can also be set using Web Image Monitor. For details, see Web Image - Ricoh CL3500N | Quick Installation Guide - Page 392
Making Printer Settings Using the Control Panel PCL Menu You can set conditions when using PCL for printing. Changing the PCL menu Follow the procedure below to change the setting for Orientation. A Press the {Menu} key. The [Menu] screen appears. B Press the {U} or {T} key to display [PCL Menu], - Ricoh CL3500N | Quick Installation Guide - Page 393
the number of lines per page between 5 and 128. ❒ Default: • Metric version: 60 • Inch version: 64 ❖ Font Source You can set the location of the default font. • Resident • RAM • HDD • SD ❒ Default: Resident ❒ When you select [RAM], you can select only fonts downloaded to the printer RAM. ❒ When you - Ricoh CL3500N | Quick Installation Guide - Page 394
Making Printer Settings Using the Control Panel ❖ Symbol Set You can specify the character set for the default font. Available sets are as follows: Roman-8, ISO L1, ISO L2, ISO L5, PC-8, PC-8 D/N, PC-850, PC-852, PC8TK, Win L1, Win L2, Win L5, Desktop, PS Text, VN Intl, VN US, MS Publ, Math-8, PS - Ricoh CL3500N | Quick Installation Guide - Page 395
Making Printer Settings Using the Control Panel PS Menu You can set conditions when using Postscript for printing. Changing the PS menu Follow the procedure below to change the setting for data format. A Press the {Menu} key. The [Menu] screen appears. B Press the {U} or {T} key to display [PS Menu - Ricoh CL3500N | Quick Installation Guide - Page 396
is canceled if binary data is sent from the printer driver. When you use an Ethernet connection, the print job is canceled if: • The printer driver data format is TBCP and the data format selected using the control panel is Binary Data. • The printer driver data format is binary and the data format - Ricoh CL3500N | Quick Installation Guide - Page 397
Making Printer Settings Using the Control Panel PDF Menu You can set conditions when using PDF printing. Changing the PDF menu Follow the procedure below to change the resolution setting. A Press {Menu} key. The [Menu] screen appears. B Press {U} or {T} key to display [PDF Menu], and then press the - Ricoh CL3500N | Quick Installation Guide - Page 398
a group password specified using DeskTopBinder Lite. ❒ When you use a group password, the optional data protection unit must be installed. • Current PW ❒ The password can be set using Web Image Monitor, but must be sent through the network. For increased security, use this menu on the control panel - Ricoh CL3500N | Quick Installation Guide - Page 399
Making Printer Settings Using the Control Panel • Presentation • Photographic • User Setting ❒ Default: Auto 159 - Ricoh CL3500N | Quick Installation Guide - Page 400
Making Printer Settings Using the Control Panel Language Menu You can set language displayed on the menu. Changing the language menu Follow the procedure below to change the language. A Press the {Menu} key. The [Menu] screen appears. B Press the {U} or {T} key to display [Language], and then press - Ricoh CL3500N | Quick Installation Guide - Page 401
settings. ❖ Available operations The following operations can be remotely performed using Web Image Monitor from a client computer. • Displaying printer status or settings • Checking the print job status or history • Interrupting currently printing jobs • Resetting the printer • Managing the Address - Ricoh CL3500N | Quick Installation Guide - Page 402
's address)/" in the address bar of a Web browser. Top Page of Web Image Monitor appears. ❒ If the printer's host name has been registered on the DNS or WINS server, you can enter it. For details, see p.279 "Using DHCP". ❒ When setting SSL, a protocol for encrypted communication, under environment - Ricoh CL3500N | Quick Installation Guide - Page 403
User Mode In the user mode, printer status, settings, and print job status can be viewed, but the printer settings cannot be changed. 1. Status Printer status, including the amount of remaining paper in paper trays and the amount of remaining toner, is displayed. 2. Job Allows you to display list - Ricoh CL3500N | Quick Installation Guide - Page 404
Status Printer status, including the amount of remaining paper in paper trays and the amount of remaining toner, is displayed. 2. Job Allows you to display list of Spooled Print Job, Job History, Error Log, Sample Print and Locked Print. This also allows you to delete Spooled Print Job, Sample Print - Ricoh CL3500N | Quick Installation Guide - Page 405
Printer Displaying Web Image Monitor Help When using Downloading Help A In the [OS] list, select the operating system. B In the [Language] list, select the language. C Click [Download]. D Download Help by following the instructions on the screen. E Store the downloaded mode. B In the menu - Ricoh CL3500N | Quick Installation Guide - Page 406
Monitoring and Configuring the Printer E Click [Apply]. 166 - Ricoh CL3500N | Quick Installation Guide - Page 407
Client for Windows NT/2000/XP ❖ Available operations The following functions are available: • Printer Information function • Display the network settings and detailed information of the printer. • Display the number of pages printed under each User Code. • Display the status of print jobs sent from - Ricoh CL3500N | Quick Installation Guide - Page 408
using the control panel. • Select type of paper loaded in the paper trays. • Energy Saver function • Enable or disable the Energy Saver mode. • System Status function • Display the information such as when paper is depleted during printing on a computer. • Groups function • Monitor multiple printers - Ricoh CL3500N | Quick Installation Guide - Page 409
using the selected protocol appears. ❒ Select the protocol of the printer whose configuration you want to change. C In the list, select a printer whose configuration you want to change. D On the [Tools] menu, click [NIB Setup Tool]. A Web browser opens and the dialog box for entering the user - Ricoh CL3500N | Quick Installation Guide - Page 410
] on [Configuration] page. Changing the Paper Type Follow the procedure below to change the paper type. A Start SmartDeviceMonitor for Admin. B On the [Group] menu, point to [Search Device], and then click [TCP/IP], [IPX/SPX] or [TCP/IP(SNMPv3)]. A list of printers using the selected protocol - Ricoh CL3500N | Quick Installation Guide - Page 411
Type] list for each tray. G Click [Apply]. H Quit Web Image Monitor. For details about setting items, see Help in the [General Settings] on [Configuration] page. Managing User Information Follow the procedure below to manage the user's information using SmartDeviceMonitor for Admin. Prints jobs can - Ricoh CL3500N | Quick Installation Guide - Page 412
to export the information of the number of pages printed under each User Code as a ".csv" file. A Start SmartDeviceMonitor for Admin. B Click the [User Page Count] tab of User Management Tool. C On the [File] menu, click [Export User Statics List]. D Specify the save location and file name, and - Ricoh CL3500N | Quick Installation Guide - Page 413
the [Access Control List] tab of User Management Tool. C On the [Edit] menu, click [Add New User]. D Enter the User Code and user name. E Select the check box of the functions applicable to the new user. ❒ If the check boxes are unavailable, there is no restriction to use that function. For details - Ricoh CL3500N | Quick Installation Guide - Page 414
Configuring the Printer Configuring the Energy Saver Mode Follow the procedure below to configure Energy Saver mode. A Start SmartDeviceMonitor for Admin. B On the [Group] menu, point to [Search Device], and then click [TCP/IP], [IPX/SPX] or [TCP/IP(SNMPv3)]. A list of printers using the selected - Ricoh CL3500N | Quick Installation Guide - Page 415
Monitoring and Configuring the Printer Top Page of Web Image Monitor appears. F Click [Configuration]. G Click [Device Settings]. Help. C To obtain status details, click the printer in the list, and then click [Open] on the [Device] menu. The printer status appears in the dialog box. D Quit - Ricoh CL3500N | Quick Installation Guide - Page 416
list of printers using the selected protocol appears. ❒ Select the protocol of the printer whose configuration you want to change. C Select a printer in the list. D On the [Tools] menu, Follow the instruction on the screen. E Enter the user name and password, and then click [OK]. Top Page of Web - Ricoh CL3500N | Quick Installation Guide - Page 417
the pop-up menu. The [SmartDeviceMonitor for Client - Options] dialog box appears. D Click the printer you want to monitor, and then select the [To Be Monitored] check box in the [Monitoring Information Settings] area. ❒ To display the printer status in the task tray using the SmartDeviceMonitor for - Ricoh CL3500N | Quick Installation Guide - Page 418
is interrupted and the network printer cancels the job because something went wrong, send the print job again. • Print jobs sent from another computer do not appear in the print queue window, regardless of protocol. • If various users send print jobs using SmartDeviceMonitor for Client to network - Ricoh CL3500N | Quick Installation Guide - Page 419
a paper tray becomes empty or paper is jammed, an e-mail alert is issued to the registered addresses to notify the printer status. For this notification, you can make the e-mail notification settings. Notification timing and e-mail content can be set. A Set [Notify by Email] under the [System] menu - Ricoh CL3500N | Quick Installation Guide - Page 420
Monitoring and Configuring the Printer Auto E-mail Notification A In the menu area, click [Auto E-mail Notification]. The dialog box for making notification settings appears. B Make the following settings: • Notification Messages • Items in the Groups to Notify column • Items in the Select Groups/ - Ricoh CL3500N | Quick Installation Guide - Page 421
change also. ❒ Some commands cannot be used depending on your printer. Using telnet Follow the procedure below to use telnet. ❒ Only one user at a time can log on to perform remote maintenance. A Use the IP address or the host name of the printer to start telnet. % telnet "IP_address" B Enter - Ricoh CL3500N | Quick Installation Guide - Page 422
registered and selected.) Example: to specify accessible IP addresses between 192.168.0.10 and 192.168.0.20: msh> access 1 range 192.168.0.10 192.168.0.20 ❖ Access control initialization msh> access flush • Use from use of the printer by IP address. If you do not need to restrict printing, make - Ricoh CL3500N | Quick Installation Guide - Page 423
Monitoring and Configuring the Printer • Timeout value becomes ineffective. autonet Use the "autonet" command to configure AutoNet parameters are available when multiple interfaces are installed. • ip1394 can be specified only when the IEEE 1394 interface is installed. • wlan can be specified only - Ricoh CL3500N | Quick Installation Guide - Page 424
Monitoring and Configuring the Printer ❖ Mode settings You can set the Bluetooth operation mode to {private} or {public}. msh> btconfig {private | public} • The default is {public}. devicename Use the "devicename" command to display and change the printer name. ❖ View settings msh> devicename ❖ - Ricoh CL3500N | Quick Installation Guide - Page 425
priority. • Priority settings are available when multiple interfaces are installed. ❖ DNS server address selection msh> dhcp dnsaddr {dhcp | static} • Specify whether to obtain the DNS server address from the DHCP server or use the address set by a user. • To obtain the DNS server address from the - Ricoh CL3500N | Quick Installation Guide - Page 426
use when the printer is expecting data from the network. • The default is 300 seconds. ❖ Setting bidirect msh> diprint bidirect {on | off} • You can specify whether the direct printing port is bidirectional or not. dns Use • You can register up to three DNS server numbers. • You cannot use "255.255 - Ricoh CL3500N | Quick Installation Guide - Page 427
A record when the dynamic DNS function is enabled and DHCP is used. • {own} To register an A record using the printer as the DNS client. The DNS server address and the domain name already designated are used for the registration. ❖ Record updating interval settings msh> dns interval "time" • You can - Ricoh CL3500N | Quick Installation Guide - Page 428
is installed. • wlan can be specified only when the IEEE 802.11b interface is installed. list and the procedures for using those commands. ❖ Command list display msh> help ❖ Display of procedure for using commands msh> help "command_name" hostname Use the "hostname" command to change the printer - Ricoh CL3500N | Quick Installation Guide - Page 429
up to 63 alphanumeric characters. • You cannot use a printer name starting with "RNP" or "rnp". • The Ethernet interface and IEEE 802.11b interface will have the same printer name. • ip1394 can be specified only when the IEEE 1394 interface is installed. • wlan can be specified only when the IEEE - Ricoh CL3500N | Quick Installation Guide - Page 430
interface and IEEE 802.11b interface. ❒ When installing the optional 1394 Interface board, set the IP address Use "0x" as the initial two letters of a hexadecimal address. info Use the "info" command to display printer information such as paper tray, output tray, and printer language. ❖ Printer - Ricoh CL3500N | Quick Installation Guide - Page 431
• The "timeout" setting specifies how many seconds the computer tries to send print jobs when no connection can be made to the network printer. • The "auth" setting indicates the user authorization mode. ❖ IPP timeout configuration Specify how many seconds the computer waits before canceling an - Ricoh CL3500N | Quick Installation Guide - Page 432
encap [802.3/802.2/snap/ethernet2/auto] ❖ Remote Printer Number msh> netware rnum ❖ Timeout msh> netware timeout ❖ Printer server mode msh> netware mode pserver msh> netware mode ps ❖ Remote printer mode msh> netware mode rprinter msh> netware mode rp ❖ NDS context name msh> netware context ❖ SAP - Ricoh CL3500N | Quick Installation Guide - Page 433
Use the "prnlog" command to obtain printer log information. ❖ Print logs display msh> prnlog • Displays 16 previous print jobs. using up to 63 alphanumeric charac- ters. ❖ rendezvous Installation location information setting You can enter information about the location where the printer is installed - Ricoh CL3500N | Quick Installation Guide - Page 434
Monitoring and Configuring the Printer ❖ Setting order of priority for each protocol • diprint msh> rendezvous diprint {0- configuration msh> rendezvous linklocal "interface_name" • If many types of interface are installed, configure the interface that communicates with linklocal address. • If you do - Ricoh CL3500N | Quick Installation Guide - Page 435
Monitoring and Configuring the Printer route Use the "route" command to control the routing table. ❖ All route information display msh> route ❖ Specified route information display msh> route "destination" • Specify the IP address - Ricoh CL3500N | Quick Installation Guide - Page 436
Monitoring and Configuring the Printer set Use the "set" command to set the protocol information display "active" when the optional IEEE 1394 interface board is installed. msh> set ip1394 • ip1394 can be specified only when the IEEE 1394 interface is installed. msh> set protocol • When protocol is - Ricoh CL3500N | Quick Installation Guide - Page 437
up | down} • ip1394 can be specified only when the IEEE 1394 interface is installed. msh> set lpr {up | down} msh> set ftp {up | down Secured Sockets Layer (SSL, an encryption protocol) function is not available for the printer, you cannot use the function by enabling it. msh> set nrs {up | down} msh - Ricoh CL3500N | Quick Installation Guide - Page 438
up to 15 characters ❖ Comment settings msh> smb comment • Set comment using up to 31 characters ❖ Notify print job completion msh> smb notif {on | off} • To notify print job completion, specify "on". Otherwise, specify "off" ❖ Deleting Computer Name msh> smb clear comp ❖ Deleting Group Name msh - Ricoh CL3500N | Quick Installation Guide - Page 439
. • To display the current community, specify its registration number. ❖ Display msh> snmp ? ❖ Community registered in numbers 1-10. When changing the community name, use SmartDeviceMonitor for Admin and SNMP Setup Tool to correspond with printer settings. • The community name can be entered using - Ricoh CL3500N | Quick Installation Guide - Page 440
Printer Access type read write trap Type of access permission read only read and write user is notified of trap messages ❖ Protocol configuration msh> snmp {ip | ipx} {on | off} • Use board accept requests from any host without requiring a specific type of access. • Enter a host address to - Ricoh CL3500N | Quick Installation Guide - Page 441
Monitoring and Configuring the Printer ❖ Deleting sysContact msh> snmp clear contact ❖ SNMP v1v2 function configuration {1-5} account "account_name" • Enter an account name using up to 32 alphanumeric characters. ❖ Deleting an SNMP v3 TRAP user account msh> snmp v3trap {1-5} clear account ❖ - Ricoh CL3500N | Quick Installation Guide - Page 442
Printer • If you select "auto", the print job will be encrypted when encryption is possible. • If you select "on", Clear Text communication is not possible, and encryption password must be set before encryption communication can be used. ❒ Encryption is possible when the security option is installed - Ricoh CL3500N | Quick Installation Guide - Page 443
displayed. msh> sprint ❖ Bidirectional configuration for IEEE 1394 (SCSI print) Use this setting to set IEEE 1394 (SCSI print) bidirectional. The default is "on". msh> sprint bidi {on | off} status The printer status can be checked using the following command: ❖ Messages msh> status For details, see - Ricoh CL3500N | Quick Installation Guide - Page 444
printer's system log. ❖ View message msh> syslog ❒ For details about the information displayed, see p.225 "System Log Information". upnp Use two URLs can be registered and specified. msh> web url http://"The URL or IP address you want to register"/ ❖ Deleting URLs registered as link destinations msh - Ricoh CL3500N | Quick Installation Guide - Page 445
Printer msh> web name "Name you want to display" ❖ Deleting URL names registered web clear help wiconfig Use the "wiconfig" command mode (ap) , the 802.11 Ad hoc mode (802.11adhoc), or the ad hoc mode (adhoc). The default is ad hoc mode. You can make settings for the SSID in the infrastructure mode - Ricoh CL3500N | Quick Installation Guide - Page 446
Monitoring and Configuring the Printer Parameter channel frequency channel no. enc {on|off} key { ASCII. With a 64-bit WEP, you can use 10 digit hexadecimals. With a 128-bit WEP, you can use 26 digit hexadecimals. Up to four WEP keys can be registered. Specify the number to be registered with "val". - Ricoh CL3500N | Quick Installation Guide - Page 447
the IEEE 802.11b interface is installed. Interface name ether ip1394 wlan Interface configured Ethernet interface IEEE 1394 interface IEEE 802.11b interface ❖ Address configuration Use the following command to configure a WINS server IP address: msh> wins "interface_name" {primary|secondary} "IP - Ricoh CL3500N | Quick Installation Guide - Page 448
Monitoring and Configuring the Printer • Use the "primary" command to configure a primary WINS server IP address. • Use the "secondary" command to configure a secondary WINS server IP address. • Do not use "255.255.255.255" as the IP address. ❖ NBT (NetBIOS over TCP/IP) Scope ID Selection You can - Ricoh CL3500N | Quick Installation Guide - Page 449
and optional IEEE 802.11b interface unit of this printer. Also, the SNMP agent operating on UDP is incorporated in the optional IEEE 1394 interface board. Using the SNMP manager, you can get information about the printer. ❒ If you changed the printer's community name, change the configuration of - Ricoh CL3500N | Quick Installation Guide - Page 450
not inserted Configuring... Cover Open: ADF Cover Open: Duplex Unit Cover Open: Finisher Cover Open: Front Cover Open: Front/Left Cover Open: Paper Exit / Rear Cover Open: Right Cover Open: Top Data Size Error Description The job was canceled because user have no authority. The staple of booklet - Ricoh CL3500N | Quick Installation Guide - Page 451
Upper Tray Description The black toner cartridge is almost empty. The cyan toner cartridge is almost empty. The magenta toner cartridge is almost empty. The yellow toner cartridge is almost empty. The machine is in Energy Saver Mode. An error has occurred. An error has occurred. An error has - Ricoh CL3500N | Quick Installation Guide - Page 452
Punch Chip receptacle for hole punch is full. The output paper tray is full. Waste toner is full. Waste toner bottle is full. It is a hex dump mode. It did not connect directly with the other party of the transmission. An error has occurred while transmitting directly. The copier is being used. The - Ricoh CL3500N | Quick Installation Guide - Page 453
Near Replacing: Develop. Unit Y Near Replacing: Fusing Unit Near Replacing: Maintenance Kit Near Replacing: Transfer Unit Nearly Full: Waste Toner Need more Staples No Paper: Interposer Tray No Paper: LCT No Paper: Selected Tray No Paper: Tray 1 No Paper: Tray 2 Description There is a problem with - Ricoh CL3500N | Quick Installation Guide - Page 454
the Printer Messages No Paper: Tray 3 No Paper: Tray 4 Not Detected: B2 Lever Not Detected: Black Toner Not Detected: Cyan Toner Not Detected: Develop. Unit (C) Not Detected: Develop. Unit (K) Not Detected: Develop. Unit (M) Not Detected: Develop. Unit (Y) Not Detected: Duplex Feed Unit Not - Ricoh CL3500N | Quick Installation Guide - Page 455
Finisher Shift Tray 2 Paper on FinisherShiftTray1, 2 Prepaid Card not inserted Print Complete Printing Processing RC Gate Connection Error Ready Replace Black PCU Replace Charger Replace Cleaning Web Replace Color PCU Replace Develop. Unit Replace Develop. Unit (Black) Description Yellow toner is - Ricoh CL3500N | Quick Installation Guide - Page 456
the Printer Messages Replace Develop. Unit (Color) Replace Develop. Unit (Cyan) Replace Develop. Unit (Magenta) Replace Develop. Unit (Yellow) Replace Fusing Unit Replace Maintenance Kit Replace PCU Replace Transfer Belt SD Card Authentication failed Setting Remotely Skipped due to Error Storage - Ricoh CL3500N | Quick Installation Guide - Page 457
the output tray Current status of the output tray • Normal:Normal • PaperExist:Paper exist • OverFlow:Paper is full • Error:Other errors ❖ Emulation Item No. Name Version Description ID number of the printer language used by the printer Name of the printer language used in the printer Version of - Ricoh CL3500N | Quick Installation Guide - Page 458
and "rsh", "rcp", and "ftp" parameters. • mshell: Use the "info" command. Item Rank Description Print job status. • active Printing or preparing for printing. • Waiting Waiting to be transferred to the printer. Owner Print request user name. Job Print request number. Files The name of the - Ricoh CL3500N | Quick Installation Guide - Page 459
to the "ftp" or "rprinter" command. Time the print requested was received. Time of print request reception Printer driver-configured User ID. Appears when the print request ID is specified. Name of the document for printing Appears when the print request ID is specified. ❒ For details about UNIX - Ricoh CL3500N | Quick Installation Guide - Page 460
location Contact Soft switch appletalk mode Net Object Type Zone TCP/IP mode ftp lpr rsh telnet diprint web http ftpc snmp ipp autonet rendezvous ssl nbt rfu EncapType dhcp Host name Address netmask Description Printer name Comment Location of the printer in the SNMP and Rendezvous information - Ricoh CL3500N | Quick Installation Guide - Page 461
URL of home page Frame type Remote printer number Print server name Name of the connect file server Context of print server Active mode (this value is fixed) Login mode Packet timeout Protocol used NDS tree name (this value is fixed) (this value is fixed) Notification of print job completion Name of - Ricoh CL3500N | Quick Installation Guide - Page 462
broadcast DNS Domain SCSI print Bidi. Bluetooth Bluetooth mode UPnP URL dns Server[X]: Selected DNS Server Domain Name ether Description Printer name DHCP (on/off) IP address Subnet mask Broadcast address DNS domain type SSID used Channels available for use Channel used IEEE 802.11b interface - Ricoh CL3500N | Quick Installation Guide - Page 463
Printer Item wlan ip1394 rendezvous Computer Name Rendezvous Name (ether) Rendezvous Name (wlan) Rendezvous Name (ip1394) location Priority (diprint) Priority (lpr) Priority (ipp) IP TTL LinkLocal Route for Multi I/F: Ethernet (ether) DDNS ether wlan ip1394 wins ether Primary WINS Secondary WINS - Ricoh CL3500N | Quick Installation Guide - Page 464
Monitoring and Configuring the Printer Item v1Trap v2Trap v3Trap SNMPv1v2Remoto Setting SNMPv3 Privacy Shell mode Description Mode of the remote maintenance tool 224 - Ricoh CL3500N | Quick Installation Guide - Page 465
the print server mode) Attached to the print queue. Cannot create service connection (In the remote printer mode) Connection to the file server has not been established. The number of file server users may have exceeded the maximum capacity of the file server. Cannot find rprinter ( - Ricoh CL3500N | Quick Installation Guide - Page 466
used. Each IP address must be unique. Check the address of the device indicated in [MAC address]. Established SPX Connection with PServer,(RPSocket=, connID=) (In the remote printer mode) Connection to the print server has been established. exiting The lpd service - Ricoh CL3500N | Quick Installation Guide - Page 467
Configuring the Printer Message Problem and solutions inetd start. The inetd service has started. IPP cancel-job: permission denied. The printer could not authenticate the name of the user attempting to cancel a job. ipp disable. Printing with ipp is disabled. ipp enable. Printing with ipp - Ricoh CL3500N | Quick Installation Guide - Page 468
the print server mode) The print queue is not assigned to the printer. Using NWadmin, assign the print queue to the printer, and then restart it. pserver start. (NetWare) (In the print server mode) The NetWare service has started. Required computer name () The start job found the - Ricoh CL3500N | Quick Installation Guide - Page 469
the Printer Message ipx is ready. SNMPD: account is unavailable: Same account name be used. Problem and solutions Connection to the SMTP server is denied. This could be The specified SMTP user name is incor- rect. • The specified SMTP password is incorrect. Check the SMTP user name and password - Ricoh CL3500N | Quick Installation Guide - Page 470
. Register the print server without specifying a password. WINS name refresh :Server No Response There was no response to the update request from the print server. Check that the WINS server address is correct and the WINS server is working properly. WINS name registration/refresh error code - Ricoh CL3500N | Quick Installation Guide - Page 471
the printer with users using a different version of Windows, click [Additional Drivers...]. ❒ If you have installed an alternative driver by selecting [Shared as:] during the printer driver installation, this step can be ignored. E Click [OK]. Close the printer properties. Printing notification - Ricoh CL3500N | Quick Installation Guide - Page 472
the expansion function] check box in [Notify Printing]. C Select the [Notify when using the print server] check box. D Click [OK]. The dialog box for setting the expansion function closes. The client setting is completed. ❒ Set the printing notification function on the printer driver as well as on - Ricoh CL3500N | Quick Installation Guide - Page 473
to set the printing environment using SmartDeviceMonitor for Admin under the following environments: • NDS mode in Windows 95/98/Me • NDS or Bindery mode in Windows 2000/XP, Windows NT 4.0 For details about installing SmartDeviceMonitor for Admin, see p.168 "Installing SmartDeviceMonitor for Admin - Ricoh CL3500N | Quick Installation Guide - Page 474
Using a Printer Server ❖ Printers listed by SmartDeviceMonitor for Admin SmartDeviceMonitor for Admin lists printers connected to the network. If you cannot identify the printer you want to configure, print configuration page, and then check the printer name. Setting Up as a Print Server (NetWare - Ricoh CL3500N | Quick Installation Guide - Page 475
with the configuration page printed from the printer. For details about printing a configuration page, see p.128 "List/Test Print Menu". ❒ If no printer names appear in the list, match the frame types of IPX/SPXs for the computer and printer. Use the [Network] dialog box of Windows to change the - Ricoh CL3500N | Quick Installation Guide - Page 476
the configuration page printed from the printer. For details about printing a configuration page, see p.128 "Printing a Configuration Page". ❒ If no printer names appear in the list, match the frame types of IPX/SPXs for the computer and printer. Use the [Network] dialog box of Windows to change - Ricoh CL3500N | Quick Installation Guide - Page 477
up using NIB Setup Tool A Log on to the file server as an administrator or administrator equivalent. B Start NIB Setup Tool on the [Start] menu. C Click [Property Sheet], and then click [OK]. D Select a printer you want to configure. E On the [NetWare] tab, Select [File Server Mode] or [NDS mode] in - Ricoh CL3500N | Quick Installation Guide - Page 478
Using a Printer Server J In the [Print Server Operation Mode] area, click [As Print Server]. K Click [OK] to close the [NIB Setup Tool] dialog box. Setting up using NWadmin A From Windows, start NWadmin. For details about NWadmin, see the NetWare manuals. B Select the object in which the print queue - Ricoh CL3500N | Quick Installation Guide - Page 479
NetWare server. If the print server is in operation, quit and restart it. ❖ To exit CAREE: unload pserver ❖ To start CAREE: load pserver "print_server_name" Setting Up as a Remote Printer (NetWare 3.x) Follow the procedure below to use the printer as a remote printer under NetWare 3.x. Setting up - Ricoh CL3500N | Quick Installation Guide - Page 480
the [Print Server] list. Use the same printer name specified using NIB Setup Tool. I From the [Print Server Information] menu, select [Print Server Configuration]. J From the [Print Server Configuration] menu, select [Printer Configuration]. K Select the printer indicated as [Not Installed]. Use the - Ricoh CL3500N | Quick Installation Guide - Page 481
Configuration Menu]. P Assign print queues to the created printer. Q From [Print Server Configuration Menu], select [Queues Serviced By Printer]. R Select the printer created. S Press the {Insert} key to select a queue serviced by the printer. You can select several queues. T Follow the instructions - Ricoh CL3500N | Quick Installation Guide - Page 482
"NETWORK.DS". K In the [Print Server Option Mode] area, click [As Remote Printer(R)]. L In the [Remote Printer No.(N)] box, enter the printer number. Use the same printer number created. M Click [OK] to close [NIB Setup Tool]. Setting up using NWadmin A From Windows, start NWadmin. For details about - Ricoh CL3500N | Quick Installation Guide - Page 483
click [Parallel] in the [Printer type] list, and then click [Communication]. O Click [Manual load] in the [Communication type] area, and then click [OK]. Check the settings, and then click [OK]. P Set up the network connection to a print server. Select a context speci- fied using NIB Setup Tool, and - Ricoh CL3500N | Quick Installation Guide - Page 484
[OK]. Check the settings, and then click [OK]. Use the same printer number specified as the remote printer number using NIB Setup Tool. X Start the print server by entering the following from the console of the NetWare server. If the print server is in operation, quit and restart it. ❖ To exit CAREE - Ricoh CL3500N | Quick Installation Guide - Page 485
Windows NT 4.0, install "Printing service for UNIX" as the network application. To print under Windows NT 4.0, install "Microsoft TCP/IP printing" as the network application. For details about setting up IP address, see Setup Guide. For details about setting the IP address of the printer using DHCP - Ricoh CL3500N | Quick Installation Guide - Page 486
Special Operations under Windows When setting the IP address of a printer using DHCP Use the printer name on the configuration page as the host name. For details about printing a configuration page, see p.128 "Printing a Configuration Page". In other cases Add the IP address and host name of the - Ricoh CL3500N | Quick Installation Guide - Page 487
[Start] - [All Programs] - [Accessories] - [Command Prompt] • Windows NT 4.0 [Start] - [Programs] - [Command Prompt] ❒ Match the data format of the file to be printed with the emulation mode of the printer. ❒ If the message "print requests full" appears, no print jobs can be accepted. Try again when - Ricoh CL3500N | Quick Installation Guide - Page 488
Special Operations under Windows ❖ When using a host name instead of an IP address c:> lpr -Sprinter's host name [-Poption] [-ol] \pass name\file name When printing a binary file, add the "-ol" option (lowercase O, and lowercase L). When using a printer with the host name "host" to print a - Ricoh CL3500N | Quick Installation Guide - Page 489
Special Operations under Windows Contact your network administrator for information about the settings. C When printing a binary file, set the file mode to binary. ftp> bin When printing a binary file in ASCII mode, print may not come out correctly. D Specify files to be printed. The following shows - Ricoh CL3500N | Quick Installation Guide - Page 490
8 and 9:PS Driver:(language):Disk1 Installing the PostScript 3 Printer Driver and PPD File It is necessary to install a printer driver and PostScript Printer Description (PPD) files to print from a Mac OS. Follow the procedure below to install a printer driver and a PPD file into a Mac OS using Mac - Ricoh CL3500N | Quick Installation Guide - Page 491
before performing the following procedure. A On the [Apple] menu, click [Chooser]. B Click the Adobe PS icon. C In the [Select a PostScript Printer:] list, click the name of the printer you want to use. D Click [Create]. E Click the printer you want to use, and then click [Select]. A PPD file is set - Ricoh CL3500N | Quick Installation Guide - Page 492
Profiles ColorSync profiles enable a printer to print colors consistent with those on the computer display. You must install the ColorSync profile to use this function. Follow the procedure below to install the ColorSync profiles. A Start a Mac OS. B Double-click the hard disk icon, and then open - Ricoh CL3500N | Quick Installation Guide - Page 493
-click the [ATM] folder. F Double-click the ATM 4.6.3 installer icon. G Follow the instructions on the screen. H When the procedure is complete, restart the computer. ATM will be com- pletely installed only after restarting. I On the [Apple] menu, open [Control Panel], and then click [~ATM]. J The - Ricoh CL3500N | Quick Installation Guide - Page 494
details about installation, see the operating instructions in the ATM folder. Installing Screen fonts Follow the procedure below to install screen fonts. Mac OS to use EtherTalk. A Open [Control Panel], and then double-click the AppleTalk icon. B On the [Connect via:] pop-up menu, click [Ethernet]. - Ricoh CL3500N | Quick Installation Guide - Page 495
to configure Mac OS 9.1. If you are using a different version of Mac OS, use the following procedures as a reference and see the manuals for your Mac OS version. ❒ Confirm the Connection to the Printer with TCP/IP For information about installing applications required for EtherTalk, see the Mac OS - Ricoh CL3500N | Quick Installation Guide - Page 496
-ROM drive icon. C Double-click the [Mac OS X] folder. D Double-click the installer icon. E Follow the instructions on the screen. Setting Up the PPD File A Start Print Center. B Click [Add Printer]. Click [AppleTalk] on the first pop-up menu. If the zone is set, select the zone from the second pop - Ricoh CL3500N | Quick Installation Guide - Page 497
installed can be made. Using USB Interface Follow the procedure below to setup USB connection. A Start Print Center. B Click [Add]. C Click [USB] on the pop-up menu. The connected printer appears. D Select the printer, and then select its manufacturer from the [Printer Mod- el:] pop-up menu. A list - Ricoh CL3500N | Quick Installation Guide - Page 498
the [Printer List] dialog box, and then quit Print Center. ❒ When printing with a Rendezvous connection to a Macintosh computer, printer language does not change automatically. Use the control panel on this printer to change printer language to [Auto Detect] or [PS] before printing. Changing to - Ricoh CL3500N | Quick Installation Guide - Page 499
Mac OS Configuration Configuring the Printer Use the control panel to enable AppleTalk. (The default is active.) 259 - Ricoh CL3500N | Quick Installation Guide - Page 500
panel. Using Sample Print ❒ To use this function, the optional hard disk must be installed on the printer. ❒ The number of pages the printer can save varies depending on the contents of the print images. At most, the printer can save 30 jobs or 1,000 pages for Sample Print and Locked Print. ❒ If - Ricoh CL3500N | Quick Installation Guide - Page 501
Print File". Using Locked Print ❒ To use this function, the optional hard disk must be installed on the printer. ❒ The number of pages the printer can save varies depending on the contents of the print images. At most, the printer can save 30 jobs or 1,000 pages for Sample Print and Locked Print - Ricoh CL3500N | Quick Installation Guide - Page 502
the job, see p.108 "Deleting a Locked Print File". Duplex Printing Use this function to select duplex printing. ❒ To use this function, the optional duplex unit must be installed on the printer. ❒ You cannot perform duplex printing when using the bypass tray. ❖ None Disables duplex printing. ❖ Flip - Ricoh CL3500N | Quick Installation Guide - Page 503
] tab. ❖ Black and White Prints everything, including color documents, in black and white. Black and White printing is faster than Color. To stop black and white areas being printed with CMYK toner, select [Black and White] in the printer driver as well as in the application. Gradation Use this - Ricoh CL3500N | Quick Installation Guide - Page 504
might not reproduce so well. ❖ Solid Color Use this setting to print specific single colors, logos and so on. ❖ User Setting Use this setting to print images using a CRD downloaded from your application. ❖ CLP Simulation Prints the output colors similar to the colors displayed on the computer screen - Ricoh CL3500N | Quick Installation Guide - Page 505
form for text. Gray Reproduction Use this function to select Black Color mode for text and line art. ❖ Black by K Select this setting to use a black toner. ❖ Black/Gray by K Black portions are printed in gray. ❖ CMY+K Select this setting to use all toners. Color Matching Use this function to select - Ricoh CL3500N | Quick Installation Guide - Page 506
OS X] folder. F Double-click the [PS Utility] folder on the CD-ROM. G Double-click the [Printer Utility for Mac] folder. H Double-click the folder of the language you use. I Move the "Printer Utility for Mac" file to the Macintosh hard disk using a drag-and-drop operation. J Drag the CD-ROM icon to - Ricoh CL3500N | Quick Installation Guide - Page 507
Printer Utility for Mac menu if you want to change the printer. D Select the printer you want to use. Printer Utility for Mac will take a few seconds to start. E Click [Choose]. Printer Utility for Mac Functions Downloading PS Fonts You can download the PS fonts to the printer memory or hard disk - Ricoh CL3500N | Quick Installation Guide - Page 508
to use. Displaying Printer Fonts You can display the available fonts currently downloaded to the printer. Fonts in the printer memory and hard disk drive can be displayed. A Select [Display Printer's Fonts...] on the [File] menu. A dialog box appears. B Select [Printer's memory] or [Printer's disk - Ricoh CL3500N | Quick Installation Guide - Page 509
Printer's Disk...] on the [File] menu. The confirmation message appears. To cancel initialization, click [Cancel]. B Click [Execute]. Initializing starts. C When the completion message appears, click [OK]. Page Setup You can set the paper size on which to print "Print Fonts Catalogue" and "Prints - Ricoh CL3500N | Quick Installation Guide - Page 510
[Print]. ❒ The paper selected under [Page Setup] is used. Printing Font Sample You can print samples of fonts downloaded to the hard disk drive or memory. A Select [Print Fonts Sample...] on the [File] menu. B Click [Print]. ❒ Print by using the paper selected on [Page Setup]. Renaming the Printer - Ricoh CL3500N | Quick Installation Guide - Page 511
select the zone for the Macintosh in use. G In the [Available Printers:] list, select the printer whose name you changed, and then click [Choose]. Restarting the Printer You can restart the printer. A Select [Restart Printer] on the [File] menu. B Confirm the message that appears on the screen, and - Ricoh CL3500N | Quick Installation Guide - Page 512
zone you changed. H In the [Select a PostScript Printer:] list, select the printer you want to use. I Close the [Chooser] dialog box. Mac OS X A On the [Utility] menu, click [Select Zone...]. The zone to which the printer belongs and the available zone list appear. B Select the zone which you want - Ricoh CL3500N | Quick Installation Guide - Page 513
to open it. You can search or replace a character string by using the [Search] menu. C After editing the PostScript file, select [Download Top Window] on [Console] menu to start printing. The PostScript file is sent to the printer. The [Reply from Printer] box opens, depending on the PostScript file - Ricoh CL3500N | Quick Installation Guide - Page 514
Client For users to manage their network print status. SmartDeviceMonitor for Client Help. ❖ 1394 Utility For the optional IEEE 1394 interface unit. For details, see the Readme file or the manual provided with the optional IEEE 1394 interface unit. ❖ USB Printing Support For connection to Windows 98 - Ricoh CL3500N | Quick Installation Guide - Page 515
. The following operating system is supported. • Windows 95/98/Me, Windows 2000/XP, Windows Server 2003, and Windows NT 4.0 ❒ For Windows NT 4.0, Service Pack 6 or higher is required. ❒ You can only print in black and white with PCL 5c driver. ❖ RPCS printer driver This printer driver allows the - Ricoh CL3500N | Quick Installation Guide - Page 516
provided with Windows NT Client Service for NetWare provided with Windows NT Novell Client provided with Windows 2000 or Windows NT ❖ Available functions SmartDeviceMonitor for Admin has the following functions to check: • printer supplies such as paper or toner; • results of print jobs executed - Ricoh CL3500N | Quick Installation Guide - Page 517
Peer-to-peer print function • Prints directly on the network printer without sending any data to a print server. • Prints on a substitute printer when there are too many jobs waiting on the specified printer, or when an error disables printing (Recovery Printing). • Allocates multiple print jobs to - Ricoh CL3500N | Quick Installation Guide - Page 518
the print job log using the user ID ❒ For Recovery Printing or Parallel Printing, the options on the printers must be the same. If a necessary option is not installed, a printer cannot be used for Recovery Printing or Parallel Printing. ❒ For Recovery Printing or Parallel Printing, the paper loaded - Ricoh CL3500N | Quick Installation Guide - Page 519
"inactive". For details about selecting protocols, see p.147 "Active Protocol". Using DHCP This printer can be used in a DHCP environment. In a WINS server environment, the printer name can simultaneously be registered with a WINS server. Note the following points when an Ethernet interface and an - Ricoh CL3500N | Quick Installation Guide - Page 520
the interface subnetwork range, it operates as "0.0.0.0". ❒ When the static IP address is not set, or is set as "0.0.0.0", the interface setting the DHCP-acquired value is activated. ❒ Supported DHCP server operating systems are: Windows 2000 Server, Windows NT 4.0 Server Service Pack 4 or higher - Ricoh CL3500N | Quick Installation Guide - Page 521
IP address on the configuration page. For details about printing a configuration page, see p.128 "Printing a Configuration Page". ❒ When AutoNet is running, the printer name is not registered on the WINS server. ❒ No communication can take place except between units started up using AutoNet. However - Ricoh CL3500N | Quick Installation Guide - Page 522
Appendix ❒ The WINS server is supported with Windows NT 4.0 Server Service Pack 4 or higher, and Windows 2000 Servers WINS Manager. ❒ For details about the WINS server settings, see Windows Help. ❒ If there is no reply from the WINS server, the NetBIOS name is registered by broadcast. ❒ The NetBIOS - Ricoh CL3500N | Quick Installation Guide - Page 523
a function which dynamically updates (registers and deletes) records (A record and PTR record) managed by the DNS server. When a DNS server is part of the network environment to which this printer, a DNS client, is connected, records can be dynamically updated using this function. Updating Updating - Ricoh CL3500N | Quick Installation Guide - Page 524
version) features DHCP servers targeted for operation As a substitute for the printer, DHCP servers capable of updating the A record and PTR record are as follows: • Microsoft DHCP servers with standard Windows 2000 Server (Service Pack 3 or higher versions)/Windows Server 2003 features • ISC DHCP - Ricoh CL3500N | Quick Installation Guide - Page 525
) Encryption To protect the communication path and establish encrypted communication, create and install the server certificate. There are two ways of installing a server certificate: create and install a self-certificate using the machine, or request a certificate from a certificate authority and - Ricoh CL3500N | Quick Installation Guide - Page 526
Create and install the server certificate using Web Image Monitor. This section explains the use of a self-certificate as the server certificate. A Open a Web browser. B Enter "http://(printer's-address)/" in the address bar to access the print- er. C Select Administrator mode. For details - Ricoh CL3500N | Quick Installation Guide - Page 527
This section explains the use of a certificate issued by a certificate authority as the server certificate. A Open a Web browser. B Enter "http://(printer's-address)/" in the address bar to access the print- er. C Select Administrator mode. For details about selecting Administrator mode in Web Image - Ricoh CL3500N | Quick Installation Guide - Page 528
the use of a certificate issued by a certificate authority as the server certificate. Enter the server certificate contents issued by the certificate authority. A Open a Web browser. B Enter "http://(printer's-address)/" in the address bar to access the print- er. C Select Administrator mode. For - Ricoh CL3500N | Quick Installation Guide - Page 529
] page appears. E Click [Enable] for [SSL/TLS]. F Click [Apply]. The SSL setting is enabled. ❒ When using SSL, enter "http://(machine's-address)/" to access the printer. For this to work, Internet Explorer 5.5 or later, or Netscape 7.0 or later must be installed on your computer. User Settings - Ricoh CL3500N | Quick Installation Guide - Page 530
If the [[Security Alert]] dialog box appears when accessing the printer using IPP to create or configure an IPP port, or when printing, install the certificate. ❒ To select the certificate store location when using Certificate Import Wizard, click [Place all certificates in the following store - Ricoh CL3500N | Quick Installation Guide - Page 531
The certificate store location appears under [Certificate store:]. G Click [Next]. H Click [Finish]. I Click [OK]. The certificate is installed. ❒ When you create or change an IPP port using SmartDeviceMonitor for Cli- ent, enter "http://(machine's-address)/ printer" in [Printer URL] to access the - Ricoh CL3500N | Quick Installation Guide - Page 532
permission. To install a printer driver by Auto Run, log on using an account that has administrator permission. A Quit all applications currently running. B Insert the CD-ROM into the CD-ROM drive. The installer starts. C Click [Font Manager 2000]. D Follow the instructions on the screen - Ricoh CL3500N | Quick Installation Guide - Page 533
be performed properly. ❒ When using PageMaker, the optional features that can be selected by the printer driver will not be active. The following procedure describes how to activate the optional printer features. A On the [File] menu, click [Print]. The [Print Document] dialog box appears. B Make - Ricoh CL3500N | Quick Installation Guide - Page 534
Presentation Server 3.0 Supported Printer Drivers ❖ When Windows Terminal Service is operating • PCL printer drivers • PostScript 3 ❒ The RPCS printer driver is not supported. ❒ Some RPCS printer driver functions do not work if Windows Terminal Service is installed. Limitations The following - Ricoh CL3500N | Quick Installation Guide - Page 535
an environment where Windows Terminal Service is installed, some printer driver functions are unavailable, even if no Windows Terminal Service functions are used. Use the install mode to install SmartDeviceMonitor for Client in an environment where Terminal Service is running on a Windows NT Server - Ricoh CL3500N | Quick Installation Guide - Page 536
's [Printer driver replication] Using [Printer driver replication], you can distribute printer drivers across all servers in a server farm. We strongly recommend testing this function in your network environment before using it for your work. • If the printer drivers are not properly copied, install - Ricoh CL3500N | Quick Installation Guide - Page 537
Cautions When Using Bluetooth Interface Unit The optional Bluetooth interface unit operation mode is set to [Public] as default. If the setting is changed to [Private], only registered computers can use this printer via the Bluetooth interface unit. Check the operation mode settings using Web Image - Ricoh CL3500N | Quick Installation Guide - Page 538
OR OTHER DEALINGS IN THE SOFTWARE. ❒ Information on expat 1.95.2 is available at: http://expat.sourceforge.net/ JPEG LIBRARY • The software installed on this product is based in part on the work of the Independent JPEG Group. NetBSD Copyright Notice of NetBSD For all users to use this product: 298 - Ricoh CL3500N | Quick Installation Guide - Page 539
operating system: For the most part, the software constituting the NetBSD operating system is not in the public domain; its authors retain their copyright. The following text shows the copyright notice used notice, this list of conditions and SUBSTITUTE GOODS OR SERVICES; LOSS OF USE, DATA, OR - Ricoh CL3500N | Quick Installation Guide - Page 540
by Jonathan Stone. • This product includes software developed by Jonathan Stone for the NetBSD Project. • This product includes software developed by Winning Strategies, Inc. • This product includes software developed by Frank van der Linden for the NetBSD Project. • This product includes software - Ricoh CL3500N | Quick Installation Guide - Page 541
version. This program is distributed in the hope that it will be useful, but WITHOUT ANY WARRANTY; without even the implied warranty of MERCHANTABILITY or Inc. • RSA is a registered trademark and BSAFE is a registered trademark of RSA Security Inc.in the United States and/or other countries.
-
 1
1 -
 2
2 -
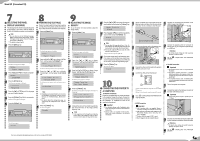 3
3 -
 4
4 -
 5
5 -
 6
6 -
 7
7 -
8
-
9
-
10
-
11
-
12
-
13
-
14
-
15
-
16
-
17
-
18
-
19
-
20
-
21
-
22
-
23
-
24
-
25
-
26
-
27
-
28
-
29
-
30
-
31
-
32
-
33
-
34
-
35
-
36
-
37
-
38
-
39
-
40
-
41
-
42
-
43
-
44
-
45
-
46
-
47
-
48
-
49
-
50
-
51
-
52
-
53
-
54
-
55
-
56
-
57
-
58
-
59
-
60
-
61
-
62
-
63
-
64
-
65
-
66
-
67
-
68
-
69
-
70
-
71
-
72
-
73
-
74
-
75
-
76
-
77
-
78
-
79
-
80
-
81
-
82
-
83
-
84
-
85
-
86
-
87
-
88
-
89
-
90
-
91
-
92
-
93
-
94
-
95
-
96
-
97
-
98
-
99
-
100
-
101
-
102
-
103
-
104
-
105
-
106
-
107
-
108
-
109
-
110
-
111
-
112
-
113
-
114
-
115
-
116
-
117
-
118
-
119
-
120
-
121
-
122
-
123
-
124
-
125
-
126
-
127
-
128
-
129
-
130
-
131
-
132
-
133
-
134
-
135
-
136
-
137
-
138
-
139
-
140
-
141
-
142
-
143
-
144
-
145
-
146
-
147
-
148
-
149
-
150
-
151
-
152
-
153
-
154
-
155
-
156
-
157
-
158
-
159
-
160
-
161
-
162
-
163
-
164
-
165
-
166
-
167
-
168
-
169
-
170
-
171
-
172
-
173
-
174
-
175
-
176
-
177
-
178
-
179
-
180
-
181
-
182
-
183
-
184
-
185
-
186
-
187
-
188
-
189
-
190
-
191
-
192
-
193
-
194
-
195
-
196
-
197
-
198
-
199
-
200
-
201
-
202
-
203
-
204
-
205
-
206
-
207
-
208
-
209
-
210
-
211
-
212
-
213
-
214
-
215
-
216
-
217
-
218
-
219
-
220
-
221
-
222
-
223
-
224
-
225
-
226
-
227
-
228
-
229
-
230
-
231
-
232
-
233
-
234
-
235
-
236
-
237
-
238
-
239
-
240
-
241
-
242
-
243
-
244
-
245
-
246
-
247
-
248
-
249
-
250
-
251
-
252
-
253
-
254
-
255
-
256
-
257
-
258
-
259
-
260
-
261
-
262
-
263
-
264
-
265
-
266
-
267
-
268
-
269
-
270
-
271
-
272
-
273
-
274
-
275
-
276
-
277
-
278
-
279
-
280
-
281
-
282
-
283
-
284
-
285
-
286
-
287
-
288
-
289
-
290
-
291
-
292
-
293
-
294
-
295
-
296
-
297
-
298
-
299
-
300
-
301
-
302
-
303
-
304
-
305
-
306
-
307
-
308
-
309
-
310
-
311
-
312
-
313
-
314
-
315
-
316
-
317
-
318
-
319
-
320
-
321
-
322
-
323
-
324
-
325
-
326
-
327
-
328
-
329
-
330
-
331
-
332
-
333
-
334
-
335
-
336
-
337
-
338
-
339
-
340
-
341
-
342
-
343
-
344
-
345
-
346
-
347
-
348
-
349
-
350
-
351
-
352
-
353
-
354
-
355
-
356
-
357
-
358
-
359
-
360
-
361
-
362
-
363
-
364
-
365
-
366
-
367
-
368
-
369
-
370
-
371
-
372
-
373
-
374
-
375
-
376
-
377
-
378
-
379
-
380
-
381
-
382
-
383
-
384
-
385
-
386
-
387
-
388
-
389
-
390
-
391
-
392
-
393
-
394
-
395
-
396
-
397
-
398
-
399
-
400
-
401
-
402
-
403
-
404
-
405
-
406
-
407
-
408
-
409
-
410
-
411
-
412
-
413
-
414
-
415
-
416
-
417
-
418
-
419
-
420
-
421
-
422
-
423
-
424
-
425
-
426
-
427
-
428
-
429
-
430
-
431
-
432
-
433
-
434
-
435
-
436
-
437
-
438
-
439
-
440
-
441
-
442
-
443
-
444
-
445
-
446
-
447
-
448
-
449
-
450
-
451
-
452
-
453
-
454
-
455
-
456
-
457
-
458
-
459
-
460
-
461
-
462
-
463
-
464
-
465
-
466
-
467
-
468
-
469
-
470
-
471
-
472
-
473
-
474
-
475
-
476
-
477
-
478
-
479
-
480
-
481
-
482
-
483
-
484
-
485
-
486
-
487
-
488
-
489
-
490
-
491
-
492
-
493
-
494
-
495
-
496
-
497
-
498
-
499
-
500
-
501
-
502
-
503
-
504
-
505
-
506
-
507
-
508
-
509
-
510
-
511
-
512
-
513
-
514
-
515
-
516
-
517
-
518
-
519
-
520
-
521
-
522
-
523
-
524
-
525
-
526
-
527
-
528
-
529
-
530
-
531
-
532
-
533
-
534
-
535
-
536
-
537
-
538
-
539
-
540
-
541
 |
 |
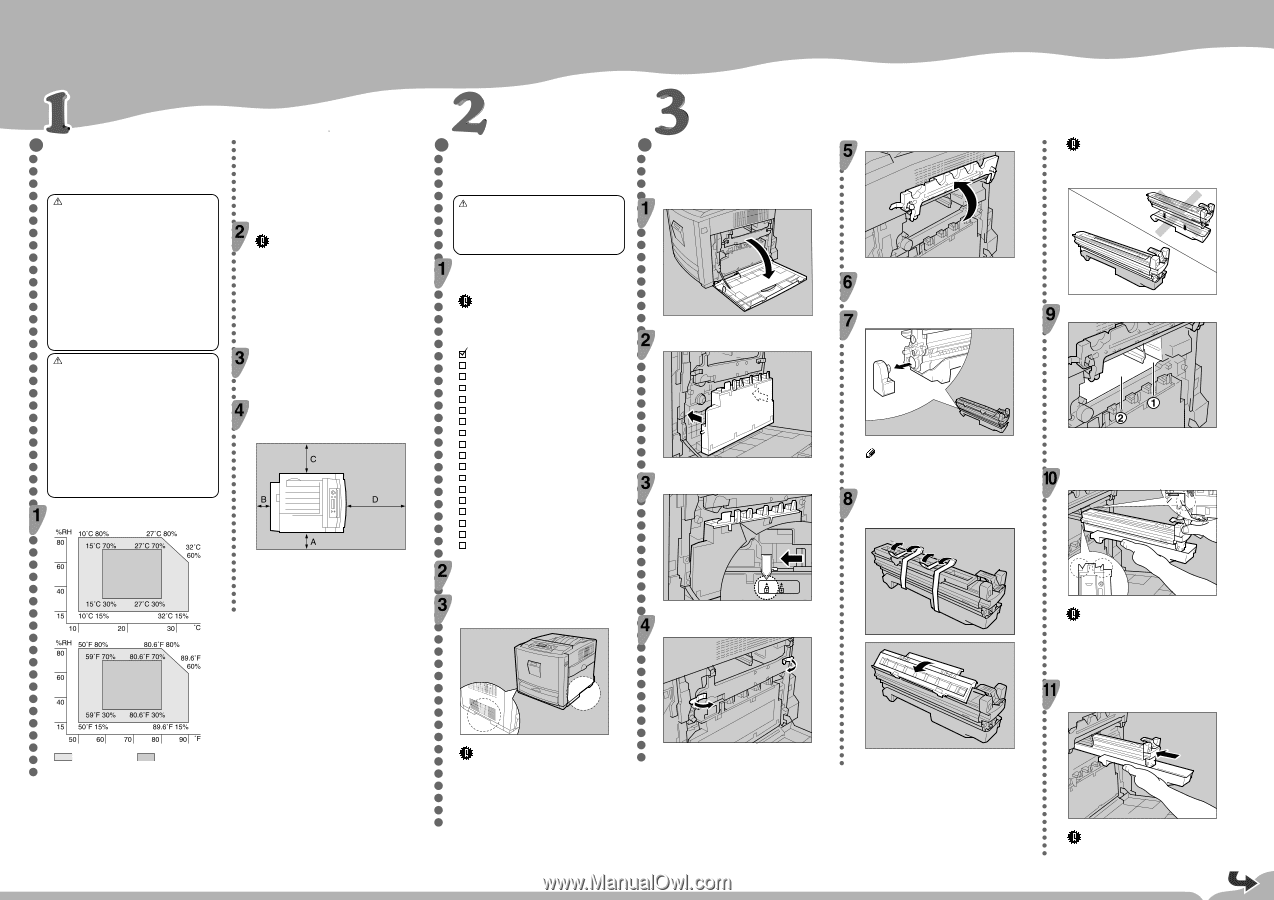
Please read the Safety Information in the Setup Guide before using this machine. It
contains important information related to USER SAFETY and PREVENTING EQUIP-
MENT PROBLEMS.
QUICK INSTALLATION GUIDE
For more detailed information please refer to the included CD-ROM
WHERE TO PUT THE PRINTER
The printer’s location should be carefully chosen
because environmental conditions greatly affect its
performance.
Warning
•
Confirm that the wall outlet is near the machine
and freely accessible, so that in event of an
emergency, it can be unplugged easily.
•
Only connect the machine to the power source
described on this manual.
•
Avoid multi-wiring.
•
Do not damage, break or make any modifications
to the power cord. Do not place heavy objects on
it, pull it hard or bend it more than necessary. These
actions could cause an electric shock or fire.
•
The supplied power cord is for use with this
equipment only. Do not use with other
appliances. Doing so may result in fire, electric
shock, or injury.
Caution
•
Do not handle the plug with wet hands. Doing
so might cause an electrical shock.
•
Keep the machine in an area that is within optimum
environmental conditions. Operating the machine
in an environment that is outside the recommended
ranges of humidity and temperature can cause an
electrical fire hazard. Keep the area around the
socket free of dust. Accumulated dust can become
an electrical fire hazard.
•
Place the machine on a strong and level surface.
Otherwise, it might fall and injure someone.
•
If you use the machine in a confined space,
ensure there is continuous air circulation.
Optimum Environmental Conditions
Recommended temperature and humidity
Possible operation range
Recommended range
The machine must be level within 5 mm (0.2 inch) both front to
rear and left to right.
To avoid possible build-up of ozone, place this printer in a large well
ventilated room that has an air turnover of more than 30 m
3
(183
cubic inch)/hr/person.
If you use this printer in a cold area, leave the printer on or severe
cold might damage sensitive components inside the printer.
Depending on the temperature and humidity around the machine,
vapor might occur when printing. Thus steam can be seen when
prints come out.
Environments to Avoid
Important
❒
Locations exposed to direct sunlight or strong light
❒
Dusty areas
❒
Areas with corrosive gases
❒
Areas excessively cold, hot, or humid
❒
Locations near an air conditioner or humidifier
❒
Locations near other electronic equipment
❒
Locations where the printer might be subjected to
frequent strong vibration
Power Connection
Connect the power cord to a power source with the following
specifications:
❒
120 V, 60 Hz, 11 A or more
Space Required for Installing the Printer
Leave enough space around the printer. This space is necessary to
operate the printer. The recommended (or minimum) space
requirement is as follows:
AJT054S
A: 13 cm (5.2 inches) or more
B: 11 cm (4.4 inches) or more
C: 35 cm (14.0 inches) or more
D: 61 cm (24.4 inches) or more
UNPACKING THE PRINTER AND
CHECKING THE CONTENTS OF
THE BOX
Caution
•
When lifting the machine, use the inset grips on
both sides. The printer could break or cause an
injury if dropped.
•
Place no objects on the right cover.
Check the contents of the box according to the
following list. If one or some items are missing,
Contact your sales or service representative.
Important
❒
This package does not include an interface cable.
Purchase one for use with your host computer. See
“Appendix”,
Maintenance Guide
.
Quick Installation Guide (This manual)
CD-ROM
“
Printer Drivers and Utilities
”
CD-ROM
“
Display-Version Manuals (HTML)
”
CD-ROM
“
Print-Version Manuals (PDF)
”
CD-ROM
“
Document Management Utility
”
Power Cable
Toner Cartridge (Black)
Toner Cartridge (Yellow)
Toner Cartridge (Cyan)
Toner Cartridge (Magenta)
Photo Conductor Unit (Black)
Photo Conductor Unit (Color)
Waste Toner Bottle
Ferrite Core (2)
Color Calibration Sample Sheet
Image density adjusting card
User registration card
Additional Documentation
Remove the plastic bag.
Position the printer where it is to be used. Lifting
the printer requires at least two people.
Lift using the inset grips on both sides of the printer.
AJT043S
Important
❒
Leave the tape holding the paper feed tray and cover
in place while moving the printer.
❒
Lower the machine slowly and carefully to prevent
trapping your hands.
INSTALLING THE WASTE TONER
BOTTLE AND PHOTO
CONDUCTOR UNIT
Open the printer's right cover.
AJT044S
Place the waste toner bottle in the position shown
in the illustration.
ZHBH660E
Lock the waste toner bottle by sliding the green
arrow into the position shown.
ZHBHA670E
Pull out the green levers on the left and right that
are securing the inner cover, and then unlock.
ZHBH301E
Lift the inner cover until it stays up.
ZHBH311E
Take out the black photo conductor unit.
Remove the cap attached to the photo conductor unit.
ZHBHA681E
Note
❒
The cap is no longer needed and should be disposed
of.
Remove the tape from around Photo Conductor
Unit by peeling it downward, and then remove
unit's top cover.
ZHBH681E
ZHBHB680E
Important
❒
Do not remove the unit's bottom cover yet.
❒
Install the new Photo Conductor Unit as soon as
you take it out of the bag.
ZHBHA682E
Check the locations for each Photo Conductor Unit.
ZHBHA720E
±
Photo Conductor Unit (Black)
²
Photo Conductor Unit (Color)
Align the green arrow at the tip of the photo
conductor unit with the rail inside the printer.
ZHBH370E
Important
❒
Make sure the green arrow fits securely on the rail
before proceeding to the next step.
❒
If you do not securely attach the green arrow of the
photo conductor unit to the rail, you may damage
the photo conductor unit.
Push the front of the photo conductor unit
carefully in, sliding the unit from its cover, until it
clicks into place.
ZHBH390E
Important
❒
If the photo conductor unit is not correctly installed,
print quality will be lost. For example, certain colors
may not print.
<G139-8514>