Ricoh CL3500N Quick Installation Guide - Page 2
Turning The Power On, Loading Paper, Installing The Toner, Cartridge, Go To Sheet 2/2. - paper tray keeps jamming
 |
UPC - 026649024344
View all Ricoh CL3500N manuals
Add to My Manuals
Save this manual to your list of manuals |
Page 2 highlights
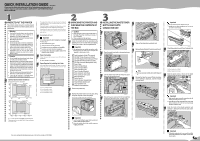
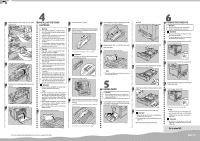
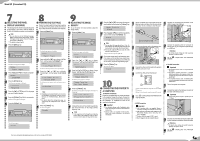
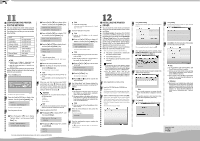
Repeat steps to to install the color photo conductor unit. ZHBH380E Lower the inner cover carefully. ZHBH400E ZHBH410E Push the left and right edge of the inner cover to secure it. AJT085S Close the printer's right cover carefully. INSTALLING THE TONER CARTRIDGE Warning • Do not incinerate spilled toner or used toner.Toner dust is flammable and might ignite when exposed to an open flame. • Disposal should take place at an authorized dealer or an appropriate collection site. • If you dispose of the used toner cartridges yourself, dispose of them according to local regulations. • Do not store toner, used toner, or toner containers in a place with an open flame. The toner might ignite and cause burns or a fire. Caution • Keep toner (used or unused) and the toner cartridge out of reach of children. • If toner or used toner is inhaled, gargle with plenty of water and move into a fresh air environment. Consult a doctor if necessary. • If your skin comes into contact with toner or used toner, wash the affected area thoroughly with soap and water. • If toner or used toner gets into your eyes, flush immediately with large amounts of water. Consult a doctor if necessary. • If toner or used toner is swallowed, dilute by drinking a large amount of water. Consult a doctor if necessary. • Avoid getting toner on your clothes or skin when removing a paper jam or replacing toner. If your skin comes into contact with toner, wash the affected area thoroughly with soap and water. • If toner gets on your clothing, wash with cold water. Hot water will set the toner into the fabric and may make removing the stain impossible. Important ❒ When you first use this printer, use the four toner cartridges packaged with the printer. Note ❒ The toner cartridges that comes with the printer will allow you to print up to about 2,500 pages. These numbers were obtained from printing A4 5% charts, but the actual number of pages will differ depending on the paper type, size, contents and settings. ❒ Toner Cartridges (consumable) are not covered by warranty. However, if there is problem, contact the store where they ware purchased. ❒ Toner cartridge mouths may be dirtied during quality inspection. Open the printer's upper left cover. AJT045S AJT046S For more detailed information please refer to the included CD-ROM Take out the toner cartridge. Hold the toner cartridge horizontally as illustrated, and then shake it in the plastic bag from side to side about 10 times. Push the toner cartridge in the direction of the arrow until it is securely positioned. ZHBH460E In the illustration, black cartridge is used as an example. Important ❒ Do not open the shutter on the bottom of the toner cartridge. Toner may leak. ZHBH491E Repeat steps to , to install the other color toner cartridges. Close the printer's upper left cover. Remove the adhesive tapes. ZHBH470E AJT047S Note ❒ If the toner cartridge is not set properly, you cannot close the upper left cover. AJT060S Check the toner color and location are correct, and then carefully insert the toner cartridge vertically. You can check the location for each toner cartridge by reading the labels on the printer. LOADING PAPER Caution • When pulling the paper tray out, be careful not to pull it strongly. If you do, the tray might fall and cause personal injury. Pull the paper tray out of the printer until it stops. Lift it slightly, and then pull it fully out. Place the paper tray on a flat surface. ZHBH481E The illustration uses the yellow cartridge as an example. AJT048S Note ❒ You cannot pull out Tray 1 if the Bypass Tray is open. AJT061S Remove the adhesive tape and packing material. TURNING THE POWER ON Warning • Plug and unplug the power cable with dry hands, or an electric shock could occur. Important ❒ Be sure to connect the power plug to the socket or the wall outlet firmly. ❒ The printer power must be off when plugging in and removing the power cord. Check the printer's power switch is set to Off. If it is set to On. Turn it off. ZHBY920E Press "Push", and then adjust the rear guide to the paper size you want to load. AJT062S Attach the power cord to the socket on the back of the printer. ZHBY040E Adjust the side guides to the paper size you want to load. AJT063S Plug the other end of the power cord securely into the wall outlet. Turn the power switch to On. AJT083S Load paper print side up in the paper tray. Important ❒ Make sure the top of the stack is not higher than the limit mark inside the tray. ❒ To avoid misfeeds, set the rear and side to the exact paper size. Slide the paper tray fully into the printer. AJT064S The power indicator on the control panel lights. Note ❒ Wait until "Ready" appears on the display panel. ❒ The machine may make a noise while initializing. This noise does not indicate a malfunction. Important ❒ Do not turn off the power switch until initializing is completed. Doing so results in malfunction. Go to sheet 2/2. Sheet 1/2
-
 1
1 -
 2
2 -
 3
3 -
 4
4 -
 5
5 -
 6
6 -
 7
7 -
 8
8 -
9
-
10
-
11
-
12
-
13
-
14
-
15
-
16
-
17
-
18
-
19
-
20
-
21
-
22
-
23
-
24
-
25
-
26
-
27
-
28
-
29
-
30
-
31
-
32
-
33
-
34
-
35
-
36
-
37
-
38
-
39
-
40
-
41
-
42
-
43
-
44
-
45
-
46
-
47
-
48
-
49
-
50
-
51
-
52
-
53
-
54
-
55
-
56
-
57
-
58
-
59
-
60
-
61
-
62
-
63
-
64
-
65
-
66
-
67
-
68
-
69
-
70
-
71
-
72
-
73
-
74
-
75
-
76
-
77
-
78
-
79
-
80
-
81
-
82
-
83
-
84
-
85
-
86
-
87
-
88
-
89
-
90
-
91
-
92
-
93
-
94
-
95
-
96
-
97
-
98
-
99
-
100
-
101
-
102
-
103
-
104
-
105
-
106
-
107
-
108
-
109
-
110
-
111
-
112
-
113
-
114
-
115
-
116
-
117
-
118
-
119
-
120
-
121
-
122
-
123
-
124
-
125
-
126
-
127
-
128
-
129
-
130
-
131
-
132
-
133
-
134
-
135
-
136
-
137
-
138
-
139
-
140
-
141
-
142
-
143
-
144
-
145
-
146
-
147
-
148
-
149
-
150
-
151
-
152
-
153
-
154
-
155
-
156
-
157
-
158
-
159
-
160
-
161
-
162
-
163
-
164
-
165
-
166
-
167
-
168
-
169
-
170
-
171
-
172
-
173
-
174
-
175
-
176
-
177
-
178
-
179
-
180
-
181
-
182
-
183
-
184
-
185
-
186
-
187
-
188
-
189
-
190
-
191
-
192
-
193
-
194
-
195
-
196
-
197
-
198
-
199
-
200
-
201
-
202
-
203
-
204
-
205
-
206
-
207
-
208
-
209
-
210
-
211
-
212
-
213
-
214
-
215
-
216
-
217
-
218
-
219
-
220
-
221
-
222
-
223
-
224
-
225
-
226
-
227
-
228
-
229
-
230
-
231
-
232
-
233
-
234
-
235
-
236
-
237
-
238
-
239
-
240
-
241
-
242
-
243
-
244
-
245
-
246
-
247
-
248
-
249
-
250
-
251
-
252
-
253
-
254
-
255
-
256
-
257
-
258
-
259
-
260
-
261
-
262
-
263
-
264
-
265
-
266
-
267
-
268
-
269
-
270
-
271
-
272
-
273
-
274
-
275
-
276
-
277
-
278
-
279
-
280
-
281
-
282
-
283
-
284
-
285
-
286
-
287
-
288
-
289
-
290
-
291
-
292
-
293
-
294
-
295
-
296
-
297
-
298
-
299
-
300
-
301
-
302
-
303
-
304
-
305
-
306
-
307
-
308
-
309
-
310
-
311
-
312
-
313
-
314
-
315
-
316
-
317
-
318
-
319
-
320
-
321
-
322
-
323
-
324
-
325
-
326
-
327
-
328
-
329
-
330
-
331
-
332
-
333
-
334
-
335
-
336
-
337
-
338
-
339
-
340
-
341
-
342
-
343
-
344
-
345
-
346
-
347
-
348
-
349
-
350
-
351
-
352
-
353
-
354
-
355
-
356
-
357
-
358
-
359
-
360
-
361
-
362
-
363
-
364
-
365
-
366
-
367
-
368
-
369
-
370
-
371
-
372
-
373
-
374
-
375
-
376
-
377
-
378
-
379
-
380
-
381
-
382
-
383
-
384
-
385
-
386
-
387
-
388
-
389
-
390
-
391
-
392
-
393
-
394
-
395
-
396
-
397
-
398
-
399
-
400
-
401
-
402
-
403
-
404
-
405
-
406
-
407
-
408
-
409
-
410
-
411
-
412
-
413
-
414
-
415
-
416
-
417
-
418
-
419
-
420
-
421
-
422
-
423
-
424
-
425
-
426
-
427
-
428
-
429
-
430
-
431
-
432
-
433
-
434
-
435
-
436
-
437
-
438
-
439
-
440
-
441
-
442
-
443
-
444
-
445
-
446
-
447
-
448
-
449
-
450
-
451
-
452
-
453
-
454
-
455
-
456
-
457
-
458
-
459
-
460
-
461
-
462
-
463
-
464
-
465
-
466
-
467
-
468
-
469
-
470
-
471
-
472
-
473
-
474
-
475
-
476
-
477
-
478
-
479
-
480
-
481
-
482
-
483
-
484
-
485
-
486
-
487
-
488
-
489
-
490
-
491
-
492
-
493
-
494
-
495
-
496
-
497
-
498
-
499
-
500
-
501
-
502
-
503
-
504
-
505
-
506
-
507
-
508
-
509
-
510
-
511
-
512
-
513
-
514
-
515
-
516
-
517
-
518
-
519
-
520
-
521
-
522
-
523
-
524
-
525
-
526
-
527
-
528
-
529
-
530
-
531
-
532
-
533
-
534
-
535
-
536
-
537
-
538
-
539
-
540
-
541
 |
 |
