| Section |
Page |
| Quick Installation Guide |
1 |
| Maintenance Guide |
5 |
| Read This First |
7 |
| Trademarks |
7 |
| How to Read This Manual |
8 |
| Paper and Other Media |
9 |
| Paper and Other Media Supported by This Printer |
9 |
| Paper Recommendations |
13 |
| Loading Paper |
13 |
| Storing Paper |
13 |
| Types of Paper and Other Media |
13 |
| Paper not supported by this printer |
16 |
| Print Area |
17 |
| Loading Paper |
19 |
| Loading Paper in Tray 1 and the optional paper feed unit |
19 |
| Loading Paper in the Bypass Tray |
24 |
| Switching between Paper Trays |
30 |
| Replacing Consumables and Maintenance Kit |
32 |
| Replacing the Toner Cartridge |
32 |
| Replacing the Waste Toner Bottle |
36 |
| Replacing the Photo Conductor Unit |
39 |
| Replacing the Fusing Unit |
48 |
| When “Replace Fusing Unit” Appears on the Display |
53 |
| When “Replace Fusing Unit soon” Appears on the Display |
53 |
| Replacing the Intermediate Transfer Unit |
55 |
| When “Replace Transfer Belt” Appears on the Display |
61 |
| When “Replace Transfer Belt soon” Appears on the Display |
62 |
| Cleaning and Adjusting the Printer |
63 |
| Cautions to Take When Cleaning |
63 |
| Adjusting the Color Registration |
64 |
| Correcting the Color Gradation |
66 |
| Set the Gradation Correction Value |
66 |
| Viewing the Color Calibration Sample Sheet and Gradation Correction Sheet |
69 |
| Resetting the gradation correction value to the initial value |
71 |
| Adjusting the Image Density |
73 |
| Adjusting Tray Registration |
75 |
| Troubleshooting |
78 |
| Error & Status Messages on the Control Panel |
78 |
| Printer Does Not Print |
87 |
| Checking the port connection |
88 |
| Other Printing Problems |
91 |
| Additional Troubleshooting |
97 |
| Removing Misfed Paper |
99 |
| Removing Misfed Paper |
99 |
| When “Remove Misfeed A: Internal Path” Appears |
100 |
| When “Remove Misfeed B: Fusing Unit” Appears |
103 |
| When “Remove Misfeed Y: Paper Tray” Appears |
106 |
| When “Remove Misfeed Z: Duplex Unit” Appears |
108 |
| Appendix |
110 |
| Moving and Transporting the Printer |
110 |
| Moving the Printer |
110 |
| Transporting the Printer |
111 |
| Consumables |
112 |
| Toner Cartridge |
112 |
| Waste Toner Bottle |
113 |
| Photo Conductor Unit |
113 |
| Intermediate Transfer Unit (Transfer Unit) |
113 |
| Specifications |
115 |
| Mainframe |
115 |
| Options |
117 |
| Safety Information |
121 |
| Positions of Warning and Caution labels |
125 |
| Setup Guide |
129 |
| Read This First |
131 |
| Trademarks |
131 |
| Safety Information |
132 |
| Positions of Warning and Caution labels |
136 |
| ENERGY STAR Program |
137 |
| How to Read This Manual |
138 |
| Guide to the Printer |
139 |
| Exterior: Front View |
139 |
| Exterior: Rear View |
140 |
| Inside |
142 |
| Control Panel |
143 |
| Setting Up |
145 |
| Where to Put the Printer |
145 |
| Checking the Contents of the Box |
148 |
| Unpacking |
150 |
| Installing the Waste Toner Bottle and Photo Conductor Unit |
151 |
| Installing the Toner Cartridge |
157 |
| Loading Paper |
161 |
| Turning the Power On |
164 |
| Selecting the Display Language |
166 |
| Test Printing |
168 |
| Adjusting the Image Density |
170 |
| Installing Options |
172 |
| Available Options |
172 |
| Option Installation Flow Chart |
172 |
| Installing Options |
173 |
| Attaching Paper Feed Unit Type 3000 |
175 |
| Attaching AD440 (Duplex Unit) |
180 |
| Attaching Memory Unit Type D 128MB, Memory Unit Type E 256MB ( SDRAM Module) |
183 |
| Attaching Printer Hard Disk Type 3000 |
188 |
| Formatting the Printer Hard Disk |
192 |
| Attaching User Account Enhance Unit Type E |
194 |
| Attaching IEEE 1394 Interface Board Type B |
198 |
| Attaching IEEE 802.11b Interface Unit Type H |
201 |
| Attaching Bluetooth Interface Unit Type 3245 |
205 |
| Attaching IEEE 1284 Interface Board Type A |
209 |
| Attaching Network Data Protection Unit Type C |
211 |
| Connecting the Printer |
213 |
| Network Connection |
213 |
| USB Connection |
215 |
| Parallel Connection |
216 |
| IEEE 1394 Connection |
217 |
| Ethernet Configuration |
218 |
| Configuration |
223 |
| IEEE 802.11b (Wireless LAN) Configuration |
223 |
| IEEE 1394 Configuration |
229 |
| IP over 1394 |
229 |
| SCSI print |
231 |
| Installing the Printer Driver |
233 |
| Quick Install |
233 |
| Install the Operating Instructions |
235 |
| Note to Administrator |
237 |
| Password |
237 |
| Addendum for Menu function |
237 |
| Software Guide |
241 |
| Read This First |
248 |
| Manuals for This Printer |
248 |
| Preparing for Printing |
249 |
| Quick Install |
249 |
| Confirming the Connection Method |
251 |
| Network Connection |
251 |
| Local Connection |
253 |
| Using the SmartDeviceMonitor for Client Port |
255 |
| Installing SmartDeviceMonitor for Client |
255 |
| Installing the PCL or RPCS Printer Driver (TCP/IP) |
256 |
| Installing the PCL or RPCS Printer Driver (IPP) |
257 |
| Installing the PostScript 3 Printer Driver (Windows 95/98/Me - TCP/ IP) |
259 |
| Installing the PostScript 3 Printer Driver (Windows 95/98/Me - IPP) |
261 |
| Installing the PostScript 3 Printer Driver (Windows 2000 - TCP/IP) |
262 |
| Installing the PostScript 3 Printer Driver (Windows 2000 - IPP) |
264 |
| Installing the PostScript 3 Printer Driver (Windows XP, Windows Server 2003 - TCP/ IP) |
265 |
| Installing the PostScript 3 Printer Driver (Windows XP, Windows Server 2003 - IPP) |
266 |
| Installing the PostScript 3 Printer Driver (Windows NT 4.0 - TCP/ IP) |
268 |
| Installing the PostScript 3 Printer Driver (Windows NT 4.0 - IPP) |
269 |
| Changing the Port Settings for SmartDeviceMonitor for Client |
270 |
| Using the Standard TCP/IP Port |
272 |
| Installing the PCL or RPCS Printer Driver |
272 |
| Installing the PostScript 3 Printer Driver (Windows 2000) |
273 |
| Installing the PostScript 3 Printer Driver (Windows XP, Windows Server 2003) |
274 |
| Using the LPR Port |
277 |
| Installing the PCL or RPCS Printer Driver |
277 |
| Installing the PostScript 3 Printer Driver (Windows 2000) |
278 |
| Installing the PostScript 3 Printer Driver (Windows XP, Windows Server 2003) |
279 |
| Installing the PostScript 3 Printer Driver (Windows NT 4.0) |
280 |
| Using as the Windows Network Printer |
282 |
| Installing the PCL or RPCS Printer Driver |
282 |
| Installing the PostScript 3 Printer Driver (Windows 95/98/Me) |
283 |
| Installing the PostScript 3 Printer Driver (Windows 2000) |
284 |
| Installing the PostScript 3 Printer Driver (Windows XP, Windows Server 2003) |
285 |
| Installing the PostScript 3 Printer Driver (Windows NT 4.0) |
287 |
| Using as the NetWare Print Server/Remote Printer |
289 |
| When using the PostScript 3 Printer Driver |
290 |
| Form Feed |
291 |
| Banner Page |
291 |
| Printing after Resetting the Printer |
291 |
| Installing the Printer Driver Using USB |
292 |
| Windows 98 SE/Me - USB |
292 |
| Windows 2000 - USB |
294 |
| Windows XP, Windows Server 2003 - USB |
295 |
| Troubleshooting USB |
296 |
| Printing with Parallel Connection |
298 |
| Installing the PCL or RPCS Printer Driver |
298 |
| Installing the PostScript 3 Printer Driver (Windows 95/98/Me) |
299 |
| Installing the PostScript 3 Printer Driver (Windows 2000) |
300 |
| Installing the PostScript 3 Printer Driver (Windows XP, Windows Server 2003) |
301 |
| Installing the PostScript 3 Printer Driver (Windows NT 4.0) |
302 |
| Installing the Printer Driver Using IEEE 1394 ( SCSI print) |
303 |
| Windows 2000 |
303 |
| Windows XP, Windows Server 2003 |
305 |
| Printing with Bluetooth Connection |
307 |
| Supported Profiles |
307 |
| Printing with Bluetooth Connection |
307 |
| If a Message Appears during Installation |
310 |
| Making Option Settings for the Printer |
311 |
| Conditions for Bidirectional Communication |
311 |
| If Bidirectional Communication is Disabled |
312 |
| Setting Up the Printer Driver |
314 |
| PCL - Accessing the Printer Properties |
314 |
| Windows 95/98/Me - Accessing the Printer Properties |
314 |
| Windows 2000 - Accessing the Printer Properties |
315 |
| Windows XP, Windows Server 2003 - Accessing the Printer Properties |
317 |
| Windows NT 4.0 - Accessing the Printer Properties |
318 |
| RPCS - Accessing the Printer Properties |
321 |
| Windows 95/98/Me - Accessing the Printer Properties |
321 |
| Windows 2000 - Accessing the Printer Properties |
322 |
| Windows XP, Windows Server 2003 - Accessing the Printer Properties |
324 |
| Windows NT 4.0 - Accessing the Printer Properties |
326 |
| PostScript 3 - Setting Up for Printing |
329 |
| Windows 95/98/Me - Accessing the Printer Properties |
329 |
| Windows 2000 - Accessing the Printer Properties |
330 |
| Windows XP, Windows Server 2003 - Accessing the Printer Properties |
332 |
| Windows NT 4.0 - Accessing the Printer Properties |
333 |
| Mac OS - Setting Up for Printing |
335 |
| Other Print Operations |
337 |
| Printing a PDF File Directly |
337 |
| Using DeskTopBinder Lite |
337 |
| Installing DeskTopBinder Lite |
337 |
| PDF Direct Printing |
338 |
| Printing PDF Password-Protected Documents |
339 |
| Using Commands |
341 |
| Sample Print |
342 |
| Printing the First Set |
342 |
| Printing the Remaining Sets |
343 |
| Deleting a Sample Print File |
344 |
| Checking the Error Log |
344 |
| Locked Print |
346 |
| Sending Print Job to the Printer |
346 |
| Entering a Password |
347 |
| Deleting a Locked Print File |
348 |
| Checking the Error Log |
349 |
| Form Feed |
351 |
| Canceling a Print Job |
352 |
| Windows - Canceling a Print Job |
352 |
| Mac OS - Canceling a Print Job |
353 |
| Caution During Printing |
355 |
| Collate |
355 |
| Spool Printing |
355 |
| Cover |
357 |
| Memory Capacity and Paper Size |
357 |
| Making Printer Settings Using the Control Panel |
360 |
| Menu Chart |
360 |
| Paper Input Menu |
364 |
| Changing the paper input menu |
364 |
| Paper input menu parameters |
365 |
| List/Test Print Menu |
368 |
| Printing a Configuration Page |
368 |
| Interpreting the configuration page |
368 |
| List/Test Print menu parameters |
370 |
| Maintenance Menu |
372 |
| Changing the maintenance menu |
372 |
| Maintenance menu parameters |
374 |
| System Menu |
378 |
| Changing the system menu |
378 |
| System menu parameters |
378 |
| Host Interface Menu |
385 |
| Changing the Host Interface menu |
385 |
| Host Interface menu parameters |
385 |
| PCL Menu |
392 |
| Changing the PCL menu |
392 |
| PCL menu parameters |
392 |
| PS Menu |
395 |
| Changing the PS menu |
395 |
| PS menu parameters |
395 |
| PDF Menu |
397 |
| Changing the PDF menu |
397 |
| PDF menu parameters |
397 |
| Language Menu |
400 |
| Changing the language menu |
400 |
| Language menu parameters |
400 |
| Monitoring and Configuring the Printer |
401 |
| Using Web Image Monitor |
401 |
| Displaying Top Page |
402 |
| About Menu and Mode |
403 |
| Access in the Administrator Mode |
404 |
| Displaying Web Image Monitor Help |
405 |
| Using SmartDeviceMonitor for Admin |
407 |
| Installing SmartDeviceMonitor for Admin |
408 |
| Changing the Network Interface Board Configuration |
409 |
| Locking the Menus on the Printer's Control Panel |
409 |
| Changing the Paper Type |
410 |
| Managing User Information |
411 |
| Configuring the Energy Saver Mode |
414 |
| Setting a Password |
414 |
| Checking the Printer Status |
415 |
| Changing Names and Comments |
415 |
| Using SmartDeviceMonitor for Client |
417 |
| Monitoring Printers |
417 |
| Checking the Printer Status |
417 |
| When Using IPP with SmartDeviceMonitor for Client |
418 |
| Printer Status Notification by E-Mail |
419 |
| Auto E-mail Notification |
420 |
| On-demand E-mail Notification |
420 |
| Remote Maintenance by telnet |
421 |
| Using telnet |
421 |
| access |
422 |
| appletalk |
422 |
| autonet |
423 |
| btconfig |
423 |
| devicename |
424 |
| dhcp |
424 |
| diprint |
425 |
| dns |
426 |
| domainname |
427 |
| help |
428 |
| hostname |
428 |
| ifconfig |
429 |
| info |
430 |
| ipp |
430 |
| netware |
431 |
| passwd |
432 |
| prnlog |
433 |
| rendezvous |
433 |
| route |
435 |
| set |
436 |
| show |
437 |
| slp |
438 |
| smb |
438 |
| snmp |
439 |
| sntp |
442 |
| spoolsw |
442 |
| sprint |
443 |
| status |
443 |
| syslog |
444 |
| upnp |
444 |
| web |
444 |
| wiconfig |
445 |
| wins |
447 |
| SNMP |
449 |
| Getting Printer Information over the Network |
450 |
| Current Printer Status |
450 |
| Printer configuration |
456 |
| Understanding the Displayed Information |
458 |
| Print Job Information |
458 |
| Print Log Information |
458 |
| Configuring the Network Interface Board |
459 |
| Message List |
465 |
| System Log Information |
465 |
| Using a Printer Server |
471 |
| Preparing Printer Server |
471 |
| Printing notification via SmartDeviceMonitor for Client |
471 |
| Using NetWare |
473 |
| Setting Up as a Print Server (NetWare 3.x) |
474 |
| Setting Up as a Print Server (NetWare 4.x, 5/5.1, 6/6.5) |
475 |
| Using Pure IP in the NetWare 5/5.1 or 6/6.5 Environment |
476 |
| Setting Up as a Remote Printer (NetWare 3.x) |
479 |
| Setting Up as a Remote Printer (NetWare 4.x, 5/5.1, 6/6.5) |
481 |
| Special Operations under Windows |
485 |
| Printing Files Directly from Windows |
485 |
| Setup |
485 |
| Using a Host Name Instead of an IP Address |
485 |
| Printing Commands |
487 |
| Mac OS Configuration |
490 |
| Mac OS |
490 |
| Installing the PostScript 3 Printer Driver and PPD File |
490 |
| Setting Up PPD Files |
491 |
| Creating a Desktop Printer Icon |
491 |
| Setting Up Options |
492 |
| Installing the ColorSync Profiles |
492 |
| Installing Adobe Type Manager |
493 |
| Installing Screen fonts |
494 |
| Changing to EtherTalk |
494 |
| Mac OS X |
496 |
| Installing the PPD Files |
496 |
| Setting Up the PPD File |
496 |
| Setting Up Options |
497 |
| Using USB Interface |
497 |
| Using Rendezvous |
497 |
| Changing to EtherTalk |
498 |
| Configuring the Printer |
499 |
| Using PostScript 3 |
500 |
| Job Type |
500 |
| Duplex Printing |
502 |
| Color Mode |
503 |
| Gradation |
503 |
| Color Profile |
503 |
| Color Setting |
504 |
| CMYK Simulation Profile |
505 |
| Dithering |
505 |
| Gray Reproduction |
505 |
| Color Matching |
505 |
| Printer Utility for Mac |
506 |
| Installing Printer Utility for Mac |
506 |
| Starting Printer Utility for Mac |
507 |
| Printer Utility for Mac Functions |
507 |
| Appendix |
514 |
| Software and Utilities Included on the CD-ROM |
514 |
| Printer Drivers for This Printer |
514 |
| SmartDeviceMonitor for Admin |
515 |
| SmartDeviceMonitor for Client |
516 |
| Cautions to Take When Using in a network |
519 |
| Connecting a Dial-up Router to a Network |
519 |
| Using DHCP |
519 |
| Configuring the WINS Server |
521 |
| Using the Dynamic DNS Function |
523 |
| Configuring SSL Encryption |
525 |
| SSL (Secure Sockets Layer) Encryption |
525 |
| User Settings for SSL (Secure Sockets Layer) |
529 |
| Installing the Certificate Using SmartDeviceMonitor for Client |
530 |
| Installing Font Manager 2000 |
532 |
| Using Adobe PageMaker Version 6.0, 6.5, or 7.0 |
533 |
| When Using Windows Terminal Service/ MetaFrame |
534 |
| Operating Environment |
534 |
| Supported Printer Drivers |
534 |
| Limitations |
534 |
| Cautions When Using Bluetooth Interface Unit |
537 |
| Information about Installed Applications |
538 |
| expat |
538 |
| JPEG LIBRARY |
538 |
| NetBSD |
538 |
| Samba(Ver 2.2.2-1.1) |
540 |
 1
1 176
176 177
177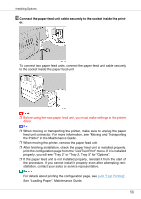 178
178 179
179 180
180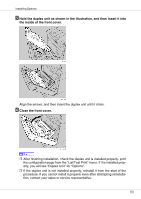 181
181 182
182 183
183 184
184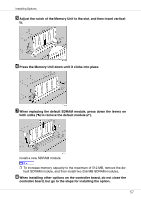 185
185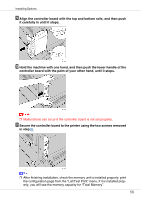 186
186