Ricoh CL3500N Quick Installation Guide - Page 3
Connectingthe Printer To, A Computer, Selecting The Panel, Display Language, Printingthe Test - parts list
 |
UPC - 026649024344
View all Ricoh CL3500N manuals
Add to My Manuals
Save this manual to your list of manuals |
Page 3 highlights
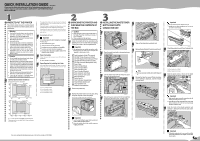
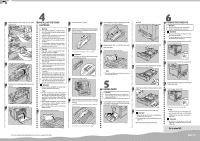
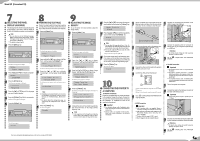
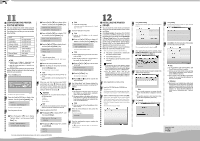
Sheet 2/2 (From sheet 1/2) SELECTING THE PANEL DISPLAY LANGUAGE The message for the selected language will appear on the display. If you want to use the display in English, the following procedures are unnecessary. Note ❒ You can select one of the following languages: English, German, French, Italian, Dutch, Swedish, Norwegian, Danish, Spanish, Finnish, Portuguese, Czech, Polish or Hungarian. ❒ The default setting is English. Press the {Menu} key. The [Menu] screen appears on the display. AGY200S Menu: Paper Input Press the {L} or {M} key to display "Language". Menu: Language Press the {# Enter} key. The following message appears on the display. Language: *English Press the {L} or {M} key until the language you want to select appears. Press the {# Enter} key. Wait for two seconds. The [Menu] screen appears on the display. Press the {Online} key. PRINTINGTHE TEST PAGE Test print in order to verify that the printer is working normally.Test printing checks printer performance only; it does not test the connection to the computer. Press the {Menu} key. The [Menu] screen appears on the display. AGY200S Menu: Paper Input Press the {L} or {M} key to display "List/Test Print", and then press the {# Enter} key. Menu: List/Test Print The menu for selecting the contents to be test printed appears. Press the {L} or {M} key to display "Config.Page", and then press the {# Enter} key. List/Test Print: Config.Page The following message appears and the configuration page is printed. Printing... Note ❒ If printing is not normal, check to see if an error message appears on the display. If there is an error message, see "Troubleshooting", Maintenance Guide. ❒ For details about the configuration page, see "Interpreting the Configuration Page", Software Guide. Press the {Online} key. The initial screen appears. Ready The initial screen appears. Ready AGY201S For more detailed information please refer to the included CD-ROM ADJUSTING THE IMAGE DENSITY To use the printer in its best condition, adjust the image density. Press the {Menu} key. The [Menu] screen appears on the display. AGY200S Menu: Paper Input Press the {L} or {M} key to display "Maintenance", and then press the {# Enter} key. Menu: Maintenance Press the {L} or {M} key to display "Image Density", and then press the {# Enter} key. Maintenance: Image Density The following message appears on the display. Image Density: Prt.Test Sheet Press the {# Enter} key. The following massage appears on the display, and then Press the [# Enter] key. Prt.Test Sheet: Press # to Start Printing... Compare the colors on the printed image density test sheet with those on the Image Density Adjusting Card. Note ❒ If the image density of the Image Density Adjusting Card is equal to the framed part of the test sheet, you do not need to adjust the image density value. Press the {L} or {M} key to select the color you want to adjust, and then press the {# Enter} key. Image Density Black Press the {L} or {M} key to set the image density value, and then press the {# Enter} key. Black (-10 +10) 0 Note ❒ You can adjust the image density from -10 to +10. Increasing the value makes the printouts darker and decreasing the value makes the printouts lighter. ❒ Pressing the {L} or {M} key makes the value increase or decrease by one. To adjust another color, repeat the steps to . Print another image density test sheet and check if the colors on the test sheet now match those on the Image Density Adjusting Card. If they still do not match, adjust the image density again. Press the {Online} key. The initial screen appears. Ready CONNECTINGTHE PRINTER TO A COMPUTER ❖ Network Connection Follow the procedure below to connect the printer to the computer through the network. Prepare the hub and other network devices before connecting the 10BASE-T or 100BASE-TX cable to the machine's ethernet port. Important ❒ Use shielded ethernet cable. Unshielded cables create electromagnetic interference that could cause malfunctions. ❒ Ethernet cable is not supplied with this machine. Select your cable according to the network environment. Attach one ferrite core at the printer end of the Ethernet cable, and then attach the other ferrite core about 10 cm (4 inches) (1) from this core. AET121S Connect the ethernet cable to the ethernet port. AJT038S Connect the other end of the cable to the printer's network, such as to a hub. Confirm the LEDs on the Ethernet port. ZESX338E ቢ Yellow: lit when 100BASE-TX is being used. Unlit when 10BASET is being used. ባ Green: lit when the printer is properly connected to the network. Go to "CONFIGURING THE PRINTER FOR THE NETWORK". ❖ USB Connection Important ❒ USB2.0 interface cable is not supplied. Obtain it separately, according to the computer you are using. ❒ USB connection is possible under Windows 98 SE/ Me/2000/XP, Windows Server 2003, Mac OS X v10.3.3 or higher. ❒ Windows 98SE/Me supports USB1.1 speeds. ❒ Mac OS supports only the standard USB port. Connect the square-shaped connector of the USB2.0 cable to the USB port. AJT040S Connect the opposite end's flat connector to devices such as your computer's USB interface, or a USB hub. Reference ❒ For details about settings for USB connection printing, see Software Guide. Go to "INSTALLING THE PRINTER DRIVER". ❖ Parallel Connection Important ❒ The parallel interface cable is not provided with the printer. ❒ The printer's parallel connection is a standard bidirectional interface that requires an IEEE 1284compliant 36-pin parallel cable and host computer parallel port. ❒ Use shielded interface cable. Unshielded cables create electromagnetic interference that could cause malfunctions. Turn off the printer and computer. Connect the cable to the interface connector of the IEEE 1284 interface board. Important ❒ Voltage rating of the computer's parallel port: DC 5 V (max.) AJT041S Securely attach the other end of the parallel cable to your computer's parallel port.Secure the cable. Reference ❒ For details about settings for parallel connection printing, see Software Guide. Go to "INSTALLING THE PRINTER DRIVER".
-
 1
1 -
 2
2 -
 3
3 -
 4
4 -
 5
5 -
 6
6 -
 7
7 -
 8
8 -
 9
9 -
10
-
11
-
12
-
13
-
14
-
15
-
16
-
17
-
18
-
19
-
20
-
21
-
22
-
23
-
24
-
25
-
26
-
27
-
28
-
29
-
30
-
31
-
32
-
33
-
34
-
35
-
36
-
37
-
38
-
39
-
40
-
41
-
42
-
43
-
44
-
45
-
46
-
47
-
48
-
49
-
50
-
51
-
52
-
53
-
54
-
55
-
56
-
57
-
58
-
59
-
60
-
61
-
62
-
63
-
64
-
65
-
66
-
67
-
68
-
69
-
70
-
71
-
72
-
73
-
74
-
75
-
76
-
77
-
78
-
79
-
80
-
81
-
82
-
83
-
84
-
85
-
86
-
87
-
88
-
89
-
90
-
91
-
92
-
93
-
94
-
95
-
96
-
97
-
98
-
99
-
100
-
101
-
102
-
103
-
104
-
105
-
106
-
107
-
108
-
109
-
110
-
111
-
112
-
113
-
114
-
115
-
116
-
117
-
118
-
119
-
120
-
121
-
122
-
123
-
124
-
125
-
126
-
127
-
128
-
129
-
130
-
131
-
132
-
133
-
134
-
135
-
136
-
137
-
138
-
139
-
140
-
141
-
142
-
143
-
144
-
145
-
146
-
147
-
148
-
149
-
150
-
151
-
152
-
153
-
154
-
155
-
156
-
157
-
158
-
159
-
160
-
161
-
162
-
163
-
164
-
165
-
166
-
167
-
168
-
169
-
170
-
171
-
172
-
173
-
174
-
175
-
176
-
177
-
178
-
179
-
180
-
181
-
182
-
183
-
184
-
185
-
186
-
187
-
188
-
189
-
190
-
191
-
192
-
193
-
194
-
195
-
196
-
197
-
198
-
199
-
200
-
201
-
202
-
203
-
204
-
205
-
206
-
207
-
208
-
209
-
210
-
211
-
212
-
213
-
214
-
215
-
216
-
217
-
218
-
219
-
220
-
221
-
222
-
223
-
224
-
225
-
226
-
227
-
228
-
229
-
230
-
231
-
232
-
233
-
234
-
235
-
236
-
237
-
238
-
239
-
240
-
241
-
242
-
243
-
244
-
245
-
246
-
247
-
248
-
249
-
250
-
251
-
252
-
253
-
254
-
255
-
256
-
257
-
258
-
259
-
260
-
261
-
262
-
263
-
264
-
265
-
266
-
267
-
268
-
269
-
270
-
271
-
272
-
273
-
274
-
275
-
276
-
277
-
278
-
279
-
280
-
281
-
282
-
283
-
284
-
285
-
286
-
287
-
288
-
289
-
290
-
291
-
292
-
293
-
294
-
295
-
296
-
297
-
298
-
299
-
300
-
301
-
302
-
303
-
304
-
305
-
306
-
307
-
308
-
309
-
310
-
311
-
312
-
313
-
314
-
315
-
316
-
317
-
318
-
319
-
320
-
321
-
322
-
323
-
324
-
325
-
326
-
327
-
328
-
329
-
330
-
331
-
332
-
333
-
334
-
335
-
336
-
337
-
338
-
339
-
340
-
341
-
342
-
343
-
344
-
345
-
346
-
347
-
348
-
349
-
350
-
351
-
352
-
353
-
354
-
355
-
356
-
357
-
358
-
359
-
360
-
361
-
362
-
363
-
364
-
365
-
366
-
367
-
368
-
369
-
370
-
371
-
372
-
373
-
374
-
375
-
376
-
377
-
378
-
379
-
380
-
381
-
382
-
383
-
384
-
385
-
386
-
387
-
388
-
389
-
390
-
391
-
392
-
393
-
394
-
395
-
396
-
397
-
398
-
399
-
400
-
401
-
402
-
403
-
404
-
405
-
406
-
407
-
408
-
409
-
410
-
411
-
412
-
413
-
414
-
415
-
416
-
417
-
418
-
419
-
420
-
421
-
422
-
423
-
424
-
425
-
426
-
427
-
428
-
429
-
430
-
431
-
432
-
433
-
434
-
435
-
436
-
437
-
438
-
439
-
440
-
441
-
442
-
443
-
444
-
445
-
446
-
447
-
448
-
449
-
450
-
451
-
452
-
453
-
454
-
455
-
456
-
457
-
458
-
459
-
460
-
461
-
462
-
463
-
464
-
465
-
466
-
467
-
468
-
469
-
470
-
471
-
472
-
473
-
474
-
475
-
476
-
477
-
478
-
479
-
480
-
481
-
482
-
483
-
484
-
485
-
486
-
487
-
488
-
489
-
490
-
491
-
492
-
493
-
494
-
495
-
496
-
497
-
498
-
499
-
500
-
501
-
502
-
503
-
504
-
505
-
506
-
507
-
508
-
509
-
510
-
511
-
512
-
513
-
514
-
515
-
516
-
517
-
518
-
519
-
520
-
521
-
522
-
523
-
524
-
525
-
526
-
527
-
528
-
529
-
530
-
531
-
532
-
533
-
534
-
535
-
536
-
537
-
538
-
539
-
540
-
541
 |
 |
