Ridgid 100-B Owners Manual - Page 11
Compact 100-B Pressing Tool - battery
 |
View all Ridgid 100-B manuals
Add to My Manuals
Save this manual to your list of manuals |
Page 11 highlights
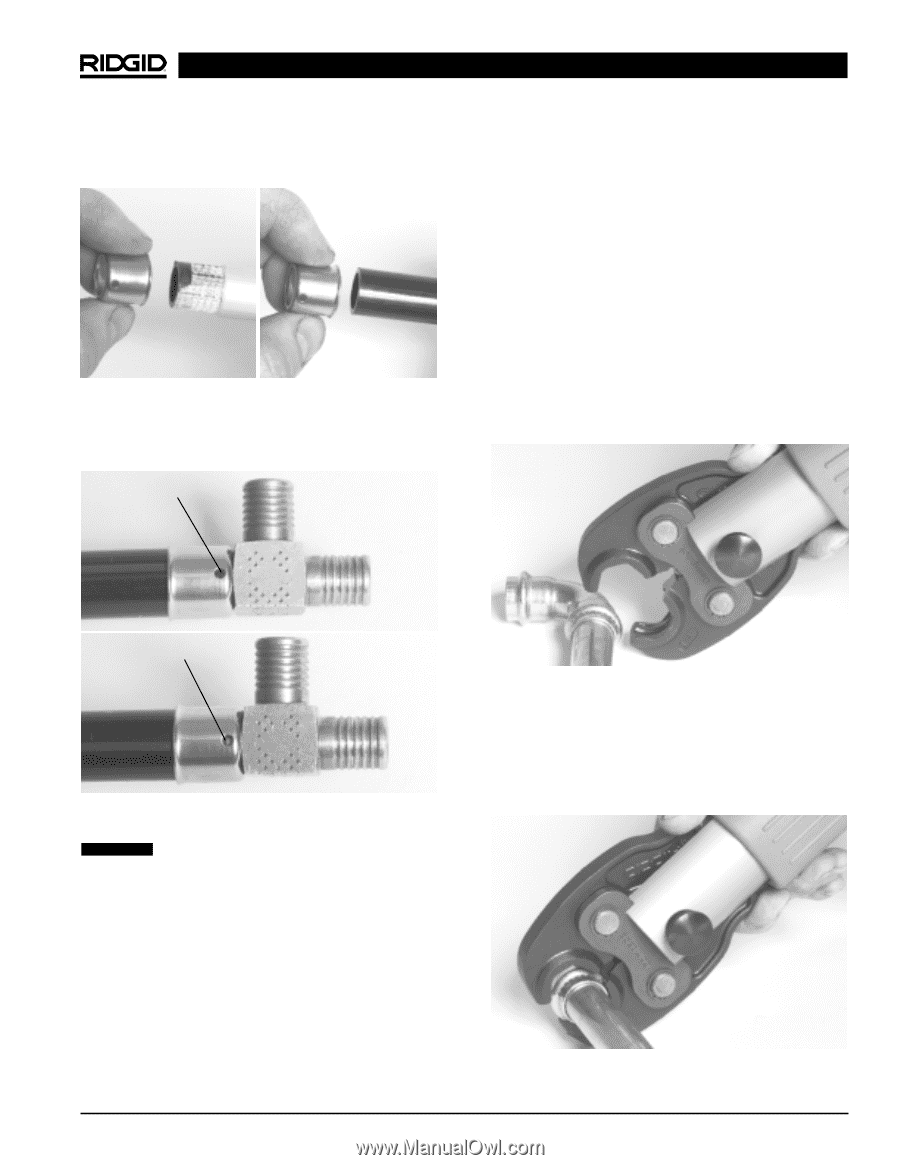
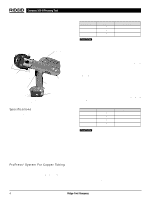
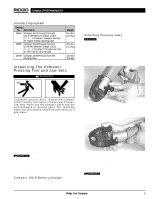
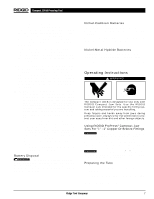
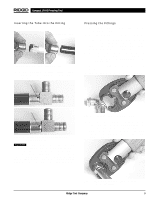
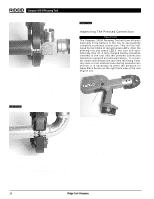
Compact 100-B Pressing Tool Inserting the Tube Into the Fitting 1. Slide press sleeve fully over end of tubing (Figure 9). FostaPex™ Tube Pexcel™ or Pextron™ Tube Figure 9 - Installing Press Sleeve Onto Tube 2. Insert tube into barbed end of fitting until tube contacts fitting shoulder. Check sight hole to confirm complete tube insertion (Figure 10). Complete Tube Insertion Pressing the Fittings 1. Make sure the Compact 100-B Pressing Tool has the correct jaw set installed. 2. Insert fully charged battery into the base of the handle. 3. Depress ON/OFF button on display panel one time to turn tool on. All three light emitting diodes (LED's) will blink once. Then, the green LED should be solid illuminated indicating the tool is ready to press. NOTE! Tool will automatically turn off if left unused for ten (10) minutes. To restart tool, it is necessary to once again depress the ON/OFF button on the top display panel. 4. Make sure the tubing is inserted to the proper depth in fitting. 5. Squeeze jaw arms to open the jaw set (Figure 11). Incomplete Tube Insertion Figure 10 - Inserting the Tube to Proper Depth on PureFlow™ Fitting CAUTION To obtain a proper seal, the tube end should be squarely cut and must be inserted fully into the press sleeve. The end of the tube must be visible through the sight hole in the press sleeve (refer to Figure 10). The tube and sleeve must be fully inserted onto barbed end of fitting up to the fitting shoulder. Failure to do so may result in an improper seal that can lead to extensive property damage. Figure 11 - Opening The Scissor-Style Jaw Set 6. Place open jaws around the fitting. Make sure the contour of the jaw set is properly aligned with the contour of the fitting for ProPress® systems (Figure 12). Make sure the raised lip of the stainless steel sleeve is properly aligned with the jaw set for PureFlow™ systems (Figure 13). Figure 12 - Placing Scissor-Style Jaw Set Around ProPress® Fitting Ridge Tool Company 9
-
 1
1 -
2
-
3
-
4
-
5
-
 6
6 -
 7
7 -
 8
8 -
 9
9 -
 10
10 -
 11
11 -
 12
12 -
 13
13 -
 14
14 -
 15
15 -
 16
16 -
17
-
18
-
19
-
20
-
21
-
22
-
23
-
24
-
25
-
26
-
27
-
28
-
29
-
30
-
31
-
32
-
33
-
34
-
35
-
36
-
37
-
38
-
39
-
40
-
41
-
42
-
43
-
44
-
45
-
46
-
47
-
48
-
49
-
50
-
51
-
52
-
53
-
54
 |
 |