Ridgid R4010 Owners Manual - Page 20
Aligning The Laser Guide Line, Danger, Warning
 |
View all Ridgid R4010 manuals
Add to My Manuals
Save this manual to your list of manuals |
Page 20 highlights
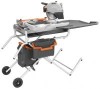
ASSEMBLY Place an outer washer onto the spindle. The double "D" flats on the washer align with the flats on the spindle. Be sure the hollow side of the washer is against the cutting wheel. Place wheel nut on spindle. Depress the spindle lock button and rotate the cutting wheel until the spindle locks. Using the wheel wrench provided, tighten nut securely. Release the spindle lock button. Close and lock the wheel guard. aligning the laser guide line See Figure 24. Danger: Laser radiation. Avoid direct eye contact with light source. WARNING: Use of controls or adjustments or performance of procedures other than those specified herein may result in hazardous radiation exposure. Draw a line on the tile. When the laser guide switch is turned on it will generate a red line on the work surface. This line will let you see your mark and the laser guide line at the same time, and will assist you in lining up the mark for more accurate cutting of the tile. Align the laser line and the mark with the wheel in the cutting position using the laser adjustment dial. Once both lines are in alignment, do not move the tile. Make several practice cuts on different styles and thickness of material. Repeat the steps above as necessary. Follow the directions below for using the laser guide: Removing Your Mark: Position the laser line near the left edge of your mark on the work surface in order to remove the mark. To Cut Your Mark: Position the laser line near or over your mark on the work surface in order to cut the mark. To Leave Your Mark: Position the laser line near the right edge of your mark on the work surface in order to leave the mark. After you have become familiar with using the laser guide, you will be able to remove, cut, or leave your mark on the work surface. Practice will teach you the correct position for aligning the laser line with your mark. 20 - English Laser guide switch Laser adjustment dial Red line Fig. 24
-
 1
1 -
2
-
3
-
4
-
5
-
6
-
7
-
8
-
9
-
10
-
11
-
12
-
13
-
14
-
 15
15 -
 16
16 -
 17
17 -
 18
18 -
 19
19 -
 20
20 -
 21
21 -
 22
22 -
 23
23 -
 24
24 -
 25
25 -
26
-
27
-
28
-
29
-
30
-
31
-
32
-
33
-
34
-
35
-
36
-
37
-
38
-
39
-
40
-
41
-
42
-
43
-
44
-
45
-
46
-
47
-
48
-
49
-
50
-
51
-
52
-
53
-
54
-
55
-
56
-
57
-
58
-
59
-
60
-
61
-
62
-
63
-
64
-
65
-
66
-
67
-
68
-
69
-
70
-
71
-
72
-
73
-
74
-
75
-
76
-
77
-
78
-
79
-
80
-
81
-
82
-
83
-
84
-
85
-
86
-
87
-
88
 |
 |
