Ridgid R4010 Owners Manual - Page 27
Adjustments, Maintenance - replacement parts
 |
View all Ridgid R4010 manuals
Add to My Manuals
Save this manual to your list of manuals |
Page 27 highlights
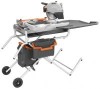
ADJUSTMENTS DEPTH STOP ADJUSTMENTS See Figure 38. The depth stop limits the wheel's downward travel. It allows the wheel to go below the table enough to maintain full cutting capacities. The depth stop is factory set to provide maximum cutting capacity for the wheel provided with the saw. Make adjustments if needed. Unplug the saw. To adjust the depth, loosen the wing nut located on the depth stop knob. Turn the depth stop knob. Set the wheel to the correct cutting depth (wheel just below the table surface). Lower the cutting wheel to the table to check wheel clearance. Readjust if necessary. Tighten the wing nut. POSITIVE STOP ADJUSTMENTS See Figure 38. Note: These adjustments were made at the factory and normally do not require readjustment. Unplug the saw. If the cutting wheel is not perfectly vertical (0°): Loosen the bevel lock knob. Place a combination square beside the wheel. Using a wrench, turn the 0° hex bolt until the wheel is square to the table and the hex bolt is resting on the saw housing. Tighten the bevel lock knob. If the cutting wheel is not an exact 45°: Set the saw arm to a 45° angle. Place a combination square beside the wheel and set the saw arm at 45°. Using a wrench, turn the 45° hex bolt until the hex bolt is resting on the saw housing. After squaring adjustments have been made, it may be necessary to loosen the indicator screw on the bevel scale indicator and reset it to zero. Bevel scale indicator 0° Hex bolt Depth stop knob 45° Hex bolt Wing nut Bevel lock knob MAINTENANCE WARNING: When servicing, use only identical RIDGID replacement parts. Use of any other parts may create a hazard or cause product damage. WARNING: Always wear eye protection with side shields marked to comply with ANSI Z87.1 during product operation. If operation is dusty, also wear a dust mask. Fig. 38 GENERAL MAINTENANCE Avoid using solvents when cleaning plastic parts. Most plastics are susceptible to damage from various types of commercial solvents and may be damaged by their use. Use clean cloths to remove dirt, dust, oil, grease, etc. WARNING: Do not at any time let brake fluids, gasoline, petroleum-based products, penetrating oils, etc., come in contact with plastic parts. Chemicals can damage, weaken or destroy plastic which may result in serious personal injury. 27 - English
-
 1
1 -
2
-
3
-
4
-
5
-
6
-
7
-
8
-
9
-
10
-
11
-
12
-
13
-
14
-
15
-
16
-
17
-
18
-
19
-
20
-
21
-
 22
22 -
 23
23 -
 24
24 -
 25
25 -
 26
26 -
 27
27 -
 28
28 -
 29
29 -
 30
30 -
 31
31 -
 32
32 -
33
-
34
-
35
-
36
-
37
-
38
-
39
-
40
-
41
-
42
-
43
-
44
-
45
-
46
-
47
-
48
-
49
-
50
-
51
-
52
-
53
-
54
-
55
-
56
-
57
-
58
-
59
-
60
-
61
-
62
-
63
-
64
-
65
-
66
-
67
-
68
-
69
-
70
-
71
-
72
-
73
-
74
-
75
-
76
-
77
-
78
-
79
-
80
-
81
-
82
-
83
-
84
-
85
-
86
-
87
-
88
 |
 |
