Samsung DVD-V1000 User Manual (user Manual) (ver.1.0) (English) - Page 10
Daylight Savings Time, Manual Clock Set - instruction manual
 |
View all Samsung DVD-V1000 manuals
Add to My Manuals
Save this manual to your list of manuals |
Page 10 highlights
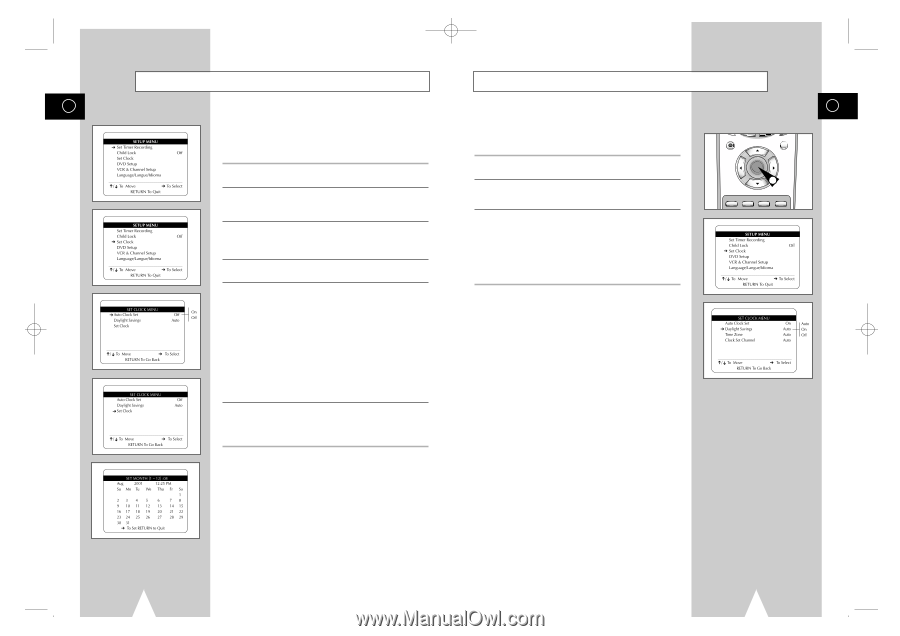
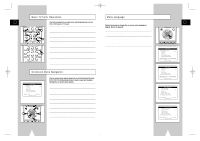
01547A DVD-V1000/XAA-Eng2 5/16/02 3:38 PM Page 18 Manual Clock Set Daylight Savings Time GB GB If Auto Setup was unable to find a local TV station to set the DVDVCR's internal clock, follow these instructions to set the date/time manually. NOTE: It is important to set the clock for accurate Timer Recording. 1 Open "SETUP MENU" Press the SETUP button. 2 Select "Set Clock" Using the up/down, move the selection arrow to "Set Clock," then push right to select. 3 Turn Off "Auto Clock Set" Move the selection arrow to "Auto Clock Set," then push right to turn this feature "Off." • The "Set Clock Menu" will change as shown. 4 Select "Set Clock" Move the selection arrow to "Set Clock," then push right to select. You can set the DVD-VCR to adjust for Daylight Savings Time. Use this feature only if Auto Clock Set has incorrectly set the time. NOTE: If you are an Arizona resident, turn Daylight Savings Time off and choose Mountain Standard Time on page 20. 1 Open "SETUP MENU" Press the SETUP button. 2 Select "Set Clock" Using the up/down, move the selection arrow to "Set Clock," then push right to select. 3 Set "Daylight Savings" Move the selection arrow to "Daylight Savings," then push right to select from the following options: • Auto - Uses Auto Clock Set information to determine if your area adjusts for Daylight Savings Time. • On - The DVD-VCR's clock will adjust for Daylight Savings Time on the first Sunday in April and the last Sunday in October. • Off - No Daylight Savings Time adjustments will be made. REC DISC MENU SETUP /ENTER 1 TITLE SUBTITLE AUDIO MARK SP/SLP SET TIMER RETURN SEARCH/INDEX 5 Set the Clock Push the left/right to select each of the following options, then push up/down (or use the 0-9 buttons) to set each option: • Set Month - Enter the month as a 2-digit number; i.e. for January, press "01". • Set Year - Enter the year as a 2-digit number; i.e. for 2001, press "01". • Set Day - Enter the day as a 2-digit number; i.e. for the ninth, press "09". • Set Hour -Enter the hour as a 2-digit number; i.e. for 12:00, press "12". • Set Minute -Enter the minute as a 2-digit number; i.e. for 00:25, press "25". • Set AM/PM - Enter 1 for AM and 2 for PM. 6 Confirm Settings Press the RETURN button to save your clock settings and return to the Setup menu. • Press Return again to exit. 18 19
-
 1
1 -
2
-
3
-
4
-
 5
5 -
 6
6 -
 7
7 -
 8
8 -
 9
9 -
 10
10 -
 11
11 -
 12
12 -
 13
13 -
 14
14 -
 15
15 -
16
-
17
-
18
-
19
-
20
-
21
-
22
-
23
-
24
-
25
-
26
-
27
-
28
-
29
-
30
-
31
-
32
-
33
-
34
-
35
-
36
-
37
-
38
-
39
 |
 |