Samsung DVD-V1000 User Manual (user Manual) (ver.1.0) (English) - Page 7
Auto Setup, Basic Connections - manual
 |
View all Samsung DVD-V1000 manuals
Add to My Manuals
Save this manual to your list of manuals |
Page 7 highlights
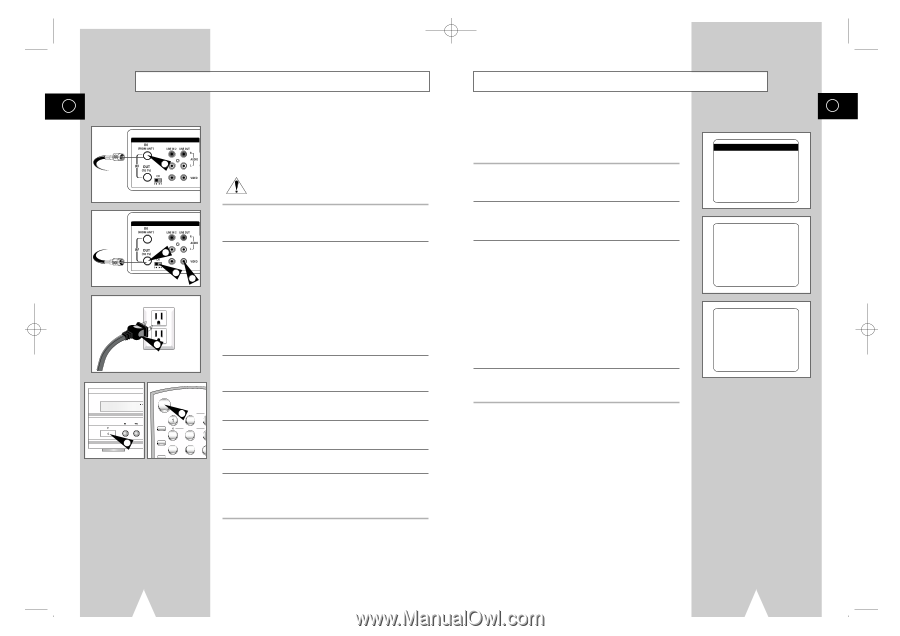
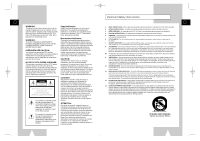
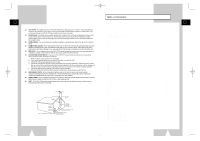
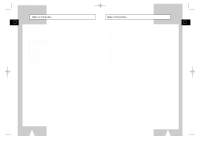
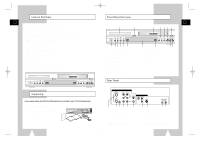
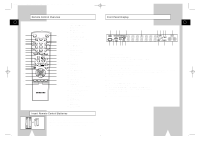
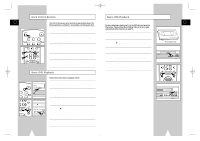
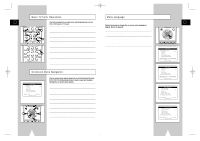
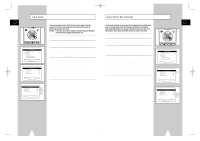
01547A DVD-V1000/XAA-Eng1 5/16/02 3:32 PM Page 12 Basic Connections GB DVD & VCR 1 From Antenna or Cable In this section, you will connect the DVD-VCR to your television and run Auto Setup, which automatically searches for channels and sets the player's internal clock. NOTES: • Advanced Connections are covered in Appendix A. • Even if you plan to use the S-Video or Component Video Outputs, you MUST connect the DVD-VCR to your television with either the standard RF or the Line Out connection. This enables you to operate the DVD-VCR setup menus. DVD & VCR 2 3 To TV's Antenna Input 2 4 POWER 5 POWER 5 TRK- AUTO T ZOOM MUTE 4 MODE 2 SHUTTLE 5 REPEAT 7 8 SKIP 3D SOUND A DUB TV/ 1 Connect Antenna/Cable to DVD-VCR Connect the RF antenna cable from your indoor/outdoor antenna or cable wall outlet to the IN (FROM ANT.) jack on the back panel of the DVD-VCR. 2 Connect DVD-VCR to TV Choose one of the following methods to connect the DVD-VCR to your TV: RF Connection Connect the supplied RF antenna cable from the OUT (TO TV) jack on the back panel of the DVD-VCR to your television's Antenna Input. Line Connection Connect an RCA-type audio/video cable (red, white, yellow) from the LINE OUT jacks on the back panel of the DVD-VCR to your television's Line In jacks. Use red for right audio, white for left audio, and yellow for video. NOTE: It is recommended that you use the Line Connection if your TV is equipped with RCA jacks. 3 Set DVD-VCR Output Channel If you used the RF connection in Step 2, set the Channel switch on the back panel of the DVD-VCR to 3 or 4, whichever is not an active channel in your area. 4 Plug In DVD-VCR Connect the DVD-VCR power cord to a standard 120V/60Hz wall outlet. 5 Turn On DVD-VCR Press the POWER button on the remote control or on the DVD-VCR's front panel. 6 Turn On TV Press the POWER button on your TV. 7 Set TV to Channel 3 or 4 or Line Be sure to use the same channel you selected in Step 3. If you used the Line Connection, set your TV to its Line Input. The "LANGUAGE/LANGUE/IDIOMA" menu should appear on the screen. Please continue with Auto Setup on the following page. Auto Setup The first time you connect your DVD-VCR, or after an extended power outage, you will be prompted to set the on-screen menu language and connect an Antenna or Cable. Then the DVD-VCR will run an Auto Setup procedure, where it will automatically search for all active channels and set the clock. 1 Set the On-Screen Menu Language Press 1, 2, or 3 to select English, French, or Spanish. To change the language at any other time, see page 17. 2 Antenna/Cable Reminder A message is displayed to remind you to connect an Antenna or Cable if you have not already done so. Press Enter to begin Auto Setup. 3 Run Auto Setup As soon as you press Enter, the screen at right will appear and the DVD-VCR will automatically perform the following steps: • Auto Channel Search - Automatically detects whether an antenna or cable is connected, then searches for all active channels in your area. If Auto Channel Search is unable to locate channels in your area, you can search and add channels manually; see pages 23-24. • Auto Clock Set - Sets the DVD-VCR's internal clock. If Auto Clock Set is unable to find a channel to set the clock, you can set the clock manually; see page 18. This procedure may take a few minutes to complete. When finished, the DVD-VCR will tune to the lowest channel found. 4 Auto Setup is Complete! Please proceed to page 14 for an introduction to the basic operations of the DVD-VCR. GB LANGUAGE/LANGUE/IDIOMA 1 English 2 Francais 3 Espanol Select=1-3 Choisir=1-3 Elegir=1-3 Connect Antenna or Cable and press ENTER Searching For Channels And Setting Clock Please Wait... 12 13
-
 1
1 -
 2
2 -
 3
3 -
 4
4 -
 5
5 -
 6
6 -
 7
7 -
 8
8 -
 9
9 -
 10
10 -
 11
11 -
 12
12 -
13
-
14
-
15
-
16
-
17
-
18
-
19
-
20
-
21
-
22
-
23
-
24
-
25
-
26
-
27
-
28
-
29
-
30
-
31
-
32
-
33
-
34
-
35
-
36
-
37
-
38
-
39
 |
 |