Samsung SCX 4016 User Manual (ENGLISH) - Page 184
Speed Dialling, Storing a Number for Speed Dialling
 |
UPC - 635753611106
View all Samsung SCX 4016 manuals
Add to My Manuals
Save this manual to your list of manuals |
Page 184 highlights
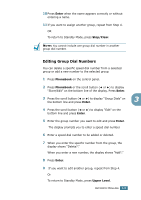
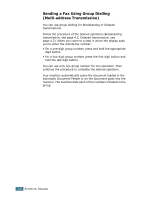
Speed Dialling You can store up to 100 frequently dialed numbers in one or two-digit speed dial locations (0-99). Storing a Number for Speed Dialling 1 Press Phonebook on the control panel. 2 Press Phonebook or the scroll button (¥ or Š) to display "Store/Edit" on the bottom line of the display. Press Enter. 3 Press Enter when "Speed Dials" appears on the display. 4 Enter a one or two-digit speed dial number between 0 and 99, using the number keypad and press Enter. If a number is already stored in the location you chose, the display shows the number to allow you to change it. To start over with another speed-dial number, press Upper Level. 5 Enter the number you want to store using the number keypad and press Enter. To insert a pause between numbers, press Redial/Pause and a "-" appears on the display. 6 To assign a name to the number, enter the name. For details about how to enter names, see "Entering Characters Using the Number Keypad" on page 1.5. OR If you do not want to assign a name, skip this step. 7 Press Enter when the name appears correctly or without entering a name. 8 To store more fax numbers, repeat steps 4 through 7. OR To return to Standby Mode, press Upper Level or Stop/ Clear. 3.2 AUTOMATIC DIALLING
-
 1
1 -
2
-
3
-
4
-
5
-
6
-
7
-
8
-
9
-
10
-
11
-
12
-
13
-
14
-
15
-
16
-
17
-
18
-
19
-
20
-
21
-
22
-
23
-
24
-
25
-
26
-
27
-
28
-
29
-
30
-
31
-
32
-
33
-
34
-
35
-
36
-
37
-
38
-
39
-
40
-
41
-
42
-
43
-
44
-
45
-
46
-
47
-
48
-
49
-
50
-
51
-
52
-
53
-
54
-
55
-
56
-
57
-
58
-
59
-
60
-
61
-
62
-
63
-
64
-
65
-
66
-
67
-
68
-
69
-
70
-
71
-
72
-
73
-
74
-
75
-
76
-
77
-
78
-
79
-
80
-
81
-
82
-
83
-
84
-
85
-
86
-
87
-
88
-
89
-
90
-
91
-
92
-
93
-
94
-
95
-
96
-
97
-
98
-
99
-
100
-
101
-
102
-
103
-
104
-
105
-
106
-
107
-
108
-
109
-
110
-
111
-
112
-
113
-
114
-
115
-
116
-
117
-
118
-
119
-
120
-
121
-
122
-
123
-
124
-
125
-
126
-
127
-
128
-
129
-
130
-
131
-
132
-
133
-
134
-
135
-
136
-
137
-
138
-
139
-
140
-
141
-
142
-
143
-
144
-
145
-
146
-
147
-
148
-
149
-
150
-
151
-
152
-
153
-
154
-
155
-
156
-
157
-
158
-
159
-
160
-
161
-
162
-
163
-
164
-
165
-
166
-
167
-
168
-
169
-
170
-
171
-
172
-
173
-
174
-
175
-
176
-
177
-
178
-
 179
179 -
 180
180 -
 181
181 -
 182
182 -
 183
183 -
 184
184 -
 185
185 -
 186
186 -
 187
187 -
 188
188 -
 189
189 -
190
-
191
-
192
-
193
-
194
-
195
-
196
-
197
-
198
-
199
-
200
-
201
-
202
-
203
-
204
-
205
-
206
-
207
-
208
-
209
-
210
 |
 |
