Samsung SCX 5530FN User Manual (ENGLISH) - Page 26
Static addressing, Dynamic addressing (BOOTP/DHCP), Configuring EtherTalk, Configuring IPX frame types - network setup
 |
UPC - 635753618044
View all Samsung SCX 5530FN manuals
Add to My Manuals
Save this manual to your list of manuals |
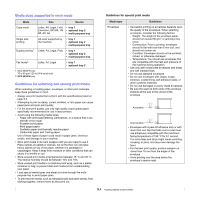
Page 26 highlights
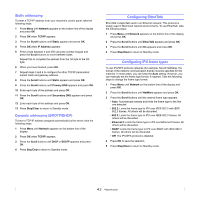
Static addressing To enter a TCP/IP address from your machine's control panel, take the following steps: 1 Press Menu until Network appears on the bottom line of the display and press OK. 2 Press OK when TCP/IP appears. 3 Press the Scroll buttons until Static appears and press OK. 4 Press OK when IP Address appears. 5 Enter a byte between 0 and 255 using the number keypad and press the Scroll buttons to move between bytes. Repeat this to complete the address from the 1st byte to the 4th byte. 6 When you have finished, press OK. 7 Repeat steps 5 and 6 to configure the other TCP/IP parameters: subnet mask and gateway address. 8 Press the Scroll buttons until Static appears and press OK. 9 Press the Scroll buttons until Primary DNS appears and press OK. 10 Enter each byte of the address and press OK. 11 Press the Scroll buttons until Secondary DNS appears and press OK. 12 Enter each byte of the address and press OK. 13 Press Stop/Clear to return to Standby mode. Dynamic addressing (BOOTP/DHCP) To have a TCP/IP address assigned automatically by the server, take the following steps: 1 Press Menu until Network appears on the bottom line of the display. 2 Press OK when TCP/IP appears. 3 Press the Scroll buttons until DHCP or BOOTP appears and press OK. 4 Press Stop/Clear to return to Standby mode. Configuring EtherTalk EtherTalk is AppleTalk used in an Ethernet network. This protocol is widely used in Macintosh network environments. To use EtherTalk, take the following steps: 1 Press Menu until Network appears on the bottom line of the display and press OK. 2 Press the Scroll buttons until EtherTalk appears and press OK. 3 Press the Scroll buttons until On appears and press OK. 4 Press Stop/Clear to return to Standby mode. Configuring IPX frame types To use IPX/SPX protocol networks (for example, Novell NetWare), the format of the network communication frames must be specified for the machine. In most cases, you can keep the Auto setting. However, you can manually set the frame type format, if required. Take the following steps to change the frame type format: 1 Press Menu until Network on the bottom line of the display and press OK. 2 Press the Scroll buttons until NetWare appears and press OK. 3 Press the Scroll buttons until the desired frame type appears. • Auto: Automatically senses and limits the frame type to the first one detected. • 802.2: Limits the frame type to IPX over IEEE 802.2 with IEEE 802.3 frames. All others will be discarded. • 802.3: Limits the frame type to IPX over IEEE 802.3 frames. All others will be discarded. • Ethernet II: Limits the frame type to IPX over Ethernet Frames. All others will be discarded. • SNAP: Limits the frame type to IPX over SNAP with IEEE 802.3 frames. All others will be discarded. • Off: The IPX/SPX protocol is disabled. 4 Press OK to save the selection. 5 Press Stop/Clear to return to Standby mode. 4.2
-
 1
1 -
2
-
3
-
4
-
5
-
6
-
7
-
8
-
9
-
10
-
11
-
12
-
13
-
14
-
15
-
16
-
17
-
18
-
19
-
20
-
 21
21 -
 22
22 -
 23
23 -
 24
24 -
 25
25 -
 26
26 -
 27
27 -
 28
28 -
 29
29 -
 30
30 -
 31
31 -
32
-
33
-
34
-
35
-
36
-
37
-
38
-
39
-
40
-
41
-
42
-
43
-
44
-
45
-
46
-
47
-
48
-
49
-
50
-
51
-
52
-
53
-
54
-
55
-
56
-
57
-
58
-
59
-
60
-
61
-
62
-
63
-
64
-
65
-
66
-
67
-
68
-
69
-
70
-
71
-
72
-
73
-
74
-
75
-
76
-
77
-
78
-
79
-
80
-
81
-
82
-
83
-
84
-
85
-
86
-
87
-
88
-
89
-
90
-
91
-
92
-
93
-
94
-
95
-
96
-
97
-
98
-
99
-
100
-
101
-
102
-
103
-
104
-
105
-
106
-
107
-
108
-
109
-
110
-
111
-
112
-
113
-
114
-
115
-
116
-
117
-
118
-
119
-
120
-
121
-
122
-
123
-
124
-
125
-
126
-
127
-
128
-
129
-
130
-
131
-
132
-
133
-
134
-
135
-
136
-
137
-
138
-
139
-
140
-
141
-
142
-
143
-
144
-
145
-
146
 |
 |
