Samsung SCX 5530FN User Manual (ENGLISH) - Page 61
Using USB flash memory (SCX-5530FN only), About USB memory, Plugging in a USB memory device, Scanning
 |
UPC - 635753618044
View all Samsung SCX 5530FN manuals
Add to My Manuals
Save this manual to your list of manuals |
Page 61 highlights
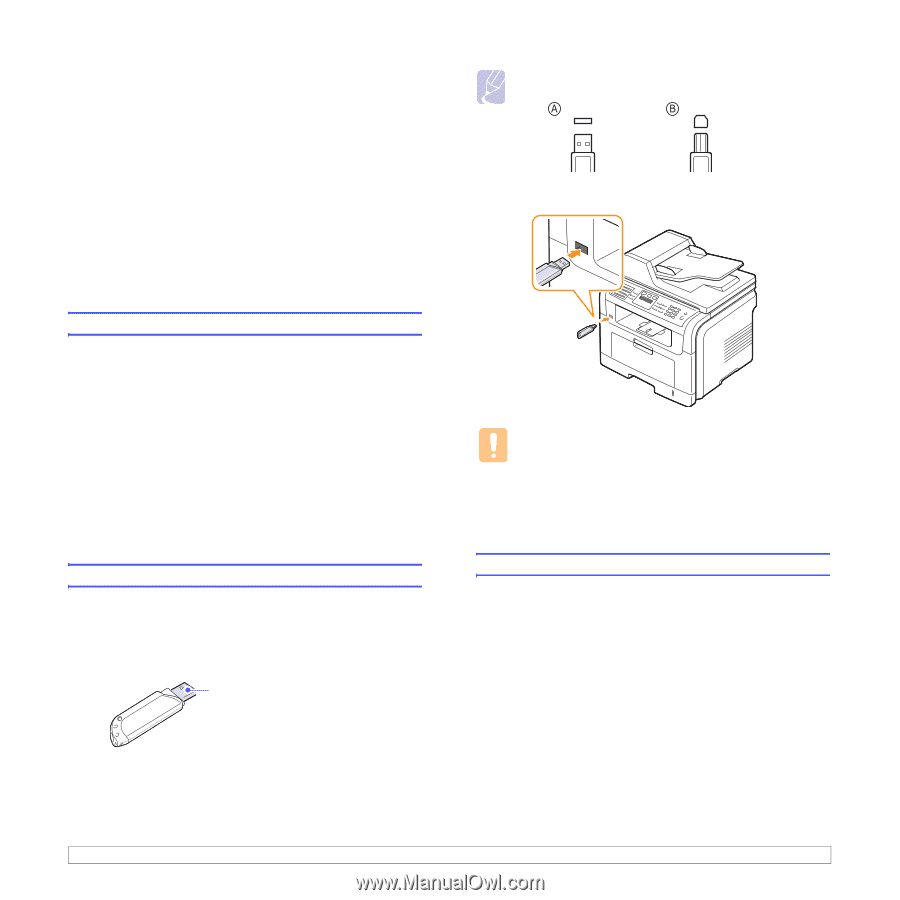
11 Using USB flash memory (SCX-5530FN only) This chapter explains how to use a USB memory device with your machine. This chapter includes: • About USB memory • Plugging in a USB memory device • Scanning to a USB memory device • Printing from a USB memory device • Backing up data • Managing USB memory Note There are two USB plug types. Insert a USB memory device into the USB memory port on the front of your machine. About USB memory USB memory devices are available with a variety of memory capacities to give you more room for storing documents, presentations, downloaded music and videos, high resolution photographs, or whatever other files you want to store or move. You can do the following on your machine using a USB memory device: • Scan documents and save them on a USB memory device. • Print data stored on a USB memory device. • Back up Address Book/Phone Book entries and the system settings of your machine. • Restore backup files to the machine's memory. • Format the USB memory device. • Check the available memory space. Plugging in a USB memory device The USB memory port on the front of your machine is designed for USB V1.1 and USB V2.0 memory devices. Your machine supports USB memory devices with capacity of up to 512 MB. You must use only an authorized USB memory device with an A plug type connector. Use only a metal/shielded USB memory device. Cautions • Do not remove the USB memory device while the machine is in operation, or writing to or reading from USB memory. This may damage your machine. • If your USB memory device has certain features, such as security settings and password settings, your machine may not automatically detect it. For details about these features, see the device's User's Guide. Scanning to a USB memory device You can scan a document and save the scanned image onto a USB memory device. There are two ways of doing this: you can scan to the device using the default settings, or you can customize your own scan settings. Scanning 1 Insert a USB memory device into the USB memory port on your machine. 2 Load originals face up into the ADF, or place a single original face down on the scanner glass. For details about loading an original, see page 5.1. 3 Press Scan/Email. 4 Press OK when Scan to USB appears on the bottom line of the display. 11.1
-
 1
1 -
2
-
3
-
4
-
5
-
6
-
7
-
8
-
9
-
10
-
11
-
12
-
13
-
14
-
15
-
16
-
17
-
18
-
19
-
20
-
21
-
22
-
23
-
24
-
25
-
26
-
27
-
28
-
29
-
30
-
31
-
32
-
33
-
34
-
35
-
36
-
37
-
38
-
39
-
40
-
41
-
42
-
43
-
44
-
45
-
46
-
47
-
48
-
49
-
50
-
51
-
52
-
53
-
54
-
55
-
 56
56 -
 57
57 -
 58
58 -
 59
59 -
 60
60 -
 61
61 -
 62
62 -
 63
63 -
 64
64 -
 65
65 -
 66
66 -
67
-
68
-
69
-
70
-
71
-
72
-
73
-
74
-
75
-
76
-
77
-
78
-
79
-
80
-
81
-
82
-
83
-
84
-
85
-
86
-
87
-
88
-
89
-
90
-
91
-
92
-
93
-
94
-
95
-
96
-
97
-
98
-
99
-
100
-
101
-
102
-
103
-
104
-
105
-
106
-
107
-
108
-
109
-
110
-
111
-
112
-
113
-
114
-
115
-
116
-
117
-
118
-
119
-
120
-
121
-
122
-
123
-
124
-
125
-
126
-
127
-
128
-
129
-
130
-
131
-
132
-
133
-
134
-
135
-
136
-
137
-
138
-
139
-
140
-
141
-
142
-
143
-
144
-
145
-
146
 |
 |