Samsung SPH-D700 User Manual (user Manual) (ver.f6) (English) - Page 108
Saving a Phone Number, Confirming Contact Synchronization
 |
View all Samsung SPH-D700 manuals
Add to My Manuals
Save this manual to your list of manuals |
Page 108 highlights
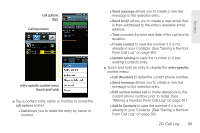
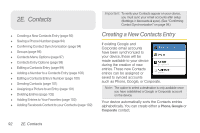
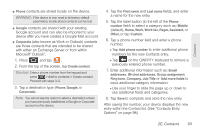
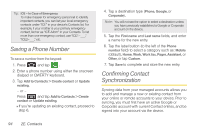
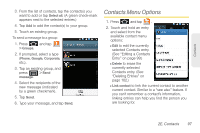
Tip: ICE - In Case of Emergency To make it easier for emergency personnel to identify important contacts, you can list your local emergency contacts under "ICE" in your device's Contacts list. For example, if your mother is your primary emergency contact, list her as "ICE-Mom" in your Contacts. To list more than one emergency contact, use "ICE1-___," "ICE2-___," etc. Saving a Phone Number To save a number from the keypad: 1. Press and tap . 2. Enter a phone number using either the onscreen dialpad or QWERTY keyboard. 3. Tap Add to Contacts > Create contact or Update existing. - or - Press and tap Add to Contacts > Create contact or Update existing. Ⅲ If you're updating an existing contact, proceed to step 6. 4. Tap a destination type (Phone, Google, or Corporate). Note: You will not see the option to select a destination unless you have previously established a Google or Corporate account on the device. 5. Tap the First name and Last name fields, and enter a name for the new entry. 6. Tap the label button (to the left of the Phone number field) to select a category such as: Mobile (default), Home, Work, Work fax, Pager, Assistant, or Other, or tap Custom. 7. Tap Save to complete and store the new entry. Confirming Contact Synchronization Syncing data from your managed accounts allows you to add and manage a new or existing contact from your online or remote accounts to your device. Prior to syncing, you must first have an active Google or Corporate account with current Contact entries, and be signed into your account via the device. 94 2E. Contacts
-
 1
1 -
2
-
3
-
4
-
5
-
6
-
7
-
8
-
9
-
10
-
11
-
12
-
13
-
14
-
15
-
16
-
17
-
18
-
19
-
20
-
21
-
22
-
23
-
24
-
25
-
26
-
27
-
28
-
29
-
30
-
31
-
32
-
33
-
34
-
35
-
36
-
37
-
38
-
39
-
40
-
41
-
42
-
43
-
44
-
45
-
46
-
47
-
48
-
49
-
50
-
51
-
52
-
53
-
54
-
55
-
56
-
57
-
58
-
59
-
60
-
61
-
62
-
63
-
64
-
65
-
66
-
67
-
68
-
69
-
70
-
71
-
72
-
73
-
74
-
75
-
76
-
77
-
78
-
79
-
80
-
81
-
82
-
83
-
84
-
85
-
86
-
87
-
88
-
89
-
90
-
91
-
92
-
93
-
94
-
95
-
96
-
97
-
98
-
99
-
100
-
101
-
102
-
 103
103 -
 104
104 -
 105
105 -
 106
106 -
 107
107 -
 108
108 -
 109
109 -
 110
110 -
 111
111 -
 112
112 -
 113
113 -
114
-
115
-
116
-
117
-
118
-
119
-
120
-
121
-
122
-
123
-
124
-
125
-
126
-
127
-
128
-
129
-
130
-
131
-
132
-
133
-
134
-
135
-
136
-
137
-
138
-
139
-
140
-
141
-
142
-
143
-
144
-
145
-
146
-
147
-
148
-
149
-
150
-
151
-
152
-
153
-
154
-
155
-
156
-
157
-
158
-
159
-
160
-
161
-
162
-
163
-
164
-
165
-
166
-
167
-
168
-
169
-
170
-
171
-
172
-
173
-
174
-
175
-
176
-
177
-
178
-
179
-
180
-
181
-
182
-
183
-
184
-
185
-
186
-
187
-
188
-
189
-
190
-
191
-
192
-
193
-
194
-
195
-
196
-
197
-
198
-
199
-
200
-
201
-
202
-
203
-
204
-
205
-
206
-
207
-
208
-
209
-
210
-
211
-
212
-
213
-
214
-
215
-
216
-
217
-
218
-
219
-
220
-
221
-
222
-
223
-
224
-
225
-
226
-
227
-
228
-
229
-
230
-
231
-
232
-
233
-
234
-
235
-
236
-
237
-
238
-
239
-
240
-
241
-
242
-
243
-
244
-
245
-
246
-
247
-
248
-
249
-
250
-
251
-
252
-
253
-
254
-
255
-
256
-
257
-
258
-
259
-
260
-
261
-
262
-
263
-
264
 |
 |