Seagate OneTouch OneTouch Installation Guide Mac - Page 17
Installing Drivers Only, Using your OneTouch button for backup - 4 driver
 |
View all Seagate OneTouch manuals
Add to My Manuals
Save this manual to your list of manuals |
Page 17 highlights
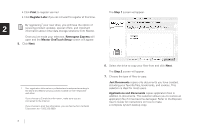
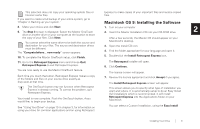
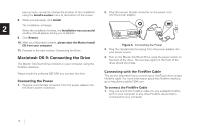
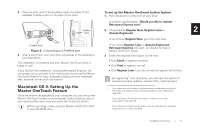
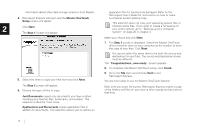
Depending on the amount of files, your first time backup, Installing Drivers Only may take a long time. No drivers are necessary. This section describes how to install your The OneTouch button may not function when Retrospect new drive without installing Retrospect Express software. Express is already running. To correct the problem, go to the File menu in Retrospect, and choose Quit. See "Using Your Drive" on page 15 in chapter 3, for information on The Maxtor OneTouch button feature will not function if you choose to install under this option. If you're using OS 9, connect your OneTouch drive as described in 2 using your drive for common applications and on using Retrospect "Macintosh OS 9: Connecting the Drive" on page 10. If you're Express to make copies of your important files and restore copied using OS X, connect your drive as described in "Macintosh OS X: files. Connecting the Drive" on page 6. The drive will not operate with more than one computer at a time. Maxtor does not support using the drive as a startup disk for the Macintosh. Using your OneTouch button for backup Only the current versions of your files are saved. Backup copies made with the default Maxtor OneTouch feature do not include earlier versions of files you have deleted since the last time you pressed the Maxtor OneTouch button. Any files that are currently open are not saved, so close any files you wish to be copied. You may customize Retrospect to create backup copies of your files which will include revisions made on a daily basis. See the Express User's Guide, included on the install CD. Your hardware and software installation is now complete. See "Using Your Drive" on page 15 in chapter 3, for information on using your drive for common applications and on using Retrospect to make copies of your important files and restore copied files. Installing Your Drive 13
-
 1
1 -
2
-
3
-
4
-
5
-
6
-
7
-
8
-
9
-
10
-
11
-
 12
12 -
 13
13 -
 14
14 -
 15
15 -
 16
16 -
 17
17 -
 18
18 -
 19
19 -
 20
20 -
 21
21 -
 22
22 -
23
-
24
-
25
-
26
-
27
-
28
-
29
-
30
-
31
-
32
-
33
-
34
-
35
-
36
-
37
-
38
-
39
-
40
-
41
-
42
-
43
-
44
 |
 |