Sharp LC-M3700 LC-M3700 Operation Manual - Page 24
Mounting Options, Mounting the table stand AN-37ST1 LC-M3700 - specifications
 |
View all Sharp LC-M3700 manuals
Add to My Manuals
Save this manual to your list of manuals |
Page 24 highlights
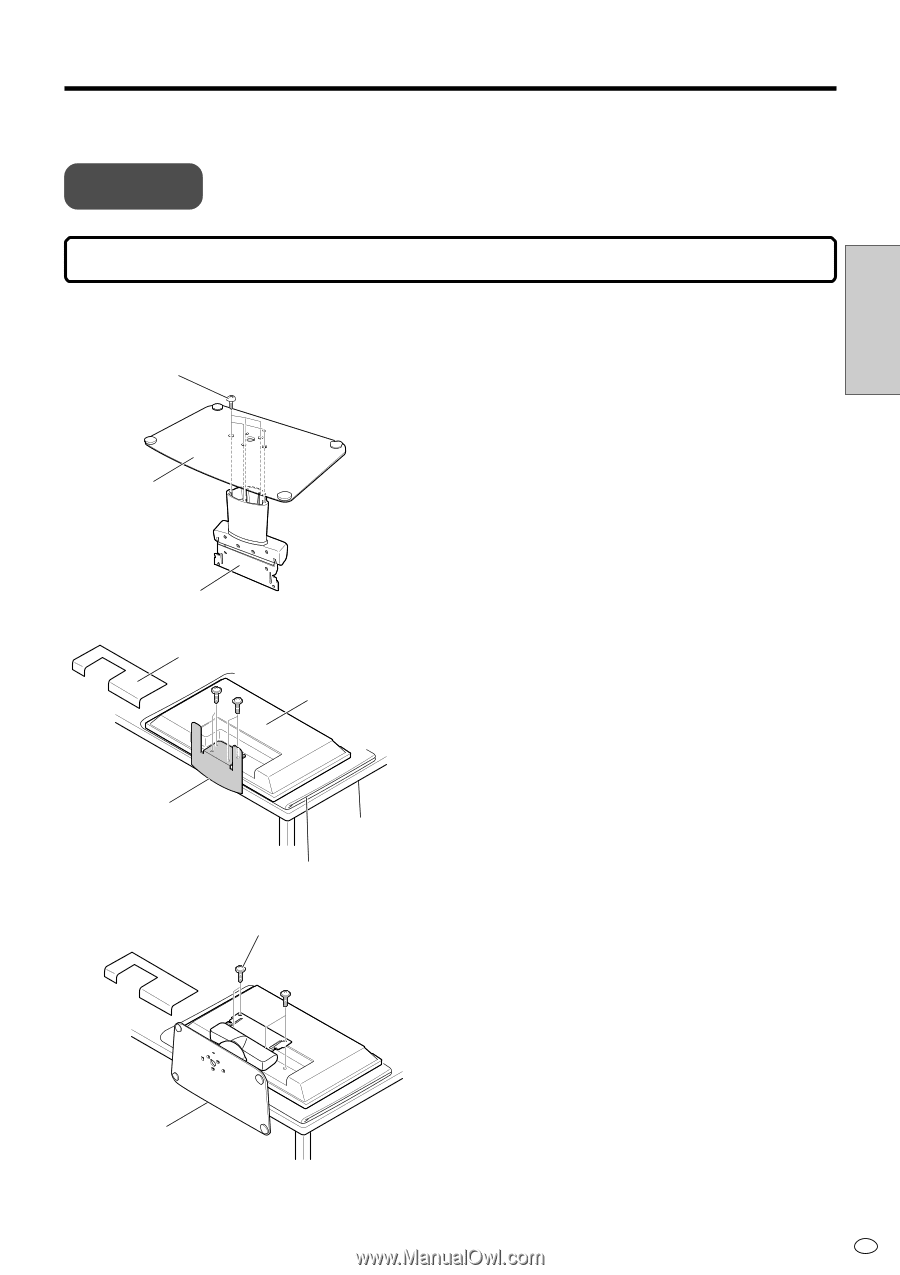
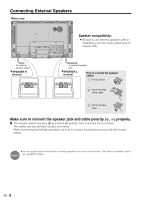
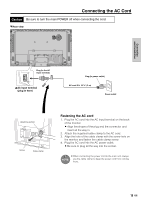
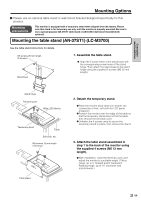
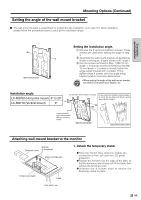
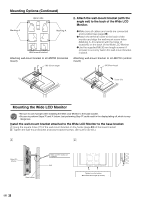
Connection and Installation Mounting Options I Please use an optional table stand or wall-mount bracket designed specifically for this product. Mounting precautions This monitor is equipped with a temporary stand when shipped from the factory. Please note this stand is for temporary use only until the monitor is properly mounted. Be sure to use a special-purpose AN-37ST1 table stand or AN-37AG1 wall-mount bracket (both optional). Mounting the table stand (AN-37ST1) (LC-M3700) See the table stand instructions for details. M5 screws 25 mm length (5 screws) Stand base 1. Assemble the table stand. G Align the 5 screw holes of the stand base with the corresponding screw holes of the stand hinge. Then attach the stand base to the stand hinge using the supplied 5 screws (M5 25 mm length). Stand hinge Terminal cover Wide LCD Monitor Temporary stand Table Soft cloth, etc. M5 screws 12 mm length (4 screws) Table stand 2. Detach the temporary stand. GPlace the monitor (face down) on a table, etc. covered by a thick, soft cloth for LCD panel protection. GPosition the monitor near the edge of the table so that the temporary stand does not hit the table, then remove the terminal cover. GUnfasten the 4 screws used to secure the temporary stand in place, then remove the stand. 3. Attach the table stand assembled in step 1 to the back of the monitor using the supplied 4 screws (M5 12 mm length). GAfter installation, close the terminal cover, and adjust the monitor to a suitable angle. (Tilting range: up to 4˚ forward and 6˚ backward. Rotating range: up to 10˚ clockwise and anticlockwise.) 23 US
-
 1
1 -
2
-
3
-
4
-
5
-
6
-
7
-
8
-
9
-
10
-
11
-
12
-
13
-
14
-
15
-
16
-
17
-
18
-
 19
19 -
 20
20 -
 21
21 -
 22
22 -
 23
23 -
 24
24 -
 25
25 -
 26
26 -
 27
27 -
 28
28 -
 29
29 -
30
-
31
-
32
-
33
-
34
-
35
-
36
-
37
-
38
-
39
-
40
-
41
-
42
-
43
-
44
-
45
-
46
-
47
-
48
-
49
-
50
-
51
-
52
-
53
-
54
-
55
-
56
-
57
-
58
-
59
-
60
-
61
-
62
-
63
-
64
-
65
-
66
-
67
-
68
-
69
-
70
-
71
-
72
-
73
 |
 |